Action Elements
Action elements are an essential part of Logi reporting and the primary mechanism for providing HTML links in a definition. Different types of Action elements are available for developers to use in specific situations. Developers will find them easy to use; they save a lot of time when creating reports.
- About Action Elements
- Example: Link to Another Report
- Example: Link to a URL
- Example: Link that Executes JavaScript
- Example: Export to PDF
- Example: Email Report as Attachment
- Example: Showing and Hiding Elements
- Example: With an Event Handler
- Example: With Event Handler for Popup Menu
About Action Elements
The following table provides a description of the available Action elements. The links connect to the Element Reference page or a relevant topic for each element.
| Element | Descriptioin |
|---|---|
| Action.Add Bookmark | Allows users to add a new bookmark for the current report, saving the request parameters so the report can be re-run later with the same input values. For more information, see . |
| Action.Add Dashboard Panel | At runtime, allows user to add a new dashboard panel, containing specified content from one report, in a specified dashboard in another report. v11.0.727+ Logi Info only |
| Action.Copy Bookmark |
|
| Action.Dial Phone | Launches a mobile device's phone application with a phone number. The user still needs to click a "Call" button to place the call. Mobile Report definitions only. |
| Action.Draft Email | Launches a mobile device's email application. The user still needs to click a "Send" button, and possibly enter Addressees, Subject and email Body text. Mobile Report definitions only. |
| Action.Draft Text Message | Launches a mobile device's SMS text messaging application with pre-filled phone number. The user still needs to enter the message text and click a "Send" button. Mobile Report definitions only. |
| Action.Drag Bookmark |
|
| Action.Edit Bookmark | Displays a popup text box that allows the user to change a bookmark's Description. For more information, see . |
| Action.Email Report | Sends a report as an email attachment. When the link is clicked, a dialog box is displayed so that To, From, Subject, and Message can be entered. v10.0.385+ Logi Info only. |
Abandons the users session and takes him to another URL. | |
Exports the report's Data Table data into a comma-delimited CSV file. | |
| Action.Export Native Excel | Runs a report for export as a native Excel document. |
| Action.Export Native Word | Runs a report for export as a native Word document. |
| Action.Export PDF | Runs a report for export as a PDF document. |
| Action.Export Word or Excel | Runs a report so that it can be exported to Word or Excel. |
| Action.Export XML | Returns the XML generated by the target report's datalayers. |
| Action.Google Spreadsheet | Runs a report for export as a Google Spreadsheet document. |
| Action.Javascript | Runs JavaScript in the user's browser, which can also call JavaScript functions defined in script files with the Script File attribute and AdditionalScriptFiles element. v10.0.259+ |
| Action.Link | Together with Target.Link, runs a specific URL or executes embedded JavaScript. |
| Action.Map Location | Runs a Google Map query on a mobile device to show a map with one or more locations highlighted. Mobile Report definitions only. |
| Action.Map Marker Info | Used with a Google Map; displays an information panel when the user clicks on a map marker. Logi Info only. |
| Action.Popup Menu | Displays a popup menu offering various options to the user. |
| Action.Process | Executes a task in a Process definition. Logi Info only. |
| Action.Refresh Element | Refreshes one or more elements in the report, using AJAX technology so that the entire report page is not necessarily redrawn. |
| Action.Remove Bookmark | Allows the user to delete a bookmark. For more information, see . |
| Action.Report | Runs a report definition, in the same window, another window, or within an IncludeFrame. |
| Action.Run Bookmark | Runs a report while applying the parameters of a bookmark to it. For more information, see . |
| Action.Show Bookmark Sharing |
|
| Action.Show Element | Shows or hides one or more elements on the current page, using Show Modes. |
| Action.Template | Runs a Logi Template definition. |
| Action.Widget | Loads a Logi widget. |
Actions are usually attached to a parent element, such as a Label or Image element. The parent element controls when and how the action is triggered. For example, a Label element can be combined with an Action.Link element to create a hyperlink to a web site.
Action elements make use of Target sub-elements when linking to another page or site. The Target element sets what page is to be loaded and how it will be displayed.
![]() You can only use one Action element directly under a user input element, Label, or Image. Additional Action elements will be ignored. You can use multiple Event Handlers, each with its own Action element, however; see the Event Handler section below for more information.
You can only use one Action element directly under a user input element, Label, or Image. Additional Action elements will be ignored. You can use multiple Event Handlers, each with its own Action element, however; see the Event Handler section below for more information.
The Action.Refresh Element
The Action.Refresh Element element uses AJAX technology to refresh specific elements or portions of a report page without reloading the entire page, which produces a smooth-looking update. However, developers should keep these guidelines in mind when using this element:
- Best practice is to refresh a Division (and thereby its contents) whenever possible.
- Don't attempt to refresh super-elements or Google Maps, which contain possibly-conflicting internal AJAX calls.
- Prior to v11.0.416, all Local Data elements are run for each refresh request. If this causes a performance issue, use the Local Data element's Condition attribute to keep it from running with every request.
- In v11.0.416, Local Data behavior was changed so that its datalayers are not re-run with all AJAX refresh requests. They are only re-run when the element being refreshed, using Action.Refresh Element, contains either a DataLayer.Linked element linked to the Local Data datalayer, or when it contains an @Local token.
- All "LoadDefinition" plug-in calls will be re-run with each refresh request.
- When refreshing a visualization that you then want to export and send via email, be sure to include the container (usually a Div) for the Action.Email Report and Export elements in the list of elements Action.Refresh Element will refresh.
Using the Wait Panel
The Wait Panel element (which was called the Wait Page at one time) displays a modal "busy" icon when an action takes more than a few seconds, letting users know processing is in progress. Simply adding the Wait Panel as a child of the following Action elements makes it work:
- Action.Link (added in v11.0.416)
- Action.Process
- Action.Refresh Element
- Action.Run Bookmark
Link to Another Report
This example shows a simple link that launches another Logi report in the same application:

- Add a Label element to your report and set its Caption attribute value as desired.
- Beneath it, add an Action.Report element. Its default attribute settings are used for this example.
- Beneath it, add a Target.Report element. Set its Report Definition File attribute to the definition file of the desired report.
 In order to reload the current report definition, DO NOT set this attribute value to CurrentReport if you want Input element values or Link Parameters to be passed, or the data to be refreshed. Enter the actual report definition name instead.
The Label caption will appear on the page as an HTML link; when clicked, the second report will be displayed. Action.Report can be used as a child of a number of elements, including Button, Image, Charts, and more.
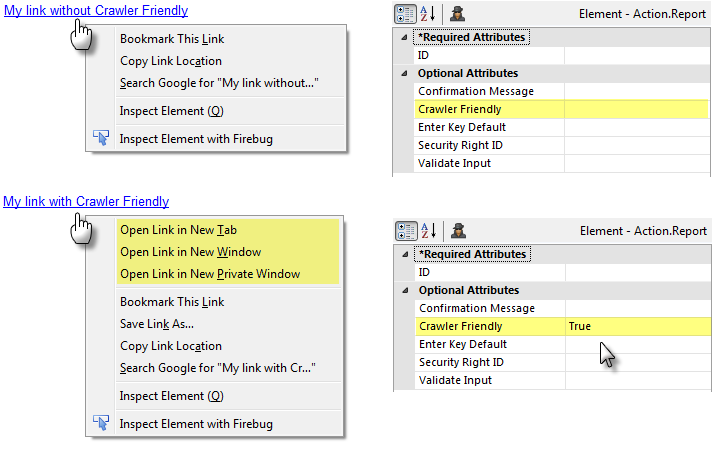
At runtime, links generated using Action.Report, by default, use internal JavaScript to link to other definitions. However, these links may go unnoticed by search robots and may cause unwanted browser behavior. For example, as shown above top, the default Action.Report settings produce the context menu shown when right-clicked in the browser.
If you want users to be able to open the link target in a new browser tab or window, be sure to set the Action.Report element's Crawler Friendly attribute to True, as shown in the bottom example. This ensures that a standard HTML <a> tag set is generated for the link. Also use this value when you want search robots to find the link.
The appearance of the link can be controlled by the usual style classes associated with Anchors.
For a discussion of methods of passing data to the next report when the link is clicked, see Pass Information.
Example: Link to a URL
This example shows a simple link that opens another web page, in a new browser window:

- Add a Label element to your report and set its Caption attribute value as desired.
- Beneath it, add an Action.Link element. Its default attribute settings are used for this example.
- Beneath it, add a Target.Link element. Set its URL attribute to the URL of the target web site or page (include the "http://" prefix).
Other Target.Link attributes control aspects of the target, such as whether it's modal or will include scrollbars. The Frame ID attribute determines if the web page will open in the same browser window or tab (the default) or in other windows or tabs. If the latter, some of the behavior (window vs. tab) may be governed by your browser settings.
The Label caption will appear on the page as an HTML link; when clicked, the second web page will be displayed. Action.Link can be used as a child of a number of elements, including Button, Image, Charts, and more.
Example: Link that Executes JavaScript
This example shows a simple link that executes some JavaScript:

- Add a Label element to your report and set its Caption attribute value as desired.
- Beneath it, add an Action.Javascript element. Set its Javascript attribute to the code you wish to run. You may enter multi-line Javascript code, set off by curly brackets if necessary, and all the traditional functions are supported.
 Double-click the Javascript attribute name to open the Attribute Zoom window for easier code editing. For more information, see the Set Element Attributes section of Use Studio 11.
The Label caption will appear on the page as an HTML link; when clicked, the embedded JavaScript will be executed on the browser. Action.Link and Action.JavaScript may be used as the child of a number of elements, including Label, Button, Image, Charts, and more.
![]() The Action.JavaScript element was introduced in v10.0.259. Developers using earlier versions can use the Action.Link and Target.Link elements to achieve the same thing. Enter the JavaScript code, prefaced with "javascript" followed by a colon, in the Target.Link element's URL attribute.
The Action.JavaScript element was introduced in v10.0.259. Developers using earlier versions can use the Action.Link and Target.Link elements to achieve the same thing. Enter the JavaScript code, prefaced with "javascript" followed by a colon, in the Target.Link element's URL attribute.
Example: Export to PDF
This example shows a simple link that exports the current report to a PDF and is typical of the Action.Export-type elements:
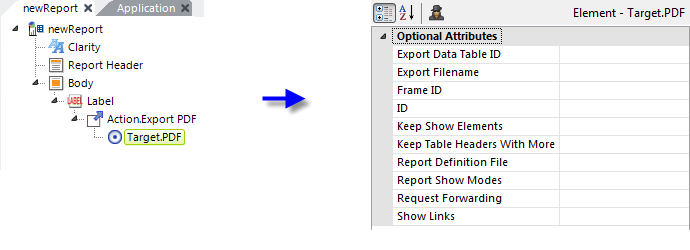
- Add a Label element to your report and set its Caption attribute value as desired.
- Beneath it, add an Action.Export PDF element. Its default attribute settings are used for this example.
- Beneath it, add a Target.PDF element. By leaving its Report Definition File attribute blank, the default (the current report) will be exported.
![]() Set the Show Links attribute to True if you want links exported from the report to be "clickable" in the PDF.
Set the Show Links attribute to True if you want links exported from the report to be "clickable" in the PDF.
The Label caption will appear on the page as an HTML link; when clicked, the report will be exported. Action.Export PDF can be used as a child of a number of elements, including Button, Image, Charts, and more.
More information about Export to Adobe PDF is available.
Example: Email Report as Attachment
This example shows a link that uses Action.Email Report to send the current report as a PDF attachment.
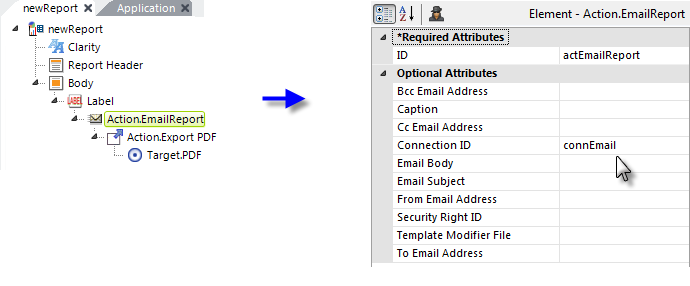
- Add a Label element to your report and set its Caption attribute value as desired.
- Beneath it, add an Action.Email Report element. Set its ID and Connection ID attributes appropriately.
- Beneath it, add Action.PDF and Target.PDF elements. By leaving Target.PDF's Report Definition File attribute blank, the default (the current report) will be attached. Other export formats are also supported.
When the report is run and the link is clicked, a modal pop-up panel will be displayed:
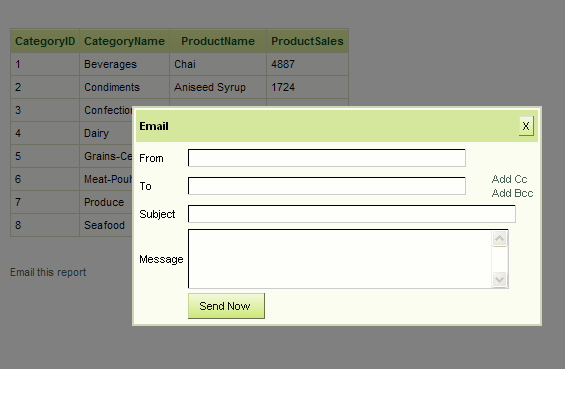
Users can then enter email information. Multiple addresses can be entered in the "To" field by separating them with commas or semi-colons. If you provide values for other attributes, such as From Email Address, those values will appear in the pop-up panel as default values for the user input controls. When Send Now is clicked, the email(s) will sent out, with the exported report attached as a PDF.
If it's supported by your browser, the Action.Email Report element will use an HTML5 feature called "local storage" to automatically store the email addresses you enter, preserve them between sessions, and provide them back to you in a list for selection in subsequent sessions. If your browser doesn't support this feature, or if it's turned off in your browser options, obviously the element won't be able to provide the list of addresses for re-use.
Example: Showing and Hiding Elements
The Action.Show Element element allows you to dynamically change part of your web page when the user clicks on a link, image, or button, using Show Modes. This is very useful for revealing and hiding page sections, best defined by "container" elements such as HTML Rows or the Division element.
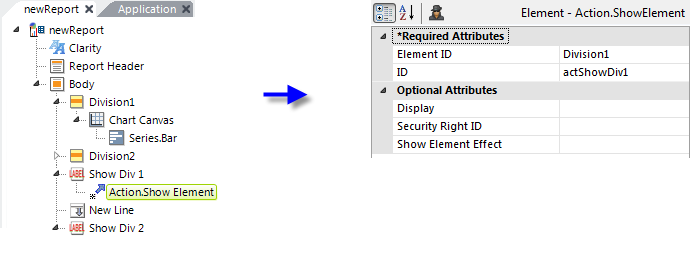
Here's how to use this element to show and hide other elements:
- We begin by determining which elements we want to show and hide. In the example above, we've added two Division elements in order to control the visibility of their Chart Canvas child elements.
- Label links, one for each Division, have been added with Action.Show Element elements beneath them. At runtime, these will initiate the showing and hiding of our divisions.
- Next, set the Action.Show Element element's Element ID attribute values to the element IDs of the Divisions.
- Leave the Display attribute blank; its default setting is Toggle, so alternate mouse clicks will show and then hide the Divisions.
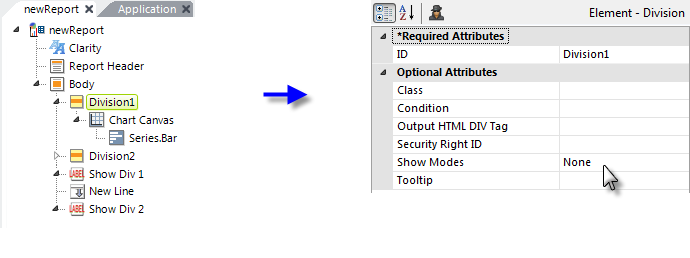
- Finally, we need to set the Show Modes attribute for the elements being shown and hidden, as shown above. We want the division be hidden initially, so we set the attribute value to None.
This example will display two links when run. When either link is clicked, their respective division will be displayed. Another click, and they'll be hidden. Neither division is dependent on the other, so any combination of shown and hidden is possible.
Here's another use case: one link that alternates which division is visible:

As shown above, this is accomplished by placing the IDs of both of the elements to be shown/hidden in the Element ID attribute of a single Action.Show Element element, separated by a comma. Change the Show Modes attribute value of one of the two Divisions to All so that it will initially be visible. Any number of elements can be included this way.
Finally, it also possible to specify which action, Show or Hide, to apply to each Division independently:

As shown above, by adding :Show or :Hide after the element ID you can independently assign the desired action to each element. This is often useful in a menu-type situation.
For more information, see Action.Show Element.
Example: With an Event Handler
Action elements can also be used with Event Handler elements, letting an event trigger an action.
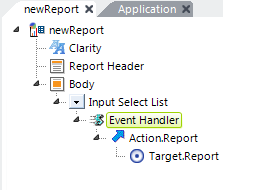
In the example shown above, an Input Select List element is the parent of an Event Handler element. Action and Target elements follow beneath. The Event Handler is set to fire when the DHTML OnChange event occurs, so the new report will be displayed when the selection in the list changes.
Note that you can use multiple Event Handlers under a single parent element, each for a different event and each with its own Action element. For example, a link created by using a Label element can have an Event Handler for the onMouseDown event, and a second one for the onClick event. In this way, two Actions can be triggered when the link is clicked. The usefulness of this approach varies, however, based on the types of events the parent element supports and the order in which they're fired.
For more specific information about using Event Handlers, see Work with User Input Elements.
Example: With Event Handler for Popup Menu
The Action.Popup Menu element can be used with event handlers to cause a "pop-up" menu to appear when the mouse passes over a link or image.
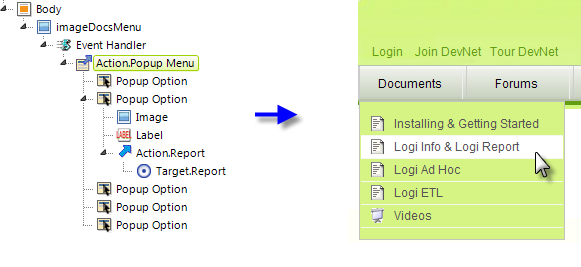
The example shown above shows the elements used to produce the Documents popup menu (sometimes called a "pull-down" menu) on an early version of DevNet:
- The Event Handler element is set to fire on the onMouseOver event. When it fires, it executes the Action.Popup Menu element beneath it.
- A Popup Option element is included for each pop-up menu item to be displayed.
- Each Popup Option element needs, at least, a Label element and an Action element beneath it to cause something to happen when the pop-up menu item is clicked. If an Image element is included, it will also be displayed.
The Action.Popup Menu element has a Popup Location attribute that controls where the pop-up menu appears in relation to the Image or Label clicked to call it. The popup menu can be beneath it, as shown above, or beside it to the right.
keywords: Action.EmailReport, Current Report