Manage Style Sheets
This topic introduces Cascading Style Sheets and their use with Logi reporting tools. You'll learn how to include a style sheet within the report application, how to create and edit CSS classes, both within Studio and using external editors, and how to preview a CSS class to discover its formatting effect.
- Add a Style Sheet
- Edit a Style Sheet in the Studio Workspace
- Edit a Style Sheet in the Style Sheet Class Selector
- Edit a Style Sheet Using an External Style Sheet Editor
Add a Style Sheet
Most developers with web design experience are familiar with Cascading Style Sheets (CSS). They provide a class-based formatting mechanism for HTML pages and can eliminate the need for font tags, framesets and tables. Logi reporting tools are CSS-compliant and Logi Studio includes a style sheet editor to ease development.
From the Logi application perspective, a style sheet is a support file that's included with a report application. In Logi Studio, the Support Files folder in the Application Panel provides an interface for managing style sheets.
Multiple style sheets can be included within a Logi application and they appear in Studio's ApplicationPanel.
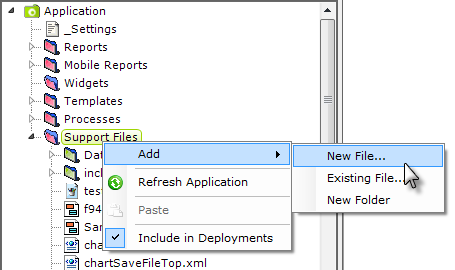
To create a new style sheet file:
- In Studio, as shown above, right-click the Support Files folder in the Application Panel.
- Click Add, then New File...
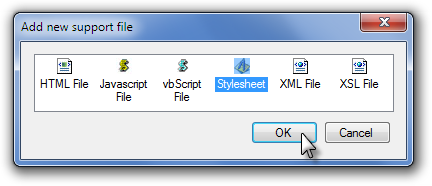
- A dialog box will be displayed that allows you to choose the type of support file you wish to add; select Stylesheet and click OK.
- A new file, named newStyleSheet.css will be added to the list of support files, and opened for editing in the Workspace Panel. An empty BODY class will be inserted by default:
BODY } |
- Rename the new style sheet by selecting it in the Application Panel and pressing F2, or by right-clicking it and selecting Rename from the popup menu.
To add an existing style sheet file:
- For an existing file, select Existing File... from the popup menu shown above and use the file browser to navigate to the directory where the style sheet is located. Select the style sheet file and click Open.
- The file will be copied to the _SupportFiles folder in the application project folder and added to the Support Files list in Studio.
Edit a Style Sheet in the Studio Workspace
There are two methods of editing style sheets inside Logi Studio, using built-in native CSS editors, or an external style sheet editor, if you have installed one on your own, can be launched from inside Studio. The first internal method is editing right in the Studio Workspace editor:
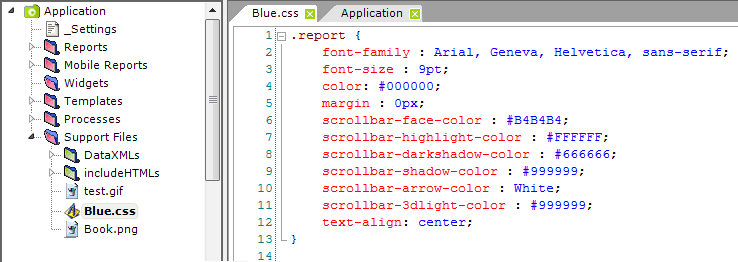
- In the Application panel's Support Files folder, double-click the style sheet file to be edited.
- The style sheet contents are displayed in the Workspace panel, as shown above, and can be directly edited.
- As you type, the editor will provide assistance via pop-up lists of selector names and values.
- Make the necessary changes or additions and click Save on the toolbar.
Note that use of the Preview tab automatically saves definition files but does not save style sheet changes. You must click Save to save your changes before previewing.
Edit a Style Sheet in the Style Sheet Class Selector
The second internal editing method is the Class Selector tool, which is opened from the Attributes panel:
The Class Selector tool can be opened by selecting it from the list of Class attribute value choices for any element, as shown above.
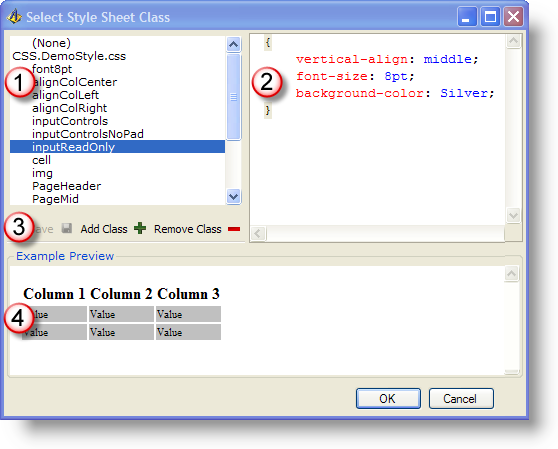
The Class Selector tool, shown above, allows a class to be assigned by selecting it in the class list (1) and clicking OK. The attributes of the selected class are shown in the upper right panel (2) and they can be edited there. Controls (3) allow you to save, add, and delete classes and the effect of the selected class is shown in the lower preview panel (4).
Edit a Style Sheet Using the External Style Sheet Editor
The external editing option works only if you have installed a 3rd-party style sheet editor program, which has been associated in the file system with the .css file extension. This external editor can then be launched from within Studio in two different ways:
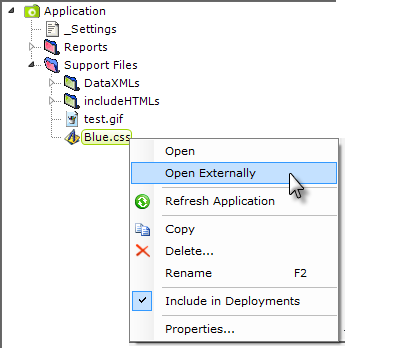
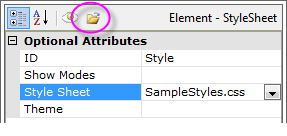
A style sheet file can be selected in the list of files in the Application panel, right-clicked, and opened externally, as shown above left. Or, in a report definition, when the Style element's Style Sheet attribute has been selected in the Attributes panel, as shown above right, the Open Referenced File... icon will appear and can be used to open the file in the external editor.
Note that, if you've edited a style sheet in an external editor, you may need to "refresh" the file in Studio before any changes are recognized. This is done by right-clicking the file in the Application panel and selecting Refresh Application.