Introduction to Style Sheets
This topic introduces developers to the use of Cascading Style Sheets (CSS) to control the presentation of Logi applications. You'll learn how to include a style sheet within a Logi application and how to assign individual CSS classes to elements. This topic assumes that you've already created a basic application whose appearance you want to affect by using a style sheet.
- About Cascading Style Sheets
- Include a Style Sheet in Your Application
- Edit a Style Sheet in the Studio Workspace
- Edit a Style Sheet in the Style Sheet Class Selector
- Assign a Style Sheet to Your Definition
- Assign Classes to Elements
About Cascading Style Sheets
Cascading Style Sheets (CSS) is a technology that allows the presentation aspects of web pages to be separated from the other page content. It can be used to add "style" (e.g. fonts, colors, alignment, spacing, and more) to web pages. It's a mature standard, fully supported by the W3C. All modern browsers support the CSS2 and earlier standards, and the very latest major browsers are starting to support CSS3.
![]() IE has lagged behind Firefox and Chrome in supporting new CSS standards. Not only does this introduce compatibility issues you may have to deal with but, because Logi Studio uses the Windows operating system's IE components, Studio's Preview function may be affected. Issues of this nature tend to arise especially if you integrate 3rd party libraries that make heavy use of HTML5 and CSS3 into your Logi
application.
IE has lagged behind Firefox and Chrome in supporting new CSS standards. Not only does this introduce compatibility issues you may have to deal with but, because Logi Studio uses the Windows operating system's IE components, Studio's Preview function may be affected. Issues of this nature tend to arise especially if you integrate 3rd party libraries that make heavy use of HTML5 and CSS3 into your Logi
application.
If you're a developer with web design experience, you should already be familiar with style sheets. If not, as used with Logi applications, style sheets are independent text files that define style "classes" with property settings. For example, the definition for the class "font8ptBold", shown below, contains selectors that cause text to appear in an 8-point, bold font:
.font8ptBold {
font-size: 8pt;
font-weight: bold;
}
Classes are assigned to elements within a Logi application in order to control their appearance. For example, we might assign the font8ptBold class to a Label element so that its caption will appear on the web page in an 8-point, bold font. CSS includes a wide variety of selectors that can affect everything from font weight, size, and color to the positioning of images on the page.
Use of style sheets creates slightly more complexity for the developer than having appearance properties directly associated (as attributes) with elements in Logi Studio. The trade-off, however, is that they offer far more flexibility and browser-version compatibility. Logi reporting tools are CSS standards-compliant and, to help you work with style classes, Logi Studio includes a style sheet editor.
Logi products allow you to set a "doctype declaration" for your application, which gives the browser some guidance about how to render the page. This is discussed in Doctype Declarations and can help sort out some the behavioral differences between browsers.
The "cascading" part of the style sheet name refers to the way in which the effects of classes permeates downward through hierarchical structures of elements in web pages. The effects start at the top and, unless superceded by other classes, continues downward within the container, structure, or child elements.
You can develop your own "standard" style sheet file with a .css file extension, and then re-use it or parts of it with different Logi applications. This saves development time and promotes a consistent look for your applications, if desired. You may care to develop and share a "company style sheet" so that all of your Logi application developers produce pages with the same appearance
Style classes can be applied in a number of ways, including "inline" or embedded directly into HTML. However, it's beyond the scope of this topic to provide a complete explanation of Cascading Style Sheets; excellent resources can be found online.
![]() Logi products include a feature called Themes which can instantly apply style and other presentation touches to your report. A number of stock themes are included with the products and you can also create your own. For more information about themes, see Themes.
Logi products include a feature called Themes which can instantly apply style and other presentation touches to your report. A number of stock themes are included with the products and you can also create your own. For more information about themes, see Themes.
Create an Example Style Sheet
Select and copy the following text, paste it into Notepad or a similar text editor, and save it to your desktop (or any other location you prefer) as CSSExample.css:
/* CSSExample.css: our example style sheet */
.myTable {
padding: 5px;
border-width: 2px;
border-style: solid;
border-color: Silver;
border-collapse: collapse;
background-color: White;
font-family: Verdana, Arial; /* if Verdana font not found, will use Arial */
font-size: 9pt;
font-weight: normal;
color: Black; /* this is the font color */
}
.myTable TH { /* TH: automatically applied to table header */
padding: 5px;
border-style: solid;
border-color: Silver;
background-color: #F0F0F0; /* colors can also be specified using hex */
font-size: 10pt;
color: Maroon;
}
.myTable TD { /* TD: automatically applied to table cells */
border: 2px solid Silver; /* combines three border selectors into one */
padding-left: 5px;
padding-right: 5px;
text-align: center;
}
.fontBold {
font-weight: bold;
}
/* end of style sheet */
If you're wondering what those "TH" and "TD" designations are, they relate to the tags that make up an HTML table: TH = Table Header, and TD = Table Data. By including them as shown above, their classes will be automatically applied to any data table that uses the myTable class. This is a bit of CSS shorthand that saves you time and effort.
The next two sections discuss how to include this style sheet in your application, and how to edit it within Studio.
Include a Style Sheet in Your Application
For the remainder of this topic, we'll show screen shot images based on a fictional Logi application that pulls data from the Northwind Foods database (creating a similar, real application is discussed in our Data Table Tutorial - Wizard). If you already have a basic Logi database table report created, you can use it as we proceed.
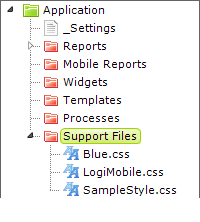
A style sheet is considered a Support File which is included with the application. In Logi Studio, the Support Files are organized in the Application panel (upper left corner) beneath their own folder, as shown above.
Now let's add your example style sheet one to your application:
- In Logi Studio, right-click the Support Files folder in the Application panel.
- Select Add
 Existing File... from the popup menus.
 - Browse to the location where you saved the example style sheet, select it, and click OK.
- The CSSExample.css style sheet will be added to your list of application support files and the file itself will be copied to your application project file, in the _SupportFiles folder.
As you see, multiple style sheets can be included within a Logi application.
When you right-clicked the Support Files folder to add the style sheet you created earlier, you may also have noticed an option to Add ![]() New File... which lets you create a style sheet file from scratch.
New File... which lets you create a style sheet file from scratch.
Edit a Style Sheet in the Studio Workspace
There are several ways to edit style sheets from Logi Studio and the most direct way is to do it right in the Studio Workspace editor:
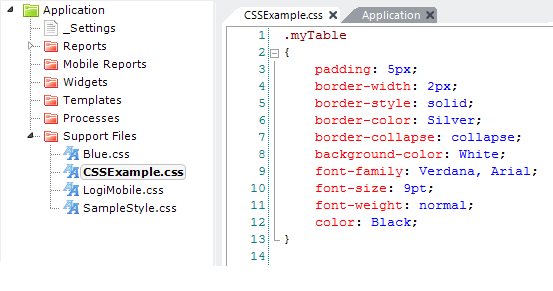
- In the Application panel's Support Files folder, double-click the style sheet file to be edited.
- The style sheet contents are displayed in the Workspace panel, as shown above, and can be directly edited.
- As you type, the editor will provide assistance via pop-up lists of selector names and values.
- Make the necessary changes or additions and click Save on the toolbar.
Note that use of the Workspace Preview tab automatically saves definition files but does not save style sheet changes. You must click Save to save your changes before previewing.
You can also select and right-click a style sheet file in the Application panel, and click Open Externally to edit it in any external CSS editing tool, such as Top, that you have installed. The file will be opened in whatever application is associated with the .css file extension.
Edit a Style Sheet in the Style Sheet Class Selector
Turn your attention to the Attributes panel now. Many elements have a Class attribute and its value field includes a drop-down list icon. Clicking this icon causes a list of classes from the style sheet(s) assigned to your application (described in the next section) to be displayed. The top item in this list is a link to the Class Selector tool, which offers a second method of previewing and editing your style classes.
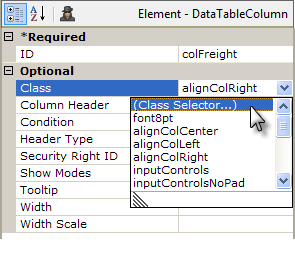
The Class Selector tool can be opened by selecting it from the list of Class attribute value choices for any element, as shown above.
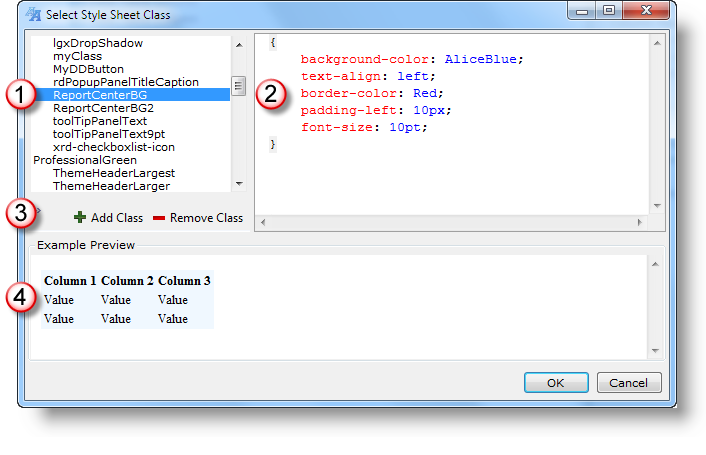
The Class Selector tool, shown above, allows a class to be assigned by selecting it in the class list (1) and clicking OK. The attributes of the selected class are shown in the upper right panel (2) and they can be edited there. Controls (3) allow you to save, add, and delete classes and the effect of the selected class is shown in the lower preview panel (4).
Assign a Style Sheet to Your Definition
Once the CSSExample.css style sheet file has been copied to your Logi application folder, you have to assign it to your report definition.
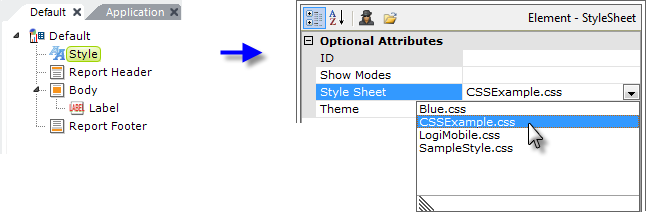
- Open your report definition in the Workspace panel and select the Style element, as shown above.
- In the Attributes panel, click the Style Sheet attribute and pull-down the list of available style sheets.
- Select the CSSExample.css style sheet entry in the list, which will assign it to the Style Sheet attribute. Now the classes in that style sheet are available for use in your definition.
- Note that you can open the selected style sheet in an external editor, if you have installed one, by clicking the Open File icon at the top of the panel. This will launch the application associated in the file system with the .css file extension and open the file in it.
Assignment Using a URL
If a style sheet resides outside of your Logi application, it can instead be assigned using a fully-formed URL, such as
http://www.myFirm.com/CSS/myStyleSheet.css
Just enter the URL into the Style Sheet attribute, instead of a file name.
Global vs. Local Assignment
The presence of the Style element in a report definition indicates a local style sheet. A Logi application may contain several report definitions and each definition may use a separate style sheet. Or, if they all use the same style sheet, a global style sheet can be used for all report definitions in the application. The global style sheet is configured in the _Settings definition:

- Select the _Settings definition in the Application panel and then select the root element (_settings) in the Workspace panel.
- Double-click a Global Style element in the Element Toolbox to add it to the definition.
- Select the newly added Global Style element in the Workspace panel.
- In the Attributes panel, enter a value for the Style Sheet attribute or select one from the pull-down list.
Assign Classes to Elements
Now you're ready to assign style classes from the style sheet to elements in your application. The images below assume this query
SELECT CategoryID, CategoryName, Description FROM Categories
has been used to produce a report from the Northwind Foods database. Follow along in your application, making adjustments as necessary. These examples assume you've already assigned the CSSExample.css style sheet to your application.
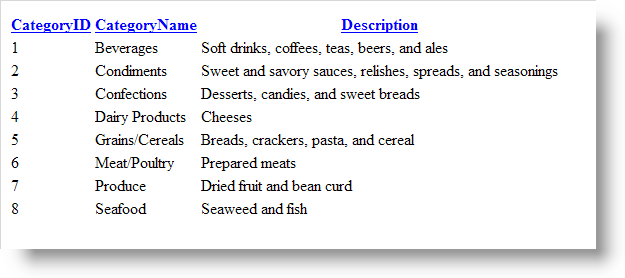
The report output above shows the data returned by the query. It's raw, unformatted, and ugly. Let's assign some style sheet classes to improve the appearance of our output.
Elements that can be affected by classes have a Class attribute. Some may have several class-related attributes depending on the complexity of the element.
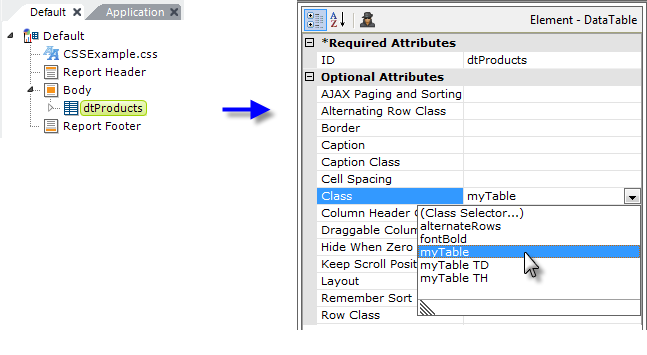
In your report definition, select the Data Table element and, in the Attributes panel, find its Class attribute and, using the drop-down list, select the myTable class, as shown above. Note that the list includes all of the classes in your style sheet. It's also possible to manually assign multiple classes, separated by commas or spaces, as a Class attribute value. Now let's preview the report:

As shown above, here's our table with the style sheet classes applied. Quite a difference from the raw table! The style sheet has affected font sizes and colors, text alignment, background color, spacing and padding, and borders.
The classes affect everything about the table and its contents, flowing down through the Data Table element and all its child elements. This is the "cascading" effect of Cascading Style Sheets. However, the effects can be overridden by assigning other classes to child elements lower down in the hierarchy. Let's see how that works.
With the myTable class assigned to the table, all the data in all the columns appears in a normal, black font. Let's change the data in the first column, the CategoryID, to be bold-faced as well.
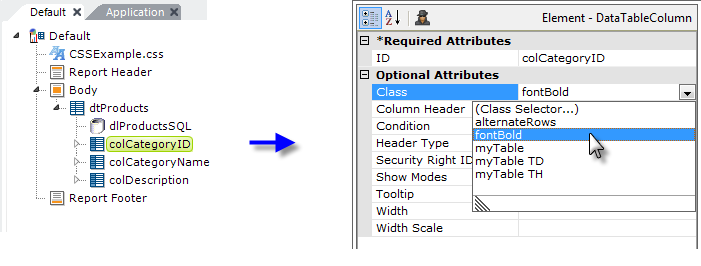
As shown above, select the Data Table Column element for the Category ID and, in its Class attribute, select the fontBold class from the drop-down list.

As you can see above, the class applied to the data column has produced an additive effect, in that column only. We could just as well have assigned the class to the Label element that actually displays the data. By assigning it to the Data Table Column, we applied the affect to all its child elements, which covers situations where you have multiple Labels or other elements in the column.
Create an Alternate Row Class
If you're using a stock Logi theme, it comes with a ThemeAlternatingRow class that you can assign to your Data Table element's Alternating Row Class attribute.
If you're not using a theme, or want to create your own class for alternating data table rows, the following exercise shows you how to do it.
Add a new class to the style sheet and then assign it to the Data Table. The goal is to have every other row in our table look slightly different, which makes it easier to read across many columns.
- In the Application panel, double-click and open the CSSExample.css style sheet file.
- In the Workspace editor, add the following CSS class:
.alternateRows {
background-color: LightYellow;
} - Click the Save icon in the toolbar, to save the style sheet changes.
- Click the tab at the top of the Workspace panel to return to your report definition.
- Select the Data Table element and assign your new alternateRows class to the Alternating Row Class attribute.
- Preview the results:
If you're using a stock Logi theme, it automatically applies dynamic row highlighting. However, if you're not using a theme, or want to create your own class for dynamic row highlighting, the following exercise shows you how to do it.
Note that this effect may not work with all browsers (especially older browsers):
- Once again, open your CSSExample.css style sheet file.
- In the Workspace editor, add the following CSS class:
.myTable TR:hover TD {
background-color: LightYellow;
} - Click the Save icon in the toolbar, to save the style sheet changes.
- Click the tab at the top of the Workspace panel to return to your report definition.
- Select the Data Table element and delete the Alternating Row Class attribute value, leaving it blank.
- Preview the results, and pass your mouse cursor over the rows:

As you have seen, style sheets are powerful tools that assist you in creating visually-interesting report presentations. More information about style sheets and Logi applications can be found in Manage Style Sheets and Use Style Sheets.
