].Bookmarks
Bookmarks provide a mechanism for storing and re-using the request parameters, user input data, and configuration choices made by report users at runtime.
- About Bookmarks
- Add Manual Bookmarks to a Report
- Add Automatic Bookmarks
- Organize Bookmarks
- Share Bookmarks
- Share Bookmark Folders
- Create a Bookmark Manager
- Run Most-Recent Bookmark on Page Load
About Bookmarks
Depending on how they're developed, Logi reports can offer users many opportunities to customize their reports at runtime. Developers can include user input controls and "super-elements", such as the Analysis Grid, in the reports. Super-elements have their own user interface and give users a lot of freedom to work with data, arrange table columns and rows, and add charts to their reports.
However, the time users invest in configuring their reports may be lost when their session ends. Logi "bookmarks" allow these settings to be saved, on an individual user basis, so users don't have to re-configure their reports each time they view them. Bookmarks can save the following:
- Values selected in user input controls
- Session variables and link parameters
- Super-element UI configurations
When a bookmark is created, it essentially "vacuums up" all the values that will become Request parameters, all super-element UI configuration settings, and all session variables (v10.0.428+) and saves them in an XML data file. The contents of the file can be "replayed" at runtime to recreate the report, with all of its selections and settings intact.
![]() Bookmarks will not work with values passed using a Target-type element's Request Forwarding attribute. When this attribute is used, request variable values are not passed in a query string so they will not subsequently be available to be saved in a bookmark. To achieve the desired results, instead of using Request Forwarding, use a Link Parameters element to send request variable values
to the
target
report.
Bookmarks will not work with values passed using a Target-type element's Request Forwarding attribute. When this attribute is used, request variable values are not passed in a query string so they will not subsequently be available to be saved in a bookmark. To achieve the desired results, instead of using Request Forwarding, use a Link Parameters element to send request variable values
to the
target
report.
Bookmark Types and Scope
Manual bookmark functionality, which uses special Action.Bookmark elements, is report-wide in scope. All of the values listed above be saved. If a report definition includes two super-elements, the UI configuration values for both of them will be saved.
The special bookmark Action elements are available as children of Label, Button, Image, and other elements that can be used to initiate actions. These special elements are discussed in more detail in a later section.
![]() Automatic bookmarks provide similar functionality but their scope is limited to recording the configuration details and parameters of their parent super-elements. These details are saved automatically every time a user makes a change in the super-element user controls. This makes working with bookmarks extremely easy. The Auto Bookmark element is available as a child
of several super-elements and its use is discussed in a later section.
Automatic bookmarks provide similar functionality but their scope is limited to recording the configuration details and parameters of their parent super-elements. These details are saved automatically every time a user makes a change in the super-element user controls. This makes working with bookmarks extremely easy. The Auto Bookmark element is available as a child
of several super-elements and its use is discussed in a later section.
![]() You can use either manual or automatic bookmarks in a report, but not both.
You can use either manual or automatic bookmarks in a report, but not both.
Bookmark Data
Regardless of type, bookmark data is stored in one or more XML data files, called a "Bookmark Collection" and, typically, there's one collection per user. The developer specifies the storage location and ID of the collection. If Logi Security is being used, these files can be named using the @Function.UserName~ token, thus tying the bookmark collection files to an individual user.
Bookmarks are identified by report name and a description. Special elements, discussed later, are available so developers can create their own Logi applications to manage bookmarks.
![]() The Bookmark Organizer element allows users organize bookmarks into folders and sub-folders, which can
be shared with other users.
The Bookmark Organizer element allows users organize bookmarks into folders and sub-folders, which can
be shared with other users.
Working examples of the Bookmark elements can be seen in our sample application.
Add Manual Bookmarks to a Report
Adding manual bookmarks to your report is easy and the following examples provide step-by-step guidance. First, ensure that your report is a good candidate for bookmarks: it needs to include a super-element and/or some kind of user input selection that affects the displayed data. A simple report that just executes a SQL query and displays the entire results in a data table is not a good candidate, for example.
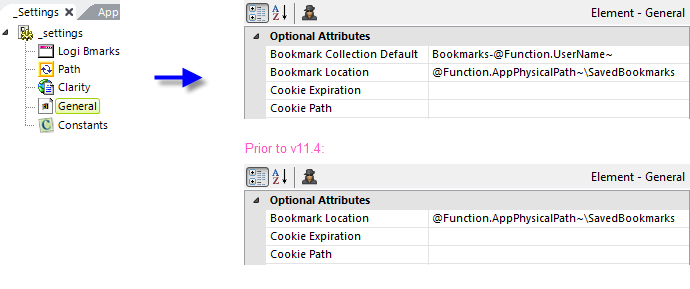
- In Studio, open your application's _Settings definition and select the General element.
- If using v11.4+, set the Bookmark Collection Default attribute to the name for the bookmark data file. Do not include a path or .xml file extension. If you're using Logi Security, you can use the @Function.UserName~ token to individualize the collection; if not, enter some other value of your choice.
 In general, specifying this value here and leaving the corresponding attributes blank in individual bookmark-related elements is good practice. If necessary, you can override this value by providing one in those other elements.
- Set the Bookmark Location attribute value to the name of a folder, underneath the Logi application root folder where you want the bookmark files to be stored. You can use a token for the root folder here, as shown above. Don't use the system rdDataCache or rdDownload folders as these are periodically "cleaned up" automatically.
- If it doesn't already exist in the file system, create the bookmark location folder and be sure it inherits all the file access permissions of the application root folder.
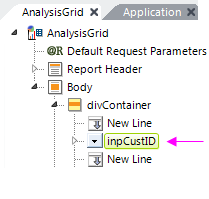
- In the report definition you want to add bookmark features to, make a note of the element ID of any user input elements whose values you want to save. In the example shown above, there's an Input Select List element with an ID of "inpCustID" that we want to save.
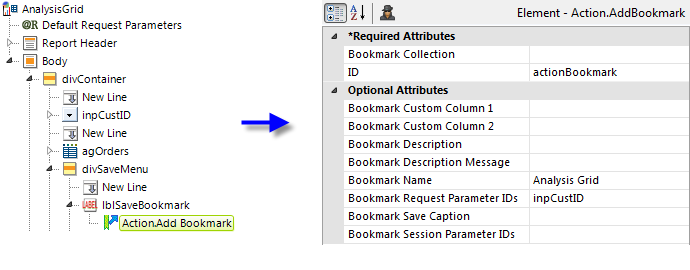
- In an appropriate place in the definition, add a Label, Button, Image or similar element, which will become the "Save Bookmark" link, as shown above.
- Beneath it, add an Action.Add Bookmark element. Unlike most Action elements, it needs no Target element.
- If using v11.4+, you can leave the Bookmark Collection attribute blank, unless you want to override the default value set in the _Settings definition.
If using a release prior to v11.4, set the attribute value to an arbitrary name for the saved bookmarks XML data file. Do not include a path or .xml file extension. This file will be created in the location identified in the _Settings definition in Step 1. This is the attribute value where, if the application uses Logi Security, you can create user-specific bookmarks collections, by entering the @Function.UserName~ token.
- Set its ID attribute to a unique ID. This is very important, especially if you have multiple reports with "Save Bookmark" links in the same application.
- Set its Bookmark Name attribute to a meaningful name, usually the name of the report. This value can be used later, along with the Description, to identify individual bookmarks.
- Set its Bookmark Request Parameter IDs attribute to a comma-separated list of one or more element IDs for user input control elements or link parameter IDs. In the example above, the element ID from Step 4 is entered. These identify the values to be stored in the bookmark; any value from this report that would be referenced in a subsequent report using an @Request token can be identified here.
That's all it takes to save bookmarks. Run the report, click the Save Bookmark link, and inspect the files created in the specified bookmark file location. Assuming a bookmark collection name of "MyBookmarks", you should see:
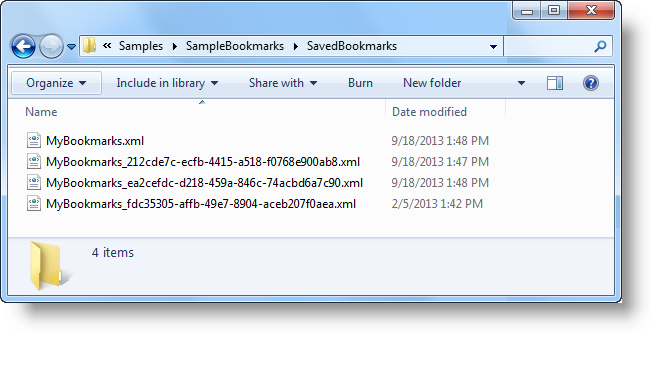
The first file is the main bookmark file and will always be present. The other files, with a GUID as part of their names, are referenced in the main file and contain information about any super-elements in the report. These may nor may not exist, depending on your report definitions.
Here are the other Action.Add Bookmark element attributes you might want to use:
| Attribute | Description |
|---|---|
Bookmark Custom Column 1 | Specifies a custom value to saved in the bookmark, which will be returned by DataLayer.Bookmarks. This could be use to provide additional information or datalayer filtering. |
| Bookmark Description | Normally, when saving a bookmark, the user enters a description of their own. This attribute value specifies custom default description text. |
| Bookmark Description Message | Specifies the prompt text for the description in the bookmark "save" dialog box. When this attribute has a value and the bookmark link is clicked at runtime, a dialog box will open prompting the user to enter a description, which is saved in the bookmark. If this attribute has no value, no dialog box will be displayed when the link is clicked. |
| Bookmark Save Caption | Specifies a custom caption for the Save button that appears in the bookmark dialog box. The default caption is "Save". (v10.0.479+) |
| Bookmark Session Parameter IDs | Specifies one or more Session variables names, in a comma-separated list, to be saved in the bookmark. For example, to save the value of the token @Session.UserID~, you would enter UserID here. (v10.0.428+).
|
Add Automatic Bookmarks
![]() Adding automatic bookmarks to your report is easy and the following examples provide step-by-step guidance. First, ensure that your report is a good candidate for automatic bookmarks: it needs to include one of the super-elements listed in the earlier About Bookmarks section. Remember that automatic bookmarks do not record values for user input controls outside of super-elements.
Adding automatic bookmarks to your report is easy and the following examples provide step-by-step guidance. First, ensure that your report is a good candidate for automatic bookmarks: it needs to include one of the super-elements listed in the earlier About Bookmarks section. Remember that automatic bookmarks do not record values for user input controls outside of super-elements.
- In Studio, open your application's _Settings definition and select the General element.
- Set the Bookmark Collection Default attribute to the name for the bookmark data file. Do not include a path or .xml file extension. If you're using Logi Security, you can use the @Function.UserName~ token to individualize the collection; if not, enter some other value of your choice.
 In general, specifying this value here and leaving the corresponding attributes blank in individual bookmark-related elements is good practice. If necessary, you can override this value by providing one in those other elements.
- Set the Bookmark Location attribute value to the name of a folder, underneath the Logi application root folder where you want the bookmark files to be stored. You can use a token for the root folder here, as shown above. Don't use the system rdDataCache or rdDownload folders as these are periodically "cleaned up" automatically.
- If it doesn't already exist in the file system, create the bookmark location folder and be sure it inherits all the file access permissions of the application root folder.
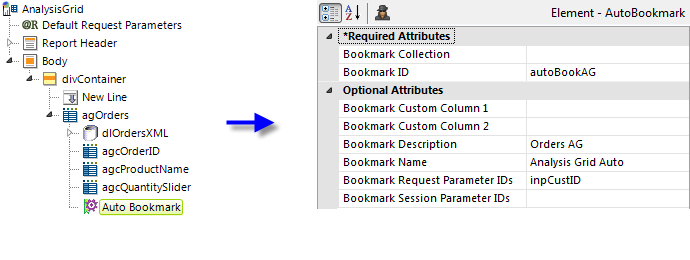
- Add an Auto Bookmark element as a child of the target super-element, as shown above.
- You can leave the Bookmark Collection attribute blank, unless you want to override the default value set in the _Settings definition.
- Specify a unique Bookmark ID to differentiate this bookmark in the collection. This value will be incorporated into the bookmark file names, so don't use any exotic characters here that the web server file system considers invalid in file names.
- With the exception of Allow Shared Bookmark Updates (discussed later), the rest of the element's attributes are identical to those for Action.Add Bookmark but, of course, without those for the Save Bookmark dialog box user interface. Refer to the table in the previous section for information about these attributes.
- The last thing you need to do to initiate automatic bookmarks. This is done by calling the report with rdLoadBookmark=True in the query string. One way to do this is by using Link Parameters with the link that calls the report.
Now you can run the report and manipulate the super-element interface. After that you can inspect the files created in the specified bookmark file location. Assuming a bookmark collection name of "MyAutoBookmarks", you should see:
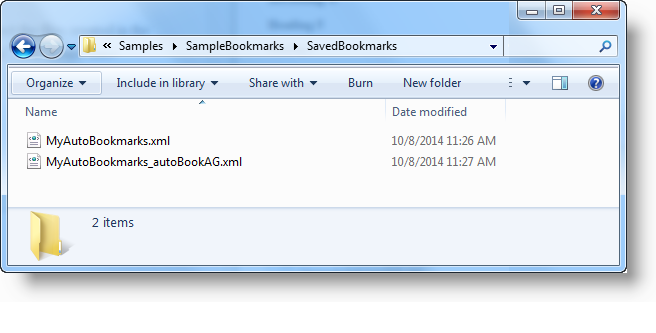
The first file is the main bookmark file and will always be present. The other file, with Bookmark ID you specified as part of its name, is referenced in the main file and contains information about the super-element in the report. It will appear once the super-element UI is manipulated.
Here are some additional important usage tips:
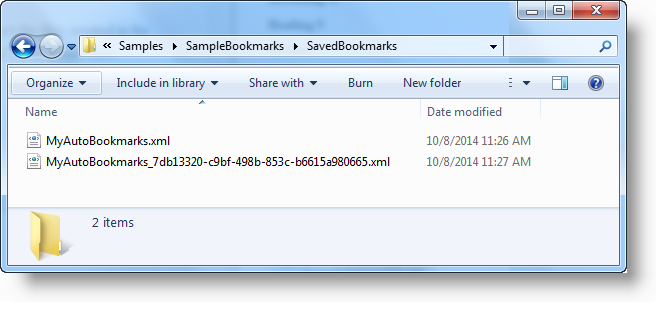
To automatically generate the Bookmark ID: If you want the application to generate the Bookmark ID automatically, using a GUID, as shown above, leave the element's Bookmark ID attribute blank and call the report with rdNewBookmark=True in the query string.
With Report Center Menu: If the report includes a ReportCenter Item element, the automatically-created bookmark will be listed with the ReportCenter Menu element.
With Dashboards: If using Auto Bookmark with a Dashboard, do not set the Dashboard element's Save File attribute. The bookmark will in effect become the dashboard's Save File.
Organize Bookmarks
![]() Users may want to group and organize the bookmarks they create. The Bookmark Organizer element allows users to place their bookmarks into "bookmark folders" at runtime.
Users may want to group and organize the bookmarks they create. The Bookmark Organizer element allows users to place their bookmarks into "bookmark folders" at runtime.
A bookmark folder is not an actual folder in the web server file system; instead, the bookmark data is referenced in the master bookmark data file in a hierarchy that creates "logical folders". The Bookmark Organizer lets users manage bookmarks and folders. Multiple bookmarks can be collected into a folder and folders can have sub-folders.
Runtime Display and Manipulation
The Bookmark Organizer displays the bookmark folders and works with a Data Table element, in the same definition, that lists the bookmarks. Clicking an entry in the data table runs the bookmarked report. When a folder is clicked, the data table is refreshed to show the contents of that folder. Folders can be created, renamed, and deleted, and bookmarks are organized by dragging them into folders. Here's an example:
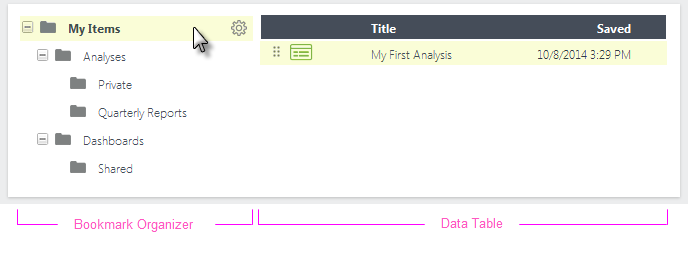
The example above shows a Bookmark Organizer and its companion data table. They can be physically arranged on the page however you desire, and theme selection and/or styling can vary their appearance.
The example shows the default "My Items" bookmark folder and several sub-folders created by the user. When bookmarks are first created, they're placed in the My Items folder by default. The "gear" icon appears when the mouse hovers over a folder and allows you to add new sub-folders, and rename or delete sub-folders. The data table displays the bookmarks in each folder (the selected folder name is shown in bold text).
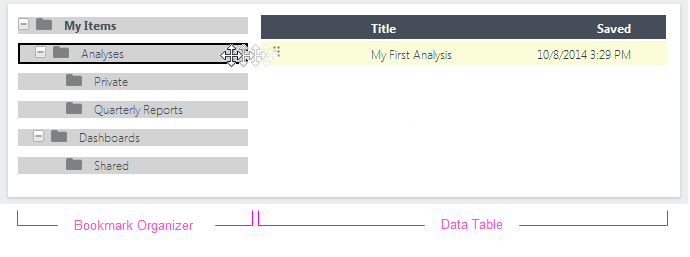
To move a bookmark from one folder to another, the user just drags the data table row's drag icon to the desired folder, as shown above.

Sub-folders can also be rearranged into other folders by clicking their folder icon and dragging, as shown above.
Implementation
As mentioned above, to implement this you'll need to add a Bookmark Organizer element and a companion Data Table element. Here's how:
- Implement manual or automatic bookmarks, as discussed in earlier sections.

- Include a Bookmark Organizer element in your report definition (one possible arrangement is shown above). Set its Data Table ID attribute to the element ID you'll give its companion data table.

- Add the companion Data Table, as shown above, and ensure its ID matches the one entered in the previous step.

- Add a DataLayer.Bookmarks element beneath the data table, as shown above. Unless you want to override the Bookmark Collection Default value set in _Settings.lgx, you can leave the collection name blank here.

- Add a Compare Filter beneath the datalayer and set its attributes as shown above. The Bookmark Organizer element automatically creates and updates the session variable rdSelectedFolderID each time the user selects a folder, so this filter causes the data table to only show the bookmarks in the selected folder.

- Add Data Table Column, Image, and Action.Drag Bookmark elements, as shown above. If you prefer, you can use a Label or Button element instead of the image. Set the action element's attributes as shown.
 If you want to use the standard "drag icon" image -
  - provided with Logi Info, enter the following for the Image element's Caption attribute value: ../rdTemplate/rdBookmarkOrganizer/rdDragHandle.png
- Enter one or more Data Table Column and Label elements, as shown above, to display information identifying the bookmarks.
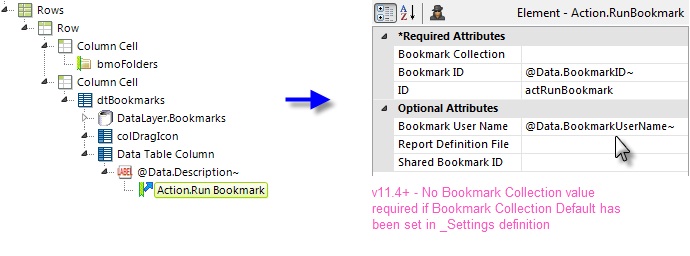
- Finally, in order to actually run the bookmarks, add an Action.Run Bookmark element beneath the Label element and set its attribute, as shown above. (The Bookmark User Name attribute was added in v11.4.046 SP2).
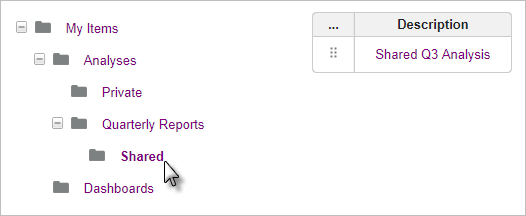
When run, with the Clarity theme applied, this simple example looks like the image shown above. The bookmark can be dragged into any of the folders and clicking its bookmark description will run the report and apply the bookmark.
Share Bookmarks
![]() Up to this point, we've seen how bookmarks can be used to preserve an individual user's configurations. It might also be useful to be able to share configurations with other users of the same application. Once the Bookmark Organizer has been implemented, adding sharing takes very little development time.
Up to this point, we've seen how bookmarks can be used to preserve an individual user's configurations. It might also be useful to be able to share configurations with other users of the same application. Once the Bookmark Organizer has been implemented, adding sharing takes very little development time.
Bookmark sharing is enabled by setting the Bookmark Organizer element's Allow Sharing attribute. Some variety of Logi Security must also be enabled so that the application knows who the users are.
Users who create bookmarks can share them by giving other users permission to access them. Here's our earlier organization example:

We've added a few icons in the bookmark row for sharing and deleting the bookmark, and you'll notice the new Shared with Me folder has appeared. This folder will contain links to bookmarks that have been shared with you by other users.
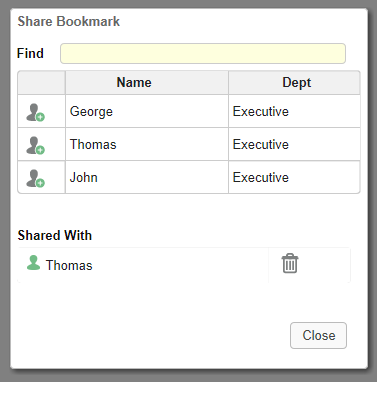
When the Share icon is clicked, a modal pop-up panel, shown above, is displayed. In it, users can select the other users who can share the bookmark. Developers can control the styling and content of the pop-up panel.
Implementation
Assuming you've already implemented the Bookmark Organizer, here's how to add bookmark sharing:
- Ensure that some variety of Logi Security is being used.

- Building on our earlier example definition, set your Bookmark Organizer element's Allow Sharing attribute to True (tokens may be used here), as shown above.
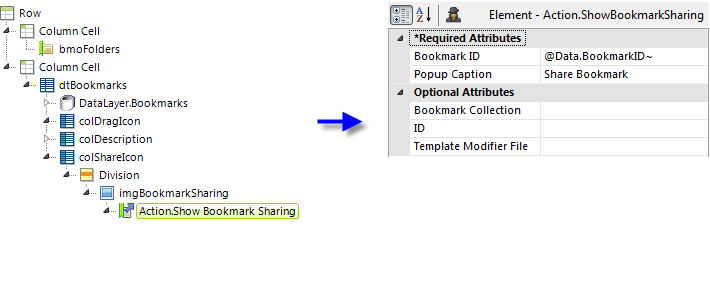
- Add a new data table column, with Division, Image, and Action.Show Bookmark Sharing elements, as shown above. Set the Action element's Bookmark ID attribute value to the Bookmark ID column returned in the datalayer.
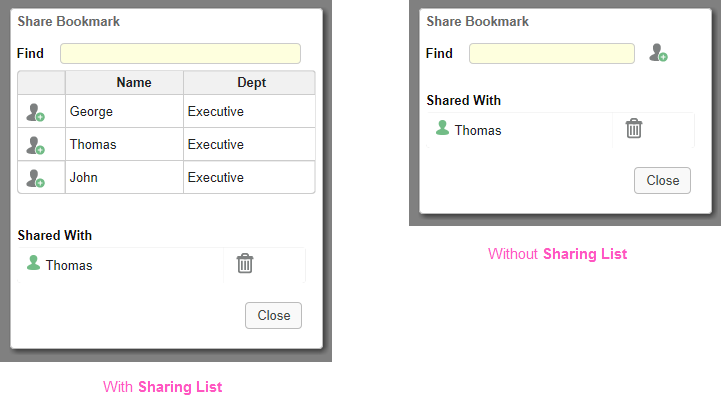
- Next, decide if you want to the pop-up Share panel to include a pick-list of other users with whom a user can share bookmarks. This is determined by the addition of the Sharing List element beneath the Action element. Referring to the images shown above:
With the Sharing List element, user names are displayed in an embedded table, as shown above right, and the names come from a datalayer. If a user in the table doesn't have a personal bookmark collection yet, one will be created for her automatically if a folder is shared with her.
Without the Sharing List element, user names can be typed-in and will be compared to the names associated with all of the existing personal bookmark collections. A type-ahead feature will help filter the available names.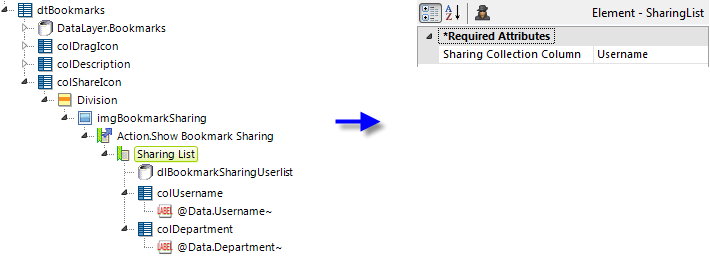
The example above shows the Sharing List element in use. You must specify the name of the datalayer column containing the user names in its Sharing Collection Column attribute.
As a special type of data table, Sharing List gives developers some control over the contents and formatting of the list. Any type of datalayer can be used and users are selected by clicking table rows. You can add whatever descriptive data you want and the pop-up panel will automatically expand to include the width of the table.
- Find the Action.Drag Bookmark element you're using in the bookmarks data table and set its Bookmark User Name attribute as shown above. The BookmarkUserName column is returned by DataLayer.Bookmarks. As with all tokens, this is case-sensitive so mind your spelling.
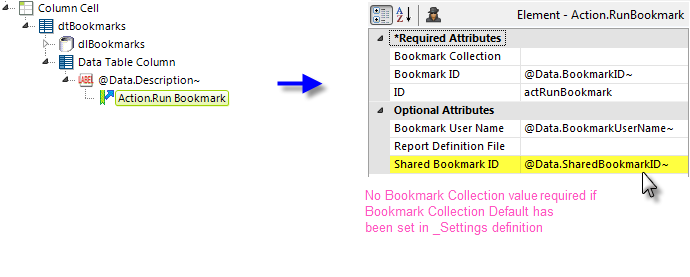
- Find any Action.Run Bookmark elements you're using in the bookmarks data table and set their Shared Bookmark ID attributes as shown above. The SharedBookmarkID column is returned by DataLayer.Bookmarks. As with all tokens, this is case-sensitive so mind your spelling.
And now you have bookmark sharing ready to go.
![]() Tip: In your _Settings definition, use the Security element's Development Username attribute to run the application as different users in order to see that bookmarks are shared correctly.
Tip: In your _Settings definition, use the Security element's Development Username attribute to run the application as different users in order to see that bookmarks are shared correctly.
A nice refinement you may want to add is to have differently colored sharing icons to indicate whether a bookmark has already been shared with others or not. To do this you'll need the two icons (assumed to be in _SupportFiles) and these formulae for the Image element's attributes:
| Attribute | Formula |
|---|---|
| Caption | =IIF("@Data.IsShared~" == "True" && "@Data.BookmarkUserName~" == "@Function.UserName~", "_SupportFiles/BookmarkShared.png", "_SupportFiles/BookmarkNotShared.png") |
| Tooltip | =IIF("@Data.IsShared~" == "True" && "@Data.BookmarkUserName~" == "@Function.UserName~", "Edit Sharing", "Share") |
If you have Logi's SSRM Add-on Module installed, you may want to copy and use these icon images:
C:\Program Files\Logi Analytics\InfoGo\_SupportFiles\rdBookmarkSharingOff.png and rdBoomarkSharingOn.png
Share Bookmark Folders
![]() Entire bookmark folders can also be shared with other users:
Entire bookmark folders can also be shared with other users:
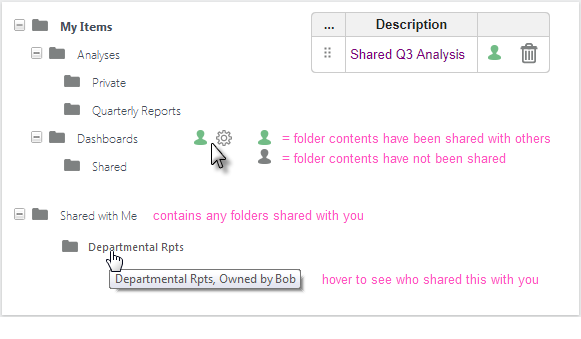
When sharing is enabled and you hover your mouse over sub-folders in the Bookmark Organizer, you'll see the built-in sharing icon, as shown above. The icon color indicates whether the folder has been shared with anyone.
A special Shared with Me folder will appear containing the folders, if any, that others have shared with you. Click the shared folders to see their contents and run the bookmarks. You can hover your mouse over them to see who shared them with you.
Clicking a sub-folder's green or black sharing icon will display the same Share pop-up panel used when sharing bookmarks. In it, you can see who you've shared the folder with, share the folder with others, and revoke sharing. The My Items personal folder cannot be shared.
Shared Folder Shortcuts
Suppose a folder shared with you is many levels of sub-folders deep and it's a nuisance to have to drill-down to it every time you need to use its bookmarks. The shared folder shortcut can make life easier for you in this case. This is created by drilling-down to the shared folder you want and then dragging it onto one of your personal folders:
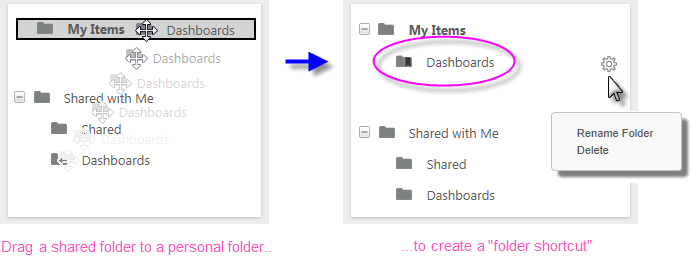
This action creates the folder shortcut, as shown above. Note that the shortcut has a special "shared folder" icon and that, by clicking its "gear" icon, you can rename it or remove it.
Implementation
Assuming you've already implemented the Bookmark Organizer, here's how to implement bookmark sharing:
- Ensure that some variety of Logi Security is being used.

- Set your Bookmark Organizer element's Allow Sharing attribute to True (tokens may be used here), as shown above.

- Next, decide if you want to provide users with a pick-list of other users with whom they can share folders. This is determined by the addition of the Sharing List element beneath Bookmark Organizer. Referring to the images shown above:
Without the Sharing List element, user names can be typed-in and will be compared to the names associated with all of the existing personal bookmark collections. A type-ahead feature helps filter the available names.
With the Sharing List element, user names are displayed in an embedded table, as shown above right, and the names come from a datalayer. If a user in the table doesn't have a personal bookmark collection yet, one will be created for her automatically if a folder is shared with her.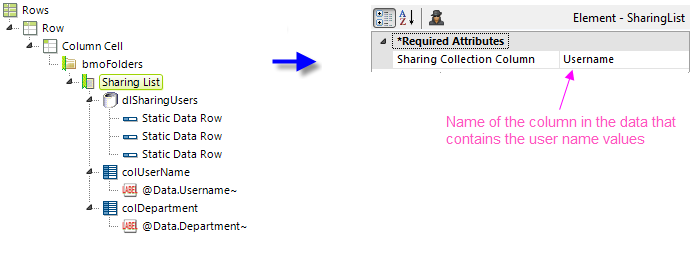
The example above shows the Sharing List element in use. As a special type of data table, it gives developers some control over the contents and formatting of the list. Any type of datalayer can be used and users are selected by clicking table rows. The Share pop-up panel will automatically expand to fit the width of the table. Specify the name of the datalayer column containing the user names in the Sharing List element's Sharing Collection Column attribute.
Your bookmark folder sharing functionality is now ready for use. Here's a testing tip:
![]() In your _Settings definition, use the Security element's Development Username attribute to run the application as different users in order to see that individual bookmark folders are created and shared correctly.
In your _Settings definition, use the Security element's Development Username attribute to run the application as different users in order to see that individual bookmark folders are created and shared correctly.
Create a Bookmark Manager
If you don't want to use the Bookmark Organizer and you're not sharing bookmarks, you can easily create your own bookmark manager application with Logi Info. This section describes how to create the data table shown below (from the Bookmarks sample app on DevNet) which can be used to manage bookmarks.
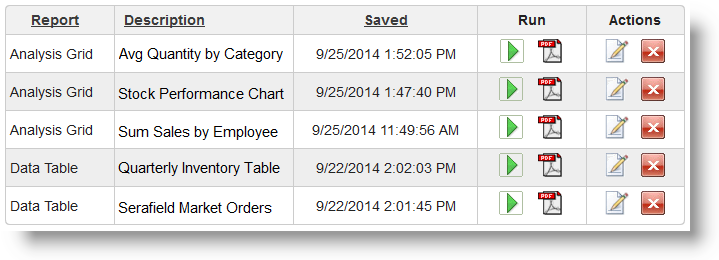
The table shown above contains these columns:
- Report - The name of the report.
- Description - Text entered when the bookmark is created to help identify it.
- Saved - The bookmark creation time stamp.
- Run As - Links that re-create the report, either by running it in a new window or by exporting it to PDF.
- Actions - Links that allow the description to be edited and the entire bookmark to be deleted.
The following examples present the bookmark-related elements used to create the table. They assume that you've set the General element's Bookmark Collection Default attribute (v11.4+) in the _Settings definition. If you're using an earlier version, you'll need to provide a value for the Bookmark Collection attribute in each element.
Re-run Reports with Bookmarked Values
Here's how to build your report definition to include links to re-run bookmarked reports:

- Add a DataLayer.Bookmarks element, as shown above, to retrieve the saved bookmark data. You may want to add a Sort Filter element to sort the data on the creation timestamp (the SaveTime column).

- Add Data Table Columns, as shown above, and in order to re-run a report with bookmarked values, add an Action.Run Bookmark element as a link. You do not need to provide a Bookmark Collection attribute value for it if you've already configured it in _Settings. If you want to run the report in a different window, add a Target.Run Bookmark element as shown. If you want to pass parameters to the report, use a Link Parameters element as usual.
Edit the Bookmark Description
Here's how to include elements that allow bookmark descriptions to be edited:

- Beneath the element to be used as a link, add an Action.Edit Bookmark element, as shown above.
- v11.4+ - If you set a Bookmark Collection Default in _Settings, leave this blank. If not, or if using earlier versions, provide the name of the bookmark collection to be edited.
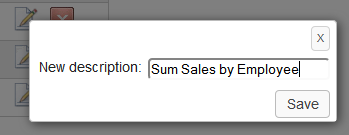
- Set its Bookmark Description Message attribute to the text for the prompt in the edit box, as shown above. When the link is clicked at runtime (and this attribute has a value), a modal dialog box will open and prompt the user to enter a description, which is saved in the bookmark.
- Set its Bookmark ID attribute value to the ID of the bookmark to be used. In this example, that information comes from the datalayer and is specified using an @Data token.
- Set its ID attribute to a unique identifier.
- Set its Bookmark Description attribute value to the current description of the bookmark to be used. In this example, that information comes from the datalayer and is specified using an @Data token.

- Finally, to fresh the table immediately, add an Action.Refresh Element element beneath the Action.Edit Bookmark element, as shown above.
- Set its Element ID attribute value to the ID of the data table.
Delete Bookmarks
Here's how to include elements that allow bookmarks to be deleted:
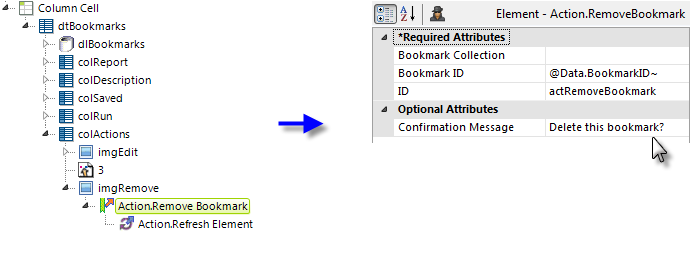
- Beneath the element to be used as a link, add an Action.Remove Bookmark element, as shown above.
- v11.4+ - If you set a Bookmark Collection Default in _Settings, leave this blank. If not, or if using earlier versions, provide the name of the bookmark collection to be edited.
- Set its Bookmark ID attribute value to the ID of the bookmark to be used. In this example, that information comes from the datalayer and is specified using an @Data token.
- Set its ID attribute to a unique identifier.
- Set its Confirmation Message attribute value to the text to be displayed when the user is prompted to confirm the deletion. If this is left blank, no confirmationrequest will appear.
- As before, an optional Action.Refresh element can be added to refresh the table after the bookmark is deleted (see Steps 7 and 8 above).
Run the Most-Recent Bookmark on Page Load
Some developers may want their users to run a report and have their most-recently saved bookmark applied by default.
There are two steps required to make this happen: 1) get the ID for the most-recently saved bookmark, and 2) reload the report, passing the appropriate request variables to apply the bookmark. Here's how to do this:

The elements shown above will let you reduce the data in the datalayer to the single row for the most-recently saved bookmark.
- Local Data - This is used to get the bookmark. We'll control when it runs by setting its Condition attribute to the special token "@Request.rdBookmarkID~" = ""
- DataLayer.Bookmarks - Configure with the name of your bookmark collection or leave blank if using v11.4+ and a default collection has been specified in _Settings. A token can also be used here.
- Sort Filter - Sort the bookmarks on the SaveTime column (Date type data), into Descending order.
- Sequence Column - This adds a "row number" column to each row of sorted data and the most recent bookmark will wind up as Row #1.
- Condition Filter - Configure its Condition attribute to @Data.mySequenceColumn~ = 1 which will remove all rows except Row #1, the most recent bookmark.
Now that you've retrieved and isolated the most-recently saved bookmark data, you need to reload the report:
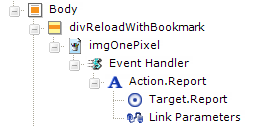
The elements shown above will reload the report with the appropriate request variables.
- Division - This container is used to prevent endless recursive reloading of the report; set its Condition attribute to "@Request.rdBookmarkID~" = ""
- Image - Create and use a 1-pixel x 1-pixel transparent image (which will not be visible in the report).
- Event Handler - Set this to handle the DHTML onLoad event.
- Action.Report & Target.Report - Configure these to call the report definition (use the actual definition name, not Current Report)
- Link Parameters - These should be as follows and are case-sensitive:
- rdBookmarkCollection = the name of your bookmark collection; a token could be used here
- rdBookmarkID = @Local.BookmarkID~
- rdLoadBookmark = True
Your report will load, then reload with the most-recently saved bookmark applied to it.