Export to Adobe PDF
The Adobe Portable Document Format (PDF) is a well-established file format standard and a widely-accepted method of distributing reports. This topic discusses how to export Logi reports to Adobe PDF. Topics include:
- About Exporting Reports to PDF
- Export a Report Manually
- Export a Report Automatically
- Add Exported Headers and Footers
- Force Page Breaks in Exports
- Fonts and Special Character Sets in Java
- Hide Elements When Exporting
- Export MoreInfo Rows
- Cascading Style Sheet Support
- Debug Exports
- Export Considerations
- Export Errors
About Exporting Reports to PDF
The PDF format is useful because of its ability to faithfully reproduce the appearance of a document, including graphics, images, and text, so that it can be easily viewed using the Adobe Reader program or browser plug-in. Notice the emphasis on "document" - PDF was not initially designed as a format for reproducing browser content and it doesn't always do so very well. Even though PDFs can be viewed within a browser, the two technologies are quite different.
For example, recent browser versions and Logi products support doctype declarations, which serve to tell the browser how to handle content layout, how to apply style, and more. Report pages can look quite different with different doctype selections. However, the PDF format does not support doctype declarations, and therefore can't represent everything exactly as the browser does. So, exported report pages may not look exactly like they do in the browser if a doctype has been applied.
What does this mean? It means developers and users should be realistic in their expectations about just how faithfully a Logi report can be reproduced when exported as a PDF document.
Logi Studio provides the Action.Export PDF element so that Logi reports can be exported to PDF files.
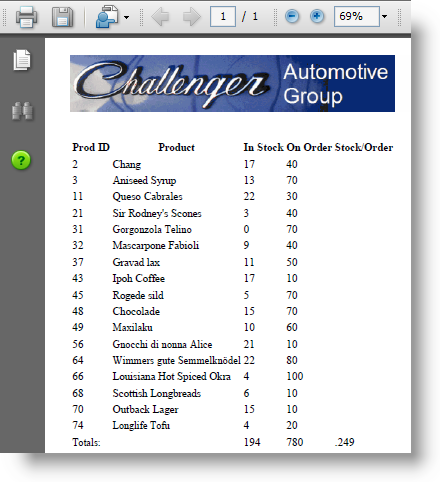
Developers can give users the ability to export a report in two ways: manually (to a PDF viewed in their own browser) or automatically (to a PDF file) based on an event or schedule. Manual exports are configured within report definitions and automated exports are configured within process definitions.
![]() The PDF export engine was changed to Gecko-based technology and Chart Canvas charts are now exported as SVG objects rather than as images. This results in Chart Canvas charts exported to PDF having extremely high resolution - they can be zoomed or printed with high-quality at any resolution.
The PDF export engine was changed to Gecko-based technology and Chart Canvas charts are now exported as SVG objects rather than as images. This results in Chart Canvas charts exported to PDF having extremely high resolution - they can be zoomed or printed with high-quality at any resolution.
Export Links
![]() By default, links in reports are not enabled when they're exported to PDF. However, "live links", which are those that do not use Action.Link, can be enabled in the PDF output. To enable them, set the Target.PDF element's Show Links attribute to True.
By default, links in reports are not enabled when they're exported to PDF. However, "live links", which are those that do not use Action.Link, can be enabled in the PDF output. To enable them, set the Target.PDF element's Show Links attribute to True.
Live links are created by using a Label element, with its Format attribute set to HTML, and adding <a> tags around the text in its Caption. Here's an example of a valid Caption attribute value for this purpose:
<a href="http://www.logianalytics.com">Visit the Logi Analytics web site</a>
A complete URL must be specified, as shown, not a relative URL.
Export a Report Manually
Here's an example of how to create a report with a link that allows the report to be exported manually:
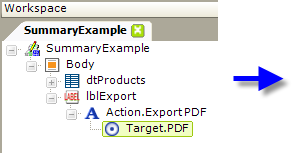
- In your report definition, add an Action.Export PDF element as the child of a Label, Image, Button or Chart element, as shown above.
- Beneath it, add the required Target.PDF element.
- If the report to export is the current report, you need do nothing more. Just save your definition, preview or browse your report, and click the link to export it. It should open in the PDF viewer associated with your browser. It's that simple.
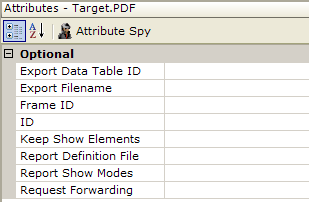
In order to export the current report while maintaining any sort order the user may have applied, set the Target.PDF's Report Definition File attribute to CurrentReport.
- If the report to export is not the current report, specify that report by setting the Target.PDF's Report Definition File attribute appropriately.
- If you wish to export only a specific data table, provide its ID in the Export Data Table ID attribute. This prevents anything else in the report, such as headers or footers, images, etc., from being exported.
What happens: the report is exported to a temporary PDF file which is created in your project folder's rdDownload folder on the web server. The temp file is then opened automatically in your browser. Temporary files are cleaned up the automatically over time.
If you wish to export to PDF in "landscape" page orientation, you should use the Printable Paging element, as described in Create Printable Reports.
Exporting a Report Automatically
The following example, for Logi Info only, shows how to create a process task that exports data automatically:
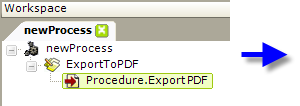
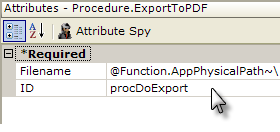
- In your Process definition, add a Procedure.ExportPDF element beneath your Task element.
- In the element's Filename attribute, specify the output path and filename, on the web server, for the exported report. The filename should include the ".pdf" file extension. For example, this value uses a token to export the report to a folder called myExports within your project folder: @Function.AppPhysicalPath~\myExports\myfile.pdf
- Ensure that Write permission has been granted for the folder you are exporting to for the local ASPNET (IIS 5.0) or NETWORK SERVICE (IIS 6.0) account on the web server.
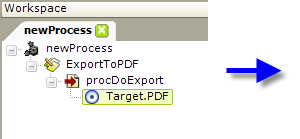
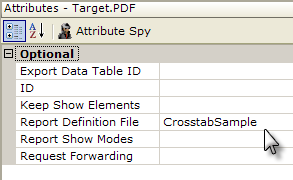
- Add the required Target.PDF element.
- In the element's Report Definition File attribute, you must specify the report to be exported (a blank value is not allowed). The CurrentReport option in the suggested values is not valid in this case, which means that the report will be exported but will not reflect any sort order that the user may have applied before clicking the export link.
- If you wish to export only a specific data table, provide its ID in the Export Data Table ID attribute. This prevents anything else in the report, such as headers or footers, images, etc., from being exported.
What Happens: When your task runs, the specified report will be exported to a temporary file in your project folder's rdDownload folder on the web server; the temp file is then copied to your output file. The file is not opened in your browser automatically.
Add Exported Headers and Footers
Reports exported to PDF are paginated and you may want to have a report header and/or footer appear on each exported page. This can be done, without affecting the normal appearance of the HTML report output in a browser, using the Printable Paging element.
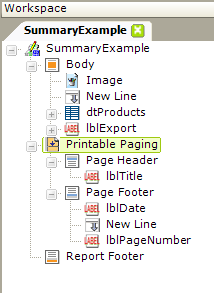
As shown above, the Printable Paging element is added beneath the report's top-level Report element. It has its own Page Header and Page Footer child elements which are containers for Label and other elements. In the example above, the captions of the footer labels could use the @Date.Today~, @Function.PageCount~, and @Function.PageNumber~ tokens.
When the report is run and viewed in a browser, the header and footer under the Printable Paging element will not be visible. When the report is exported to PDF, the header and footer will be visible on each exported page.
Suppose you want to have different-looking headers or footers on an exported page depending on the page number? For example, you might want Page 1 to have a fancy header and the following pages, a less-fancy header. Developers writing reports for the .NET environment can do this using Division elements:
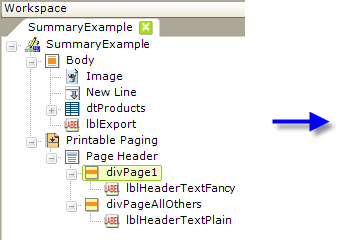
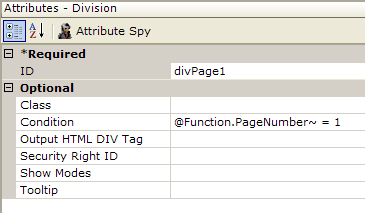
As shown in the example above, place Division elements beneath the Page Header element and then set their Condition attributes to evaluate the PageNumber token. The Condition attribute value for the first division is shown, and the value for the second division might be @Function.PageNumber~ > 1. Each division, and its child elements, will appear in the export then, depending on the page number. The same functionality is available in exported report footers.
![]() Adding a header or footer beneath the Printable Paging element will increase rendering time. Their inclusion causes the export engine to have to make multiple passes through the entire report while generating the PDF, and the performance hit incurred may be acceptable for short reports but not for longer reports. The alternative
is to use regular Report Header and Report Footer elements, which will appear in the report in a browser, rather than the Printable Paging element's Page Header and Page Footer child elements.
Adding a header or footer beneath the Printable Paging element will increase rendering time. Their inclusion causes the export engine to have to make multiple passes through the entire report while generating the PDF, and the performance hit incurred may be acceptable for short reports but not for longer reports. The alternative
is to use regular Report Header and Report Footer elements, which will appear in the report in a browser, rather than the Printable Paging element's Page Header and Page Footer child elements.
Force Page Breaks in Exports
When a report is paginated during an export, it may be useful to be able to force a page break, for example, to ensure that sections of the report start on new pages. This can be done using the Printer Page Break element.
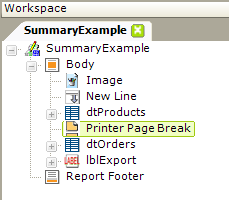
You can add one or more Printer PageBreak elements beneath the Body element to break the exported pages where desired. In the example above, these elements ensure that the "dtProducts" table and the "dtOrders" table start on new pages. When the report is viewed in the browser, however, like the Printable Paging element, the Printer Page Break element has no effect.
![]() The Gecko-based PDF export engine does not recognize printer page breaks. In order to enable them, switch to the older export engine by creating the constant rdPdfRenderingStyle and setting it to MSHTML in your _Settings definition. This will disable some of the benefits of the Gecko engine, such as the exporting of Chart Canvas Charts
as SVG objects.
The Gecko-based PDF export engine does not recognize printer page breaks. In order to enable them, switch to the older export engine by creating the constant rdPdfRenderingStyle and setting it to MSHTML in your _Settings definition. This will disable some of the benefits of the Gecko engine, such as the exporting of Chart Canvas Charts
as SVG objects.
Force a Data Table Row Break
When working with data tables with multi-line rows, developers may want to ensure that rows break cleanly across pages of their PDF exports. In other words, they want to prevent different lines of the same data table row from appearing on different PDF pages. This can be accomplished through CSS:
|
Assigning the above class to a Data Table Column element will create the desired effect.
Fonts and Special Character Sets in Java
Developers creating Logi apps that use the Java libraries and include less commonly-used fonts or special character sets may need to take steps to ensure that those character sets or fonts are also used in their PDF exports. This is done by adding the Globalization element in the _Settings definition, and setting its Java Font Folder attribute:
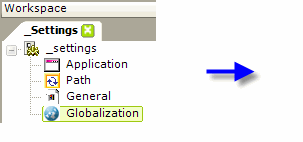
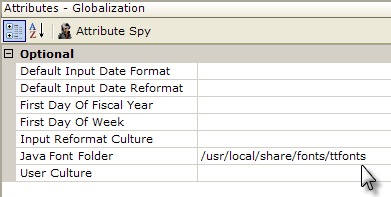
The value of this attribute identifies the folder where TrueType font files, for use with PDF exports, are located. These are required when PDF exports use fonts that contain characters that are not in the ISO 8859_1 character set, such as Arabic, Cyrillic, and Korean language characters. Depending on your Java environment, you may even need to point the Logi application to the location of your regular fonts in order to ensure that they'll be used.
A typical value for a Windows installation might be something like C:\Windows\Fonts. For a Linux installation, the value might be something like /usr/local/share/fonts/ttfonts. This attribute is only functional when creating a Java application.
Hide Elements When Exporting
When exporting to PDF, developers commonly want to hide some of the elements in the report page, like the Export button or link. This can be done very easily using Show Modes.
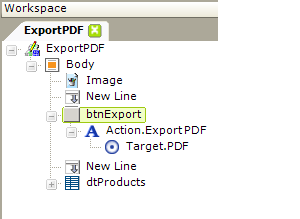
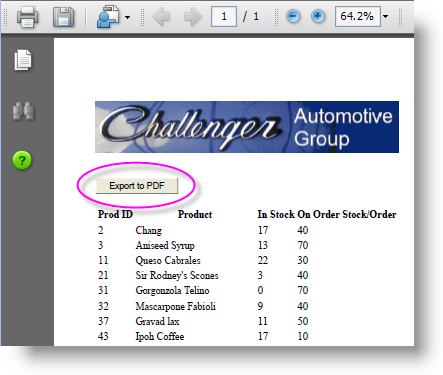
Consider the example shown above. The definition, on the left, includes a button that can be clicked to export the report to a PDF. However, when it's exported, shown on the right, the Export to PDF button appears in the PDF itself. We don't want that button to appear in the PDF.
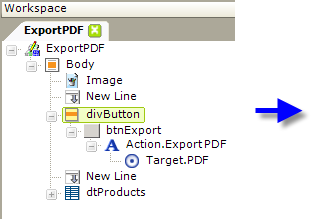
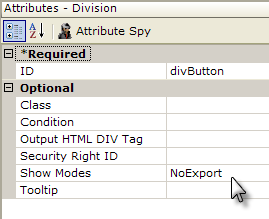
The first step in "hiding" the button in the export is to place the button beneath a Division element. This element supports Show Modes, which the button, by itself, does not. Set the Division element's Show Modes attribute value to an arbitrary string, such as "NoExport", as shown above.
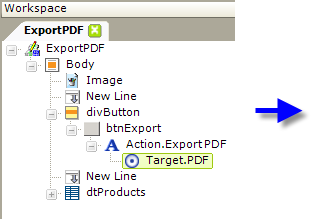
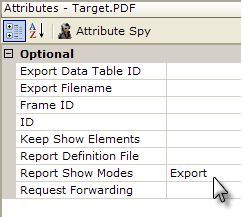
Then set the Target.PDF element's Report Show Modes attribute value to an arbitrary string that does not match the string used in the previous step, as shown above.
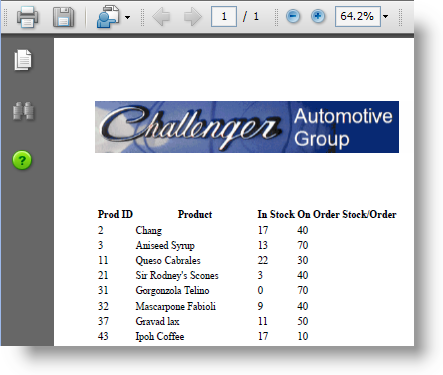
When the report is run and exported, as shown above, the PDF no longer includes the Export to PDF button. Any element whose Show Modes attribute value does not match the Target.PDF element's Report Show Modes attribute will not appear in the export.
Export MoreInfo Rows
If your report contains a data table and you're using the More Info Row element to show/hide additional detail data within the table, you may want the detail rows (when visible) to be exported along with the main table data.

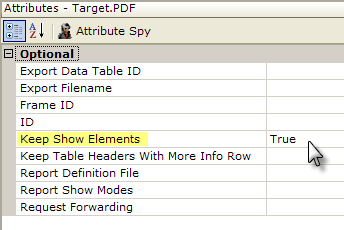
To enable this, as shown above, set your Target.PDF element's Keep Show Elements attribute to True.
Keep Show Elements works with Action.Show Elements (used to show/hide the More Info Row) so that items that have been shown or hidden by the user remain that way when the report is re-displayed or exported.
In addition, you may want to set the Keep Table Headers with More Info Row attribute to True if you want to ensure that all the tables in the report have repeatable table headers, even if they have a More Info Row containing other reports with tables.
It is possible to "nest" More Info Row elements, so that you have one More Info Row element as a child of a table that's a child of another More Info Row. However, be aware that the lowest More Info Row contents may not export correctly, or at all, so we don't recommend this design arrangement if exporting of expanded rows is desired.
Cascading Style Sheet Support
When a PDF export is being generated, the export engine processes any style sheet information along with the report data. The style sheet assigned to the report is used; you do not need to do anything additional to specify the style sheet. Because your browser is used to render the PDF, your browser's style sheet limitations or quirks apply to the exported PDF.
If desired, you can use two different style sheets in your report definition, one for the report and one for the PDF export:
- Select the root element of your report definition and set its Default Show Modes attribute value to an arbitrary string, such as "Normal".
- Add two Style Sheet elements to your report definition.
- Assign one Style Sheet element's Show Modes attribute a value that matches the string used in Step 1, "Normal". This style sheet will be used for the regular HTML report.
- Assign the other Style Sheet element's Show Modes attribute a value that matches the Target.PDF element's Report Show Modes attribute value (both should be an arbitrary string that does not match the string from Step 1, such as "Export".
Now when the report runs in a browser, the first style sheet will be applied; when it's exported to PDF, the second style sheet will be applied.
What if you want to combine the effects from this section and the previous section, i.e. hide some elements and use different spreadsheets? Just remember that the Show Modes attribute can accept several values, separated by a comma. To combine the examples from these two sections, ensure that the root element's Default Show Modes attribute includes both Show Modes values: "Normal,NoExport" (do not enter the double quotes).
Our PDF export engine has full support for all symbols in the Unicode character set. Developers can also apply specific fonts in a CSS class. If you're having difficulty rendering to PDF in your native language, ensure that the fonts specified in your CSS classes support the language.
![]() In earlier versions, only a maximum of nineConditional Class elements beneath a single parent element would be recognized when reports were exported to PDF. That restriction was removed in v11.3.049.
In earlier versions, only a maximum of nineConditional Class elements beneath a single parent element would be recognized when reports were exported to PDF. That restriction was removed in v11.3.049.
We do not recommend that you use absolute positioning of elements through CSS if you plan to export a report to PDF. The export engine will attempt to "fit" your report to its page size and elements so positioned may wind up in unexpected locations.
Debug Exports
In v10.0.259 a new feature was added that allows developers to debug their exports. When the debugger has been set to Debugger Links and the report is run, and then exported, a debug link will be included at the bottom of the exported report:
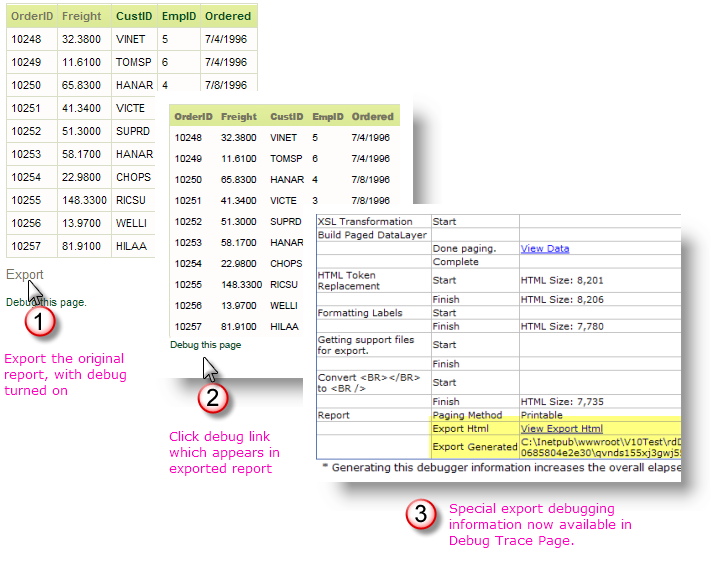
This mechanism allows you to review the export process in more detail and can help to diagnose any problems that may arise.
Export Considerations
The following apply when exporting to PDF:
- If, when you attempt to export to PDF, you receive the error:
The type initializer for WebSupergoo.ABCpdf7.Internal.NDoc threw an exception
it's usually the result of installing the Logi server engine on the wrong type of system. It will occur, for example, if you install the 64-bit version of the Logi engine on a 32-bit system, or vice versa, if you install the 32-bit engine on a 64-bit system. Logi products are available in 32-bit and 64-bit versions; please ensure that you have the correct version installed, based on the system's environment and the IIS configuration for running the Logi application (under Windows 7, you can configure specific applications to run in 32- or 64-bit mode under a 64-bit version of the OS).
- On .NET platforms, the PDF generator used by the Logi Server Engine relies on the presence, on the web server, of code in Internet Explorer. However, the latest generator used in Logi Info and Logi Report v10 is incompatible with IE 6 and attempts to export to PDF will produce the error:
Index was outside the bounds of the array
To resolve this situation, upgrade the web server to IE 7 or IE 8.
- Chart color transparency is not available in exports to PDF. Non-animated charts displayed in Logi HTML reports are rendered as .png images and support transparency, however, when exported to PDF, these charts are rendered as .jpg images, which do not support transparency.
- It's not possible to support links that may use relative URLs in an exported document, as the document can be saved and relocated. As a result, links in general are not supported in exported PDFs. They will work when Studio's Debugging Links feature is turned on during development, but when that link is removed for a production release, they will no longer work.
- Data table column headers will be repeated on each page of PDF export only if there are no sub-elements within the report. This includes Sub Report, Sub Data Table, and More Info Row.
- Data table column headers will be repeated on each page of a PDF export only if there are one or more characters in the column header text. If you want a column that has no header text to be repeated, you must include a single space character in its Header attribute value.
- When exporting to a PDF from a web browser on different computers, the page dimensions may be affected
by different screen resolutions. In addition, when using different browsers, exported reports may
appear differently, as different browsers handle aesthetics differently. Developers may
care to implement a "Printable Paging" element in their report definitions, to set
absolute page dimensions.
- Exports may fail if XHTML reserved characters are included in the data and the most common culprit is the unencoded "&" character. The application will fail and produce an error message that looks like a parsing error. Replacing the "&" character with "&" is an easy solution.
- Exporting reports that include characters that are read right-to-left, such as Arabic, from a Windows server requires that special OS files be installed, as follows: Go to Regional and Language Options in Control Panel; select "Install files for complex script and right-to-left languages (including Thai)" under the Languages tab; when prompted, insert the Windows OS CD and run the install; restart the computer once the files are completely copied and the restart prompt comes up.
Export Errors
The most common error encountered when exporting is "Error Exporting to PDF - HTML render is blank." This error can be caused by a variety of configuration issues, as discussed below:
Insufficient Process Identity Permissions - If the account or identity used by your web server to run your Logi app is not the default (ASPNET, Network Service, or IIS_IUSRS), ensure that the account or identity has full file access permissions to the Logi app directory or any folder outside it that you may have designated as an exported file destination.
Insufficient Temp File Space - Ensure that you have enough space for temporary Logi application files, by shortening your temp file cleanup interval (60 minutes by default).
Insufficient Permissions for Windows/Temp - Ensure that the account or identity used by your web server to run your Logi app has Read/ Write file access permissions to C:\Windows\Temp and the ability to create folders. You may also find that the account is being denied access to its own preferences (C:\Documents and Settings\IIS_IUSRS, C:\Documents and Settings\NetworkService, or similar).
Web Server Unable to Resolve URLs to Itself - This means that when testing using the IP address of another machine, your code will work but when you try and render a web page on the local server using a URL, you may get errors. This is a typically a DNS problem.
IIS 7+: User Profile Not Loaded - Ensure that the Application Pool being used is loading the User Profile:
- In IIS, identify the App Pool used by the Logi application and select its Advance Settings
- Locate the Load User Profile attribute and set it to True
Other - If all this looks fine and you're still seeing problems we strongly suggest putting in ten minutes with Process Monitor, a free advanced monitoring tool for Windows that shows real-time file system, Registry and process/thread activity. In most cases it will flag an obvious cause. We suggest you do not apply Process Monitor filters as problems may not always be quite where you expect them to be.