Use Style Sheets
Cascading Style Sheets (CSS) is a powerful technology that provides developers with the ability to control the appearance of their Logi applications. This article introduces the developer to the process of applying a style sheet to various parts of a report definition and style classes to elements.
- Apply a Style Sheet
- Assign a Style Class to an Element
- Use Conditional Class Elements
- Global versus Local Style Sheets
- Supported Class Definitions
- Overriding Element Style Classes
- Position May Matter
- Prohibited Characters
This topic assumes that the reader is familiar with the techniques for including style sheet files within their Logi application. For more information on style sheets, see Manage Style Sheets.
Apply a Style Sheet
Once a style sheet file has been added to an application's _SupportFiles folder, it's available for use with any of the definitions within that application.

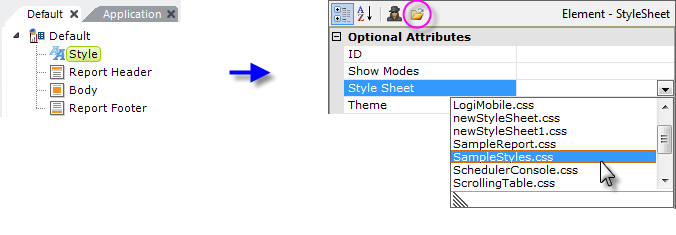
- To apply a style sheet to a specific definition, open the definition in the Workspace, as shown above.
- Add a Style element, if necessary,
- The Style element's Style Sheet attribute will provide a pull-down list of the style sheet files in the _SupportFiles folder. Select the appropriate style sheet for use with this definition.
Note that, once a style sheet has been selected, it can be edited in an external style sheet editor (if you have installed one) by clicking the Open File... link (highlighted) at the top of the Attributes panel. This will launch the application associated in the file system with the .css file extension and open the file in it.
You can assign multiple style sheets but adding multiple Style elements in your definition. If two style sheets contain a class with the same name, then the last one (identified in the Style element further down the element tree) will "win" any conflict, overriding earlier classes.
Assign a Style Class to an Element
One a style sheet has been applied to the report, the next step is assigning a style class to individual elements. Class assignment provides flexibility for the layout and appearance of a report definition.

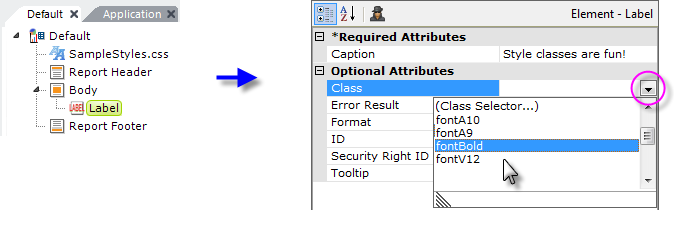
- To apply a style class to an element, select the element in the Workspace panel in order to view its attributes.
- In the Attribute panel, find the element's Class attribute and use the drop-down list (click the down arrow) to select a class from those available in the style sheet assigned to this definition, as shown above. If no classes appear, then no style sheet has been properly assigned.
Alternately, you can type in a style class name, or select it by invoking the Class Selector tool, which is the first entry in the list. You can also assign multiple style classes to an element by entering their names in the element's Class attribute, separated by a space or a comma.
Sample applications installed with Logi managed reporting products include sample style sheets, which you can play with and modify.
Use Conditional Class Elements
The Conditional Class element allows you to dynamically apply different style sheet classes, based on the Condition attribute.

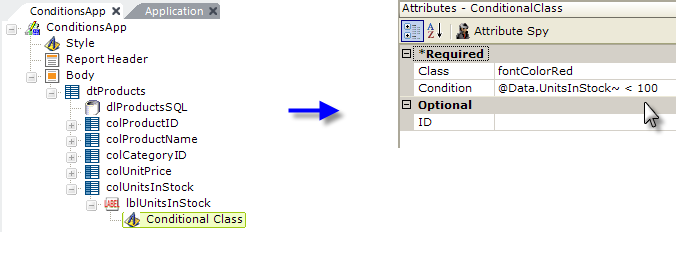
Suppose product managers want to be visually alerted if product stock levels fall below 100 units. In fact, when an item falls below that threshold, they'd like to see its "in stock" count displayed in the table in red, as in the example above.

In the example shown above, the Label in the last data table column displays the number of units in stock. Its font color may be explicitly set in its own Class attribute, or it may be inherited from a parent element or a theme.
To give the product managers what they want, a Conditional Class element is added beneath the Label, and its attributes set as shown above. The expression in the Conditional Class element's Condition attribute sets the threshold and its Class attribute specifies which class to apply if the Condition expression evaluates to True.
Multiple Conditional Class elements can be used beneath a parent element. In this case, the class from the first one of these elements that has a Condition attribute that evaluates to True will be applied; however, any remaining Conditional Class elements below it will not be evaluated.
![]() In earlier versions, only a maximum of nine Conditional Class elements beneath a single parent element would be recognized when reports were exported to PDF. That restriction was removed in v11.3.049.
In earlier versions, only a maximum of nine Conditional Class elements beneath a single parent element would be recognized when reports were exported to PDF. That restriction was removed in v11.3.049.
![]() If you're using a stock Logi Theme (see Themes) and use a Conditional Class element with a complex element structure, like a Data Table, application of the conditional class may override the Theme styling for the entire structure, causing undesired results. Be sure, especially when using a Theme,
to apply conditional
classes at the right level of the element structure. For example, if you want to affect data table rows, make a Conditional Class element the child of each Data Table Column element, rather than making it a child of the Data Table element itself.
If you're using a stock Logi Theme (see Themes) and use a Conditional Class element with a complex element structure, like a Data Table, application of the conditional class may override the Theme styling for the entire structure, causing undesired results. Be sure, especially when using a Theme,
to apply conditional
classes at the right level of the element structure. For example, if you want to affect data table rows, make a Conditional Class element the child of each Data Table Column element, rather than making it a child of the Data Table element itself.
Global versus Local Style Sheets
The presence of the Style element in a report definition indicates a local style sheet, one that applies only to that definition. A Logi application may contain several report definitions, and each definition may use a separate style sheet. However, a global style sheet can be used instead, one that affects all report definitions in an application. The global style sheet is configured in the _Settings definition.

- Double-click the _Settings definition in the Application Panel, so that it opens for editing in the Workspace panel.
- In the Element Toolbox panel, double-click the Global Style element to add it to the definition.
- Select the Global Style element, as shown above, and select a style sheet from the pull-down list in its Style Sheet attribute.
Now all of the applications definitions will be able to use classes from the global style sheet and you need not assign a style sheet to each definition individually.
However, what happens if you assign both a local and a global style sheet, and each has a class with the same name but with a different class definition? As you might guess, the local style sheet's classes will override those of the same name in the global style sheet. This is discussed in more detail in a later section.
Supported Class Definitions
There are several ways in which classes can be defined within style sheets and all of them can be used in style sheets for Logi applications. Logi elements work with CSS classes that are defined using these selectors:
| Selector | Example | How Applied |
|---|---|---|
| 1. An HTML tag | BODY | Applied automatically to the HTML tag. No assignment in an element's Class attribute is necessary. |
2. An HTML tag and a Class name, separated by a period (.) | TD.left | Applied automatically to the HTML tag. For example, if a table element has the class .left applied to it, its cells (which use <TD> tags) will have TD.left applied to them. |
3. A Class name only, preceded by a period (.) | .textLeft | Applied to an element by entering the class name, without the leading period, in the element's Class attribute.
|
4. An Element ID, preceded by the hash mark (#) | #myLabel | Automatically applied to elements with an element ID matching the class name. It's not available to any element with a different ID. No assignment in the Class attribute is necessary. |
The last example, which uses the Element ID, is very useful for applying style to elements which seem to have no mechanism for controlling their appearance. For example, by default, Data Table Column header text is centered and its data is left-aligned, but this technique can be used to right-align them instead.
Overriding Element Style Classes
The acronym "CSS" stands for Cascading Style Sheet, which means that the effects of style sheets, like water, flow "down hill". Classes assigned to elements that are "containers" or parents for other elements, such as divisions, tables, or rows, affect all the elements they contain. The style "flows" down into all the child elements within the container. However, if a style class is individually assigned to one of the child elements, it can override the style set in the parent container element.
For example, you could assign to a Table element a style class that includes text-align: left and causes all text in the table's columns to be aligned to the left. However, for a numeric column, you could assign a class that includes text-align: right to one of the Data Table Column elements (a child element of the Table element). The alignment specified by the Table element's class will be overridden by the Data Table Column element's class.
Similarly, classes from a global style sheet are applied before classes from a local style sheet, so the local style sheet will be the winner (will override) if there are any class duplications in both style sheets.
This inheritance and overriding of style classes doesn't always work the way you expect it to, though, and it can be frustrating. If style assigned to a parent isn't working on the child elements as you expect, ensure that they don't have their own class assignments or try moving the class assignment "up" a level, to the parent container element's parent container.
Some complicated elements, such as the Dashboard, Analysis Grid, and Tabs elements, have their own "internal style sheets" which govern their general appearance. It is possible to affect their appearance by including appropriate classes in your own report-level style sheet that override the default classes used with the elements. By looking around in your application folder, under the rdTemplate folder, you can find these element style sheets and determine which classes to include and thereby override in your own style sheet.
![]() Never change the default style sheet distributed with your Logi product! Always work from a copy.
Never change the default style sheet distributed with your Logi product! Always work from a copy.
There's a caveat, however: future releases of Logi products may include class name changes that could cause your overrides to stop working and require you to update them.
Style Sheets vs Themes
Themes were introduced in v10 and apply a specific appearance to a report page. A Theme includes its own style sheet and it's possible to assign both a theme and an individual style sheet to a report definition. In this case, if the theme's style sheet conflicts with your individual style sheet, then the classes in your individual style sheet will "win."
How Did They Do That?
Not sure how to recreate the styles you see on the web? There are developer tools in most modern browsers, or add-ons, that let you to look "into" web pages to see how style is applied in them. These tools can be very helpful in learning both commonly-used and more esoteric techniques, and also in understanding how classes are "cascading" through the web page. They're are usually invoked using the F12 key.
In addition, unless a style sheet has been "minified" or compacted to an almost unreadable state, you can view it to see its classes. This is a great way to learn CSS tricks and advanced techniques. Look for its URL near the top of an HTML page, copy it, and paste it into your browser's address bar (relative references may require a little extra work), then browse to see the classes.
Position May Matter
Because of the way that the HTML is generated when a Logi application is run, the position of a local Style element in the Element Tree may be significant. It may affect its ability to override classes in other style sheets, especially for individual elements such as Dashboards and Analysis Grids.

Due to the variety involved in this, it's difficult to provide definite rules here. However, if you're attempting to override other classes and find it's not working, and have checked all other variables such as correct spelling, etc., try repositioning the Style element lower down in the element tree so that it's below the element you're trying to affect.
Prohibited Characters
As a general rule, you should avoid using any un-encoded invalid XML characters in your style sheets... even in comments. For example, consider this style class:
BODY {
margin: 0px auto;
background-color: #F6F6F6;
font-family: Verdana, Arial, Helvetica;
text-align: -moz-center; /* centering for Firefox */
text-align: -khtml-center; /* centering for Safari & Chrome */
#text-align: center; /* centering for IE */
}
When used with report definitions that are manipulated by elements, such as Procedure.Send Html Report, that stream the CSS code into the report XML, the class shown above will cause an error, because there's an un-encoded ampersand (&) in the comment.
The best practice is to simply avoid these characters - in the comment above, use of the word "and" would do the trick. You could provide them in encoded form (for example, "&" for ampersand) but in something like a comment, it's less trouble and easier to understand if you just spell it out.