Work with Conditions
The Condition attribute allows a variety of elements to be rendered or hidden, and can control other behavior dynamically, based on evaluation of an expression. This topic shows developers how to implement this very useful attribute.
- Elements Using the Condition Attribute
- Conditions vs. Show Modes
- Evaluate the Condition Expression
- Example: Set Session Variables
- Example: Use the Division Element
- Example: Use the Data Table Column Element
- Example: Use the Conditional Class Element
- Example: Use the Procedure.If Element
Elements with the Condition Attribute
The following elements have a Condition attribute. In the first group, the Condition attribute simply determines whether or not the element and its child elements are rendered on the page:
- Column Cell
- Crosstab Table Label Column
- Data Table Column
- Division
- Local Data
- More Info Row
- More Info Row Column
- Include Frame (also called Sub-Report)
- Row
- Security Filter
- Set Session Variables (v11.4.046)
- Tooltip Panel
These two elements use the Condition attribute slightly differently to control other behaviors:
- Conditional Class - the Condition attribute determines whether the element's style sheet class is applied to all of its child elements that do not have a class specified.
- Condition Filter - the Condition attribute determines which data layer result rows are kept and which are filtered out.
Examples of typical usage are provided later on in this topic.
Conditions vs Show Modes
For the first group of elements mentioned above, it may appear that the Show Modes and the Condition attributes do the same thing: show and hide elements.
However, Show Modes processing occurs in the client (the browser), whereas Conditions are processed in the server. This means Show Modes are more browser-dependent and may not always behave exactly as expected with different browsers, making Conditions a better choice in many situations.
Whereas Show Modes simply hide page parts in the browser, Condition actually keeps them from being generated at all. For example, a data table column hidden using a Condition never has its data rendered; it's never sent by the server to the browser. However, if Show Modes are used for the same purpose, then the data column is rendered and is sent to the browser, where it's then hidden (but might be seen by viewing the page's HTML source code). So, using the Condition in this case is more secure, in that it ensures that data is not sent to the browser at all.
However, Show Modes do not require a roundtrip to the server to make dynamic changes, as Conditions do, so there may be performance implications involved in deciding which mechanism to use.
Condition attributes may also have a performance impact: If an element isn't rendered then, obviously, its child elements aren't rendered either. Child datalayers that aren't rendered, won't run to retrieve data. So Conditions can be used in some cases to determine when, or if, datalayers run.
When exporting, Show Modes include built-in values, introduced in v10.0.169, that make hiding or showing elements very easy, so they may be a better choice for that purpose.
For more information about Show Modes, see Show Modes.
Evaluate the Condition Expression
In all instances, the Condition attribute's value is an expression that evaluates to either True or False. Leaving the attribute value blank equates to setting it to True. Expressions should be in Javascript syntax. VBScript was supported in earlier product versions but has now been deprecated.
Tokens of all kinds may be included in expressions.
Expressions used in Conditions do not require the leading "=" sign which is typically used before formulae in other types of attributes. Values are generally compared using a comparison operator and, when expressions use string or ambiguous data types, both sides of the equation should be enclosed in double-quotes. More complex expressions can be created using logical operators and parentheses.
Here are some example expressions:
| Expression | Comment |
|---|---|
"@Data.LastName~" = "Smith" | Both sides of the equation are known to be strings. |
@Data.CustomerID~ <> 1234 | Both sides of the equation are known to be numbers. |
1 = 1 | This expression can be used to force a True value. |
("@Request.Page~" = "") Or ("@Request.Page~" = "1") | Logical operators can be used. |
InStr("@Data.Categories~", "1") > 0 | Script functions are supported. |
"@Cookie.UserCategory~" = "1" | Cookies are evaluated as text. |
| "@Data.City~" = "Toronto" | When used with the Condition Filter element, causes all datalayer rows where the City column value is not "Toronto" to be removed. |
Complete information about Intrinsic Functions and Operators is available for your reference.
Generally, if the expression contains an error of some kind, such as a data type mismatch or a missing function argument, no error message is displayed in the browser; instead, the Condition just doesn't work as desired. However, an error message will usually be included in the Debugger Trace Page at the point at which the expression is evaluated. So, if your Condition isn't working as you expected, check the Debugger page. For more information, see Debug Reports.
Example: Set Session Variables
![]() The ability to conditionally set Session variables is very useful. These variables with global scope provide a great way to share small amounts of data across report definitions. For more information on session variables, see Work with Session Variables.
The ability to conditionally set Session variables is very useful. These variables with global scope provide a great way to share small amounts of data across report definitions. For more information on session variables, see Work with Session Variables.

As shown in the example above, the Set Session Variables element will run and create Session variables only if the formula in its Condition attribute is true.
Example: Use the Division Element
A Division element is very useful as a container for other elements and, through use of its Condition attribute, allows you to selectively control whether it and its child elements, possibly entire areas of application pages, are rendered.

In the example shown above, three Division elements have been used to contain responses to specific potential errors.
If the Request variable and value ;"ErrorCode=3" is passed to this page when it's called, then the "divErrorMsg3" element will be displayed, along with its child elements, causing an error message to appear on the page. The other two Divisions, which have a similar expression in their Condition expressions but with a comparison to values 1 and 2, will not be displayed.
As mentioned earlier, the effect of displaying or hiding a Division element extends beyond just visibility; for example, datalayers within divisions will not run if the division is not displayed.
Example: Use the Data Table Column Element
A Data Table Column element's Condition attribute allows the column to be displayed or hidden dynamically, based on criteria you set.

The example report definition shown above displays Product information in a data table. However, the display of sensitive data, such as the unit cost, needs to be restricted so that it can only be viewed by specific users. If the application starts by authenticating the user and classifying them using a Session variable before calling this report, sensitive data can be hidden, using a Condition attribute, from everyone except authorized users. The Unit Cost column will not be displayed at all unless the Condition evaluates to True.
Example: Use the Conditional Class Element
The Conditional Class element allows you to dynamically apply different style sheet classes, based on the Condition attribute.

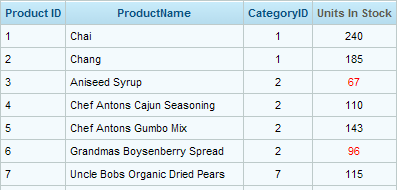
Suppose product managers want to be visually alerted if product stock levels fall below 100 units. In fact, when an item falls below that threshold, they'd like to see its "in stock" count displayed in the table in red, as in the example above.

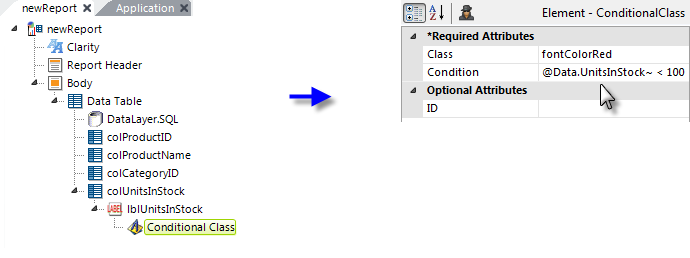
In the example shown above, the Label in the last data table column displays the number of units in stock. Its font color may be explicitly set in its own Class attribute, or it may be inherited from a parent element or a theme.
To give the product managers what they want, a Conditional Class element is added beneath the Label, and its attributes set as shown above. The expression in the Conditional Class element's Condition attribute sets the threshold and its Class attribute specifies which class to apply if the Condition expression evaluates to True.
Multiple Conditional Class elements can be used beneath a parent element (the maximum is nine Conditional Class elements). In this case, the class from the first one of these elements that has a Condition attribute that evaluates to True will be applied; any remaining Conditional Class elements below it will not be evaluated.
Example: Use the Procedure.If Element
The following does not apply to Logi Report as it does not support the use of Process Definitions.
Tasks within Process Definitions can make use of the Procedure.If element to provide conditional processing. This element functions like a typical IF-THEN statement in procedural programming:

In the process definition example above, the "taskExport" task includes a Procedure.If element which has a conditional Expression attribute. If this expression evaluates to True, then all of the Procedure.If element's child elements will execute. If the expression is False, then processing will continue with the next element following the Procedure.If element's child elements. So, as shown above, if the "doExport" Request parameter equals 1, then the yellow-highlighted elements will execute; otherwise they'll be skipped.
Conditions give developers a useful tool, providing the ability to dynamically change their reports and allowing great flexibility when developing Logi reporting applications.