Show Modes
Show Modes is a feature in Logi applications that allows elements to be shown or hidden. This allows report content and appearance to be dynamically customized, which can be used to format reports for special purposes and even lead to a reduction in the number of report definitions you need. This topic discusses Show Modes.
- About Show Modes
- Use Built-in Show Modes Values
- Set the Report-Level Default Show Modes
- Override Default Show Modes with Action.Report
- Toggle Show Modes with Action.Show Element
About Show Modes
The Show Modes feature allows developers to control to the visibility of elements. This has many uses, from customizing reports based on individual user needs to changing the look of a report when it's exported. For example, if your report includes an "Export" button or link, you may not want that button or link to appear in the actual exported report. Or you may want to add special page headers to reports exported for printing purposes, but you don't need them when the report is viewed in a browser.
Many elements have a Show Modes attribute and the value of this attribute determines the element's visibility. If the value is left blank, the element will always be visible.
If they have a value, element Show Modes are compared against a list of values assigned to the entire report (also known as the "Report-level"). Elements with matching values are then handled appropriately (shown or not shown) when the report is displayed.
![]() Don't use Show Modes to attempt to secure data. Show Modes controls element visibility by applying CSS at the client, which mean "hidden" information may actually be in the page's HTML source and available to anyone who views it.
Don't use Show Modes to attempt to secure data. Show Modes controls element visibility by applying CSS at the client, which mean "hidden" information may actually be in the page's HTML source and available to anyone who views it.
As of v10.0.169, certain standardized built-in Show Modes values are automatically included and available at the Report-level. Developers can also provide their own custom values at the Report-level and work with them to handle circumstances not covered by the built-in values. Let's take a look at how Show Modes work.
Show Modes in Action
A custom Show Modes value can be any string the developer chooses to use. For example, "Show Documents" or "ExportMode"; anything that makes sense in the circumstances. These values can be defined at the Report-level in several ways, which are discussed separately in later sections of the topic.
When selecting a Show Modes value, keep in mind that embedded spaces are allowed and that the comparison between element Show Modes values and Report-level values is case-sensitive, so capitalization matters.
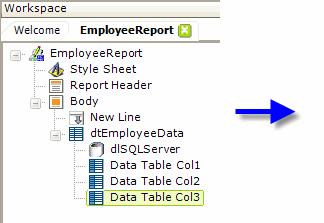
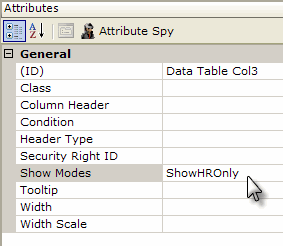
The example above presents Show Modes in action. Assuming that the first two data table columns in the definition have no value in their Show Modes attributes, they will always be visible. But the third column, which may display special employee information, has a Show Modes attribute value, "ShowHROnly". Therefore it will only be visible when "ShowHROnly" has been assigned as a Show Modes value at the Report-level.
Setting or removing this Report-level value dynamically at runtime will make the column appear or disappear. Tokens can be used to provide Show Modes attribute values, for both individual elements and at the Report-level, with one exception: @Data tokens cannot be used.
Additional flexibility is available: multiplevalues can be entered in a Show Modes attribute, separated by commas. Matching any one of them with another Show Modes value will cause an element to be visible.
![]() As browser technology has advanced through the years, the reliability of Show Modes specifically with the example shown above, showing and hiding data table columns, has decreased. Recent versions of IE, Chrome, Safari, and Firefox have "tightened up" their tolerance for quirky HTML syntax and so, if you're using the latest versions of these browsers, we recommend that you use Conditions (discussed
below),
rather than Show Modes, to show and hide data table columns.
As browser technology has advanced through the years, the reliability of Show Modes specifically with the example shown above, showing and hiding data table columns, has decreased. Recent versions of IE, Chrome, Safari, and Firefox have "tightened up" their tolerance for quirky HTML syntax and so, if you're using the latest versions of these browsers, we recommend that you use Conditions (discussed
below),
rather than Show Modes, to show and hide data table columns.
Show Modes vs. Conditions
Logi products also include another mechanism for conditionally showing or hiding elements: the Condition attribute. Many elements have this attribute and the way it works is that if the attribute value, which is typically a formula, is True or blank, the element is visible. If it's False, the element is hidden.
When should you use Show Modes and when should you use Conditions? Here are some factors to consider:
- First, some elements have a Show Modes attribute but not a Condition attribute, and vice versa, so your choice will be dictated by the availability of the attributes. Some elements have both.
- Next, for export purposes, the built-in Show Modes values for exports clearly offer the easiest configuration.
- As mentioned earlier, Show Modes is a client-side effect that uses CSS to hide elements. Conditions, on the other hand, are applied at the server; elements hidden using Conditions are not rendered at all and do not appear in the page HTML. So the results of Show Modes are less secure but do not require a return trip to the server to change the page, while Conditions are more secure but their changes require a full or partial refresh of the page from the server.
- Formulae used with Conditions can include scripting functions so they make certain types of comparisons possible, especially those involving math and dates, and they generally use some kind of data, request, or session token. Show Modes, on the other hand, use literal values, don't generally use tokens, and provide fast string comparisons from a list.
- If you're using Show Modes in a definition with a "super-element", such as the Analysis Grid or Dimension Grid, you must exercise caution to treat the super-element in an independent manner. Super-elements include their own internal Show Modes that may interfere with, or be interfered with by, Show Modes on the report page. If possible, use Conditions when working with super-elements, instead of Show Modes.
- As mentioned above, to show and hide Data Table Column elements when using more recent browser versions, we recommend that you use Condition attributes.
You can find out more about Conditions in Work with Conditions.
Use Built-In Show Modes Values
Introduced in v10.0.169, the built-in values provide the easiest method of working with Show Modes. They work like switches, automatically including or excluding elements from appearing under certain standard situations. These values are:
| Built-in Value | Description |
| All | Element will always be visible |
| None | Element will never be visible |
| rdBrowser | Element will only be visible when report is viewed in a browser |
| rdExport | Element will only be visible when report is exported |
| rdExportCsv | Element will only be included when report data is exported to a CSV file |
| rdExportExcel | Element will only be included when report is exported to an Excel worksheet |
| rdExportPdf | Element will only be included when report is exported as a PDF |
| rdExportWord | Element will only be included when report is exported to a Word document |
![]() When one of these built-in values is used, developers do not need to set a corresponding value at the Report-level. When a specific action occurs, like an export, the application will compare these values to internal system values to determine what action to take.
When one of these built-in values is used, developers do not need to set a corresponding value at the Report-level. When a specific action occurs, like an export, the application will compare these values to internal system values to determine what action to take.
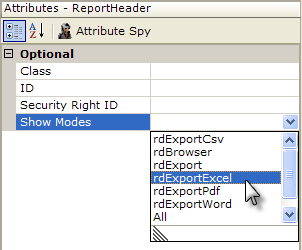
The built-in values are available for selection from a drop-down list in the Show Modes attribute value field, in the Attributes panel, as shown above.
Set the Report-Level Default Show Modes
When using custom Show Modes values, the most direct way to implement it at the report-level is to set the report's Default Show Modes attribute.
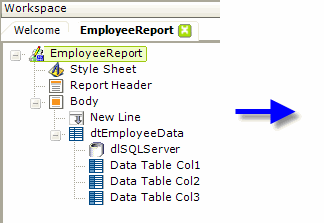
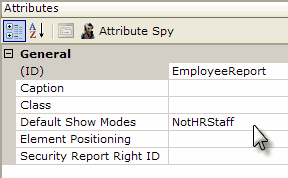
As shown above, the root element of a report definition has a Default Show Modes attribute. A string literal entered in this attribute's value will affect the rest of the report (as a "report-level" value). Going back to our earlier example with the three data table columns, entering the "NotHRStaff" value here will ensure that the Data Table Col3 element will be invisible by default, because the report-level Show Modes value and the element Show Modes value do not match.
Now suppose we want to alter the Show Modes (and column visibility) dynamically. We can do that with a special query string variable named "rdShowModes". For example, if the URL for this report includes rdShowModes=ShowHROnly this will override the Default Show Modes attribute's value and in our earlier example Data Table Col3 will become visible. So, by altering the query string, parts of this report can be made visible on the fly.
Override Default Show Modes with Action.Report
In the previous section we learned that use of the rdShowModes query string variable will override a report's Default Show Modes setting. The query string variable can be included when calling a report by using a number of methods, including Link Parameters. One of the easiest methods is available when using Action.Report and Target.Report elements to call the next report.
The example above shows a simple Label element, used as a link, with Action.Report and Target.Report beneath it. If the Target.Report element's Report Show Modes attribute is given a value, that value will be automatically paired with the rdShowModes keyword and placed in the query string of the URL that calls the target report. The resulting URL would look like this:
http://localhost/myLogiApp/rdPage.aspx?rdReport=EmployeeReport&rdShowModes=ShowHROnly
Great runtime flexibility is possible because the Report Show Modes attribute value can be an @Data, @Request, or other token. Multiple comma-separated values, or tokens, can also be entered.
The following elements have a Report Show Modes attribute that can be used in the same way:
- Action.Refresh Element
- Target.CSV
- Target.IncludeFrameReport
- Target.NativeExcel
- Target.NativeWord
- Target.PDF
- Target.Widget
Toggle Show Modes with Action.Show Element
Developers may have a need to allow the user, at runtime, to alternately show and hide a report section. Two elements, the Division and Action.Show Element, using Show Modes, make this easy to do.
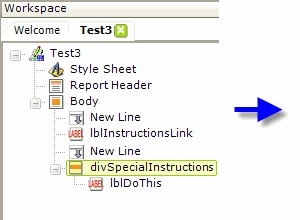
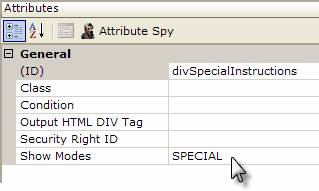
In the example above, a Label element ("lblInstructionsLink") has been placed in a report to be the link for showing and hiding a report section. The section we want to be able to show and hide is contained within a Division element ("divSpecialInstructions"). The Division element's Show Modes attribute is set to an arbitrary value, which causes the section to be initially be hidden. Without this value, the situation would be reversed: the
section would initially be visible.
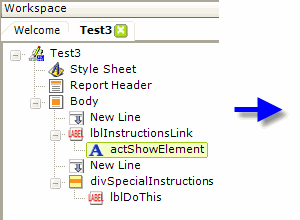
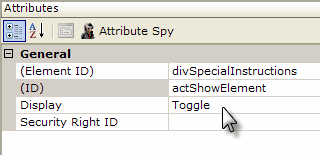
Next, an Action.Show Element element has been added beneath the link Label and its attributes configured as shown. Clicking the link will now result in the Show Modes of the Division element being manipulated, "toggling" it between being shown and hidden.