Work Process Definitions
Logi Info includes a special type of definition, the Process definition, which provide developers with the ability to create subroutine-like tasks that can include conditional processing, branching, error handling, and other advanced features. This topic discusses process definitions and tasks.
- About Process Definitions and Tasks
- Calling and Completing a Task
- If-Then Branching in a Task
- Setting Variables in a Task
- File System Interactions from a Task
- Exporting from a Task
- Using Local Data in Tasks
- SQL Database Interactions from Tasks
- Running Datalayer and Data Table Rows
- Sending Email from a Task
- Error Handling in Tasks
Process definitions are not available in Logi Report.
About Process Definitions and Tasks
Process definitions define tasks. Tasks are built using elements, in a manner similar to assembling a report definition, but they do their work without presenting anything visual in the browser.
Process definitions are similar to report definitions, and they're created and managed in Studio in the same way.
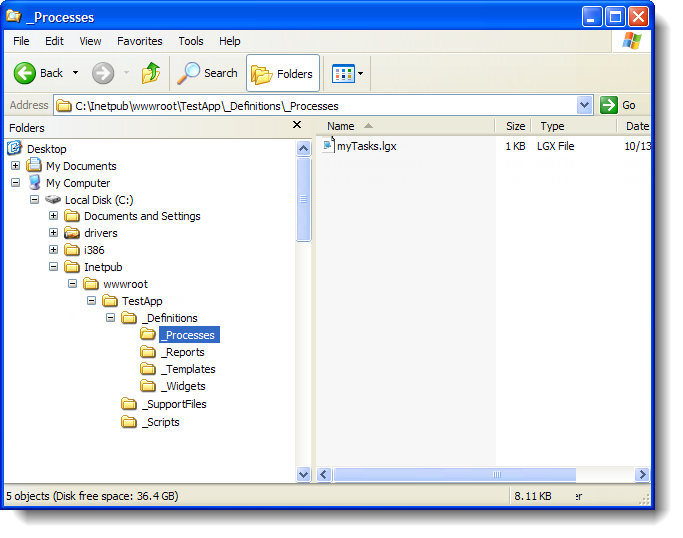
As shown above, process definition files are physically stored in your application folder, beneath the _Definitions folder, in the _Processes folder. They're .LGX type files, and use the same XML source code found in report definition files.
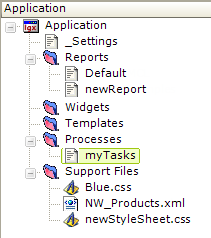
In Studio, in the Application panel, process definitions are listed under the Processes folder, as shown above. You can add a new process definition by selecting and right-clicking the Processes folder.
You may have multiple process definition files in your application. Each process definition file contains one or more tasks. Some developers prefer to put all of their tasks in a single definition file, while others prefer to group tasks, by function for example, in separate process definition files. The choice is entirely up to the developer; the Logi Server Engine will include all process definition files when it runs the app.
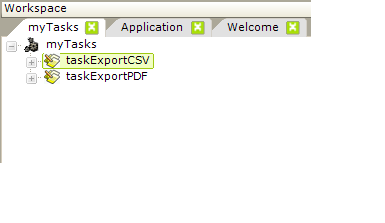
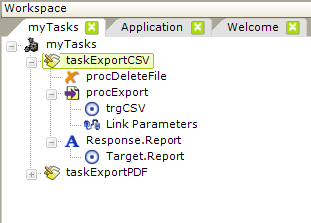
Process definitions contain tasks, which are created by adding a Task element to the definition. The example shown above, left contains two tasks.
![]() In a report definition, the top-to-bottom position of its elements is important, as it correlates to the appearance of the resulting HTML page, but in a process definition, the order of tasks does not matter. However, within a task, as shown above, right, position is important as a task's child elements are processed in a top-to-bottom sequence.
In a report definition, the top-to-bottom position of its elements is important, as it correlates to the appearance of the resulting HTML page, but in a process definition, the order of tasks does not matter. However, within a task, as shown above, right, position is important as a task's child elements are processed in a top-to-bottom sequence.
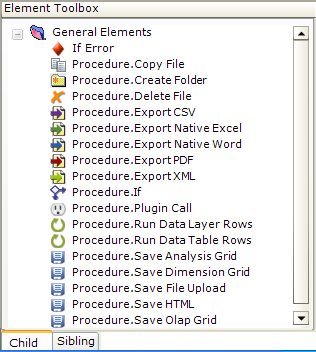
The example above shows some of the elements available for use in a task; they can perform a variety of operations. Some look similar to those used in report definitions and some are unique procedures.
Tasks can accomplish many things that cannot be done in a report definition. For example,
- Direct interaction with the web server file system (to save, copy, or delete files and to create folders)
- Conditional processing using If-Then branching of processing flow
- Row-by-row processing of datalayer or data table contents
- Generic and error-specific error handling (including SQL errors)
- Send email, SMS messages, and Twitter tweets
- Save file uploads and the state of super-elements
- Set and clear client-side cookies
- Create and manage Logi Scheduler tasks
- Terminate session
and they can do many of the same things, such as exports, plug-in calls, database operations, and more.
In v10.0.405, the Security Right ID attribute was added to the Task element to provide greater security control over the running of tasks.
Tasks are essential to use of the Logi Scheduler: when the Scheduler runs a scheduled event, it calls a process task, which then runs the desired report and manages its output. For more information about this, see Introduction to Logi Scheduler.
Process definitions and tasks extend the capabilities of Logi Info apps in many ways, and provide developers with tremendous functionality. The remainder of this topic highlights some of these capabilities.
Call and Complete a Task
In order to use a task, you must call it, and when it completes, it needs to redirect processing to someplace else.
Call a Task from a Report Definition
As Logi report developers, we're used to "calling" one report definition from another report definition, using links, buttons, or events. We can pass information to the next report using Link Parameters and we know that User Input element values are POST'ed to the next report as Request variables. All of this is also true when calling a process task from a report.
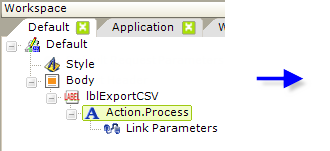
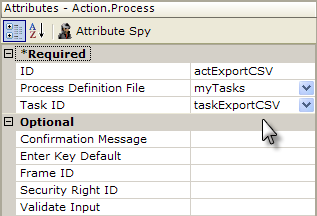
In the report definition shown above, an Action.Process element is used beneath a Label, Button, Image, or Event Handler element to redirect processing to a task. At a minimum, the Action element's attributes identify the Process Definition File and the specific task to be called, and these values can be selected from drop-down lists. A Link Parameters element can also be used beneath the Action element, if necessary, to pass information to the task.
When processing is transferred to the task, the Link Parameters and any User Input element values will be available in the task as Request variables, and can be used there via @Request tokens.
Call a Task from a URL
You can also call a process task directly from a URL, using the following syntax:
http://www.myReportSite.com/myLogiApp/rdProcess.aspx?rdProcess=myTasks&rdTaskID=taskExportCSV&myVar=1
where rdProcess and rdTaskID are required and additional request variables, such as myVar, are optional.
This URL can be used, for example, with an Action.Link element, or even from an external application.
Call a Task from Another Task
Under certain circumstances, you may want to call a second task when the first task completes.
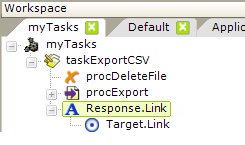
In this case, you would use a Response.Link element, as shown above and, in its Target.Link child element's URL attribute, use the syntax shown in a previous section for calling a task from a URL. You can use @Request tokens right in the URL to forward request variables sent to the first task, so they'll be available in the second task, like this:
http://www.mySite.com/myApp/rdProcess.aspx?rdProcess=myTasks&rdTaskID=taskSecond&myVar=@Request.myVar~
"Recursion" and nesting does not exist in this case; one task just leads to another and the last task needs to handle redirection to a visible web page.
Call a Task at Session Start
Beginning in v10.1.59, you can have a task run automatically when a user session begins (i.e., when the application is browsed by a user for the first time). This allows you to set variables, run procedures, and accomplish any other "startup" work you might want to do, and then redirect the browser to a report definition.
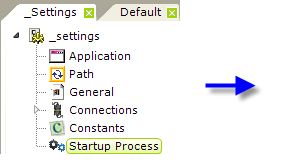

As shown above, the Startup Process element is added to the _Settings definition, and its attributes are set to the desired Process definition and Task ID.
Any Request variables in the query string used to call the application will automatically be available as Request tokens in the process task called with this element. For example, @Request.rdReport~ will contain the name of the report definition.
![]() You can use a Response element at the end of the task to redirect the browser to a specific report definition after the task completes but this is optional. Without one, the browser will be automatically redirected to the application's default report definition.
You can use a Response element at the end of the task to redirect the browser to a specific report definition after the task completes but this is optional. Without one, the browser will be automatically redirected to the application's default report definition.
Complete a Task
When processing is transferred to a task and it completes, there is, unlike a function call, no "stack" to unwind, no built-in return path back to the calling report definition. So you, as the developer, must explicitly transfer processing somewhere else after a task completes. If you don't, your user will be left looking at a blank browser screen!
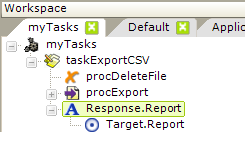
Tasks use Response elements, as shown above, which end a task by redirecting processing to a report, another web page, or (see below) to another task.
If-Then Branching in a Task
Data validation provides a fine example of conditional branching within a task. Tasks are excellent places to do data validation, if you can't, or don't want to, do it in a report definition.
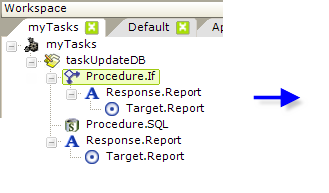

In the task example shown above, we introduce the Procedure.If element, which allows you to use conditional branching in your task. In the example, we want to validate a password entered by the user in a report definition. The Save button in the report calls this task and the Procedure.If element's Expression attribute uses an @Request token to access the password value. If the Expression attribute formula evaluates to True, then its child elements will be processed. If it evaluates as False, the child elements are ignored and the next sibling element down will be processed.
So, if the evaluation is True (the password is less than 8 characters long), we redirect back to the original calling report definition without taking any other action. A further enhancement to this task would be to add a Link Parameters element to pass an error message back to the calling report.
If the evaluation is False, the password length is acceptable and the next sibling element, the Procedure.SQL element, is processed. Note that we're careful to provide a Response element at the end of the task to redirect processing elsewhere.
You can have multiple Procedure.If elements in a task and they can be nested. They're useful, of course, for many other purposes besides data validation and can be used any time you want to direct processing flow based on an expression.
Set Variables in a Task
As mentioned earlier, the values of Request variables passed to a task are available using @Request tokens. Imagine a case where you want to work with one of those values but you need to alter it in some way first. Session variables can be used in a task for this purpose.
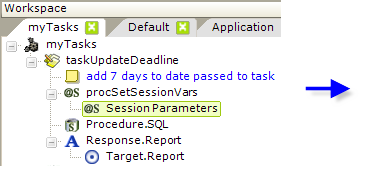

In the example above, a Procedure.Set Session Vars element has been added. The new session variable it creates applies the DateAdd function to a date passed as a Request variable. Now, in the Procedure.SQL element, we can use the token @Session.newDeadline~ to update a database with the new date.
Session variables set in tasks are, of course, globally available and can be accessed later in report definitions and other tasks.
File System Interactions from a Task
Tasks can include Procedure elements that allow direct manipulation of files on the web server or network-connected drives. To do this, of course, the account used by the web server to run your Logi application needs to have appropriate file access permissions. Here are the elements available for file system interactions:
| Element | Description |
|---|---|
| Procedure.Compress File | Compresses the named file, using the .ZIP format. You must specify both the source and destination file names. Wild cards are allowed, see below. (v10.0.269) |
Procedure.Compress Folder | Compresses the named folder and its contents using the .ZIP format. Maintains the hierarchy of any sub-folders and files within it. You must specify both the source folder name and destination file name. (v10.0.269) |
Procedure.Copy File | Copies a single file. You must specify both the source and destination file names. If it already exists, the destination file is overwritten without warning. |
Procedure.Create Folder | Creates a new file system folder. No error occurs if the folder already exists. |
Procedure.Delete File | Deletes a file. No error occurs if the named file does not exist. |
| Procedure.File Exists | Returns True and executes its child elements if the named file is found in the web server file system. (v10.0.337) |
| Procedure.Folder Exists | Returns True and executes its child elements if the named folder is found in the web server file system. (v10.0.337) |
Procedure.Uncompress File | Expands a compressed .ZIP file. You must specify the compressed file name. If no destination folder is specified, the files are written to the application's rdDataCache directory. Wild cards are allowed for selectively identifying files to be uncompressed, see below. (v10.0.269) |
Procedure.Uncompress Folder | Expands a compressed folder and its contents. Maintains the hierarchy of any sub-folders and files within it. You must specify both the source file name and the destination folder name. (v10.0.269) |
You may use tokens, such as @Function.AppPhysicalPath~ and @Data.FileName~, to provide the part or all of the file or folder names required in these attributes. Valid characters that can be used in file and folder names are those allowed by the web server operating system.
The wildcards characters * and ? can be used where mentioned in the descriptions above. For example, to compress all files in a folder, leave the Files To Compress attribute blank or enter *.* and to compress only XML files that start with an S, enter S*.xml.
Export from a Task
Developers can create tasks with procedures that export reports or data. This is done in the task by running an existing report definition and then exporting it or its data.
![]() There is a difference between exporting reports from a report definition and from a process task: an export from a report definition is written out as a temporary file in your application's rdDownload folder and then that file is opened in your browser. The temporary file is automatically deleted later. However, an export from a process task is saved as a file in a location, and with the filename,
you specify
and it's not opened automatically in the browser. And it's not considered a temporary file, so it's not deleted later automatically.
There is a difference between exporting reports from a report definition and from a process task: an export from a report definition is written out as a temporary file in your application's rdDownload folder and then that file is opened in your browser. The temporary file is automatically deleted later. However, an export from a process task is saved as a file in a location, and with the filename,
you specify
and it's not opened automatically in the browser. And it's not considered a temporary file, so it's not deleted later automatically.
So, exporting from a process task is useful when you need to save a file to the web server for later use, such as:
- Archiving data or reports
- Creating attachments to be sent with emails
- Building a custom Data Cache (XML export) that can be used later by your reports
More information about exporting can be found in our exporting topics.
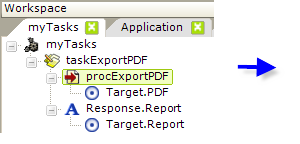

As shown in the example above, an export procedure such as Procedure.Export PDF is added to a task, and its Filename attribute is set to the fully-qualified path for the export file, including the file name and extension. The account being used to run the Logi app must have Write permissions to the storage location, and the @Function token for the app path can be used here, as shown.
The Target.PDF element is used to set options related to the data table to be exported, report definition to be used, etc. If none of these options are set, the "Current Report" definition - the one that called the task - will be exported in its entirety.
The elements for exports to other formats (Word, Excel, CSV, etc.) operate in a similar fashion.
DevNet includes a sample application that demonstrates exporting using process tasks.
Use Local Data in Tasks
Beginning in v10.1.59, the Local Data element is available for use in Process definitions. It operates there in the same manner that it does when used in Report definitions and can be accessed from any task in the definition using an @Local Data token. For a full explanation of this element, see Introducing Datalayers.
SQL Database Interactions from Tasks
Tasks also provide the the ability to interact with SQL databases, including the so-called "write back" capability developers often require to update databases. Both SQL Queries and Stored Procedures are supported with special elements, and all valid SQL commands, including INSERT and DELETE, can be used.
Use SQL Statements
Implementing a direct SQL statement in Process task is easy and tokens can be used to "parameterize" the statement:

In the example shown above, we see a task that includes the Procedure.SQL element. The complete SQL Command in the example is:
UPDATE Products SET UnitsInStock = @Request.inpHidden~ WHERE ProductID = @Request.ProductID~
All valid SQL statements can be executed. The Handle Quotes Inside Tokens attribute handles tokens that might have embedded single quotes, such as the text Trail's Head. When set to True, token values in the SQL Command will be wrapped in single-quotes, "doubling" them so the syntax will be valid. The default is False.
Tokens for string values should be wrapped in quotes to conform to your database SQL syntax. For example, if you'd use a query with a WHERE clause including quotes, like this:
...WHERE user_lastname = 'Smith'
Then with tokens it would be:
...WHERE user_lastname = '@Request.UserName~'
The SQL Return Type attribute specifies the return value type of the SQL operation:
- If RowsAffected (the default) is selected, the operation will return the number of rows changed by any UPDATE, INSERT, or DELETE commands. You can access this value later in the task using the special token @Procedure.<yourProcedureSQL_ID>.RowsAffected~.
- If FirstRow is selected, the first row of any result set from the SQL operation is returned. You can access the values of the returned row columns later in the task using tokens in this format: @Procedure.<yourProcedureSQL_ID>.<ColumnName>~.
The example above shows an UPDATE operation but queries using SELECT statements are, of course, also supported. Values returned by a query using Procedure.SQL are limited to those in the first row, as described above. If you want to return multiple rows, use Procedure.Run DataLayer Rows and a datalayer, as described in the next major section.
The If Error element can be used beneath Procedure.SQL to handle errors that may occur. The actual error message text is available in this token: @Procedure.<yourProcedureSQL_ID>.ErrorMessage
Procedure.SQL elements can also be used beneath Procedure.Run Data Table Rows and Procedure.Run DataLayer Rows, which are discussed in the next major section.
Use SP Parameters
The SQL Parameters and SQL Parameter elements can be used to include tokenized parameters, if you prefer not to embed tokens directly into the SQL statement. This approach also allows you to enforce a data type for the parameter value and also offers protection against SQL Injection attacks.
To use parameters, you write your SQL statement using "placeholder" notation. The exact syntax depends on your database and the Connection element you're using. For example, if you're using Connection.SQLServer, you use this notation:
SELECT * FROM Customers WHERE State=@state AND City=@city
and the ID attribute of each SQL Parameter element must match a placeholder name. So, in the example, the value of an element with an ID of state will replace the @state placeholder at runtime.
Similarly, if you're using Connection.Oracle, you use this notation:
SELECT * FROM Customers WHERE State=:state AND City=:city
and, as before, the ID attribute of each SQL Parameter element must match a placeholder name.
If you're using Connection.OLEDB, you use this notation:
SELECT * FROM Customers WHERE State=? AND City=?
Unlike the previous examples, these are positional parameters so, at runtime, placeholders in the statement will be replaced, starting with the first placeholder, by the values specified in the SQL Parameter elements, based on the elements' top-to-bottom order in the definition. The element IDs are ignored.
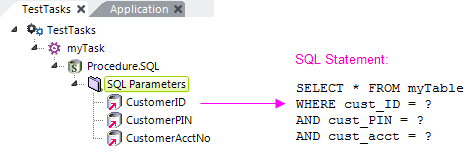
The example above illustrates the relationship, in this scenario, between SQL Parameter element order and placeholders in the statement.
![]() SQL Parameters will not work when using Connection.ODBC.
SQL Parameters will not work when using Connection.ODBC.
Consult your database documentation for specific placeholder information.
Use Stored Procedures
We highly recommend the use of Stored Procedures, especially when updating the database. It's the most secure method and usually offers the best performance.
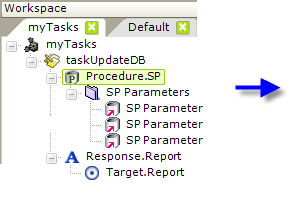
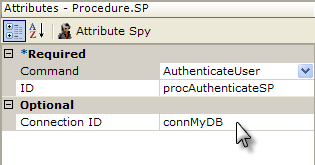
In this example, a Procedure.SP element has been added to task, in order to invoke a Stored Procedure. Its attributes are set as shown to connect to, and run, the stored procedure. The Command attribute includes a pull-down list of all of the stored procedures available through the database connection specified.
Two other types of elements can be used if the stored procedure requires parameters: the SP Parameters element, which is just a container, and one or more SP Parameter elements.
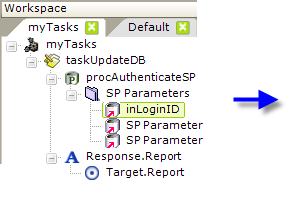
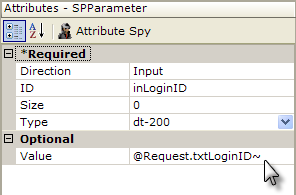
The first SP Parameter element has been configured, as shown above, as an Input parameter. It will pass the Login ID value from a Request variable to the stored procedure. Its Direction attribute is set to Input, and its Size attribute value is set to 0, which causes it to be adjusted to the correct size automatically at runtime. A second SP Parameter will be configured similarly, to pass a password.
The relationship between parameters in the task and the parameters in the stored procedure is determined solely by their order, not by their IDs.
Pre-v10.0.205 SP Return Values
Prior to v10.0.205, if a RETURN statement is included in the stored procedure, it will return a "return value". This is usually an integer value, and it can be accessed using the token: @Procedure.procAuthenticateSP.rdReturnValue~
Post-v10.0.205 SP Return Values
In release v10.0.205, the Procedure.SP return mechanism was expanded with the addition of a new attribute, SP Return Type, which has two possible values:
When configured as ReturnValue (the default) only the value of the first column of the first row of data returned by the stored procedure, if any, is available. Additional columns or rows are ignored. The returned value can be accessed with an @Procedure "rdReturnValue" token, for example: @Procedure.myProcedureId.rdReturnValue~
When configured as FirstRow, the entire first row of data returned by the stored procedure is available. Access the values of the first row with @Procedure tokens. For example: @Procedure.myProcedureId.someColumnName~
Use SP Output Parameters
Another approach for returning data is for the stored procedure to return output parameters and the task can be configured to receive them:
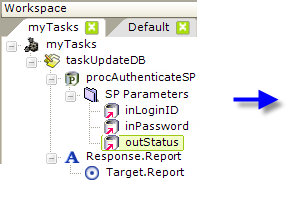
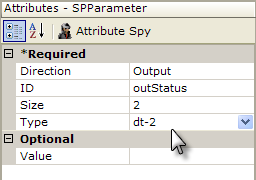
To accomplish this, the example task has now been given an SP Parameter element that's configured as an output parameter. Note that its Direction attribute is set to Output. The stored procedure will return a value to the task, using this parameter. In this case, the Size attribute must be set to the number of bytes for its data type, or the maximum expected to be returned.
Once again, the relationship of task and stored procedure output parameters is determined solely by their order, not their IDs.
The value returned in the output parameter is available using a special token, shown below:
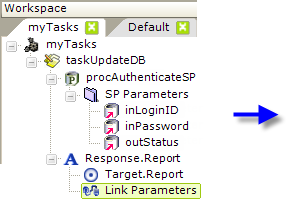

A Link Parameters element has been added to the task so that we can pass the results back to a report. Its Status attribute has been configured to use the special token that holds the value passed to the output parameter element.
DevNet includes a sample application that demonstrates the use of a process task to update a table.
Run Datalayer and Data Table Rows
Tasks offer developers the ability to iterate through all of the rows in either a datalayer or a data table in a report definition, processing the data in each row separately.
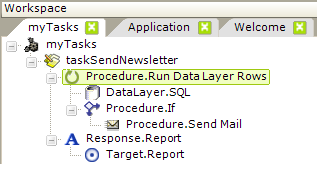
In the example task shown above, we'd like to look through a contact database table and send out an email newsletter for every record that has an email address. Here's a description of the purpose of each element used:
- The Procedure.Run Data Layer Rows element is the parent container that causes the iteration through each row in the datalayer once data has been retrieved.
- A DataLayer.SQL element is used to query the database table, returning all of the records into the datalayer. Other elements beneath the Procedure.Run Data Layer Rows element can access data values in the datalayer using standard @Data tokens.
- The Procedure.If element is configured so that its child element, Procedure.Send Mail, will run only if the email address column in the current datalayer row is not Null.
- The Procedure.Send Mail element uses the token @Data.EmailAddress~ in its To Email Address attribute to send out an email for the current datalayer row.
- The Response.Report element, of course, redirects processing somewhere else when the task completes.
Let's look at another example: imagine a report definition that includes a data table and one of its columns has an Input Text element displayed in every row, like this:
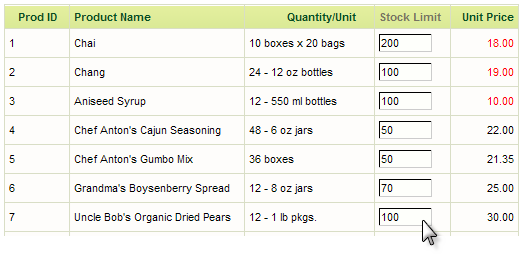
At runtime, the user can enter numbers to adjust the table values. But, how would you update the database after multiple changes have been made and the page is submitted? That's right - you can do it with a task.
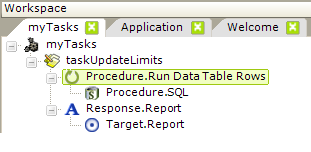
Here's a description of the elements needed:
- The Procedure.Run Data Table Rows element is the parent container that causes the iteration through each row in the data table named in its Data Table ID attribute. If the attribute is left blank, the first table found in the application that includes user input elements will be used.
- The Procedure.SQL element is used to issue an UPDATE command to the database, using an @Request token to access the value of the Input Text element for each table row.
- The Response.Report element, of course, redirects processing somewhere else when the task completes.
Send Email from a Task
Developers often need the ability to send email messages, separately or in bulk, and a process task can be used to accomplish this.
An example in the previous section demonstrated one method of sending out a mass mailing, but there's a second method you may want to use instead.
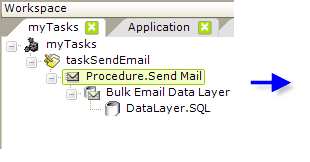
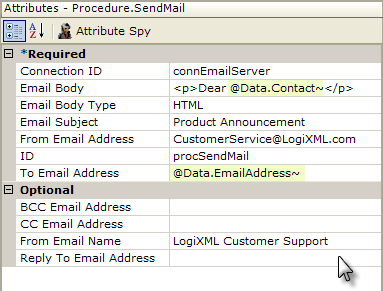
- Add a Procedure.Send Mail element to your task, as shown above, and set its attributes as desired to configure the message to be sent. Note that the actual message (the "Email Body") can be formatted as Plain Text or HTML. Use @Data tokens to reference the data values that will be coming from your data source.
- Beneath it, add a Bulk Email Data Layer element, which iterates through its child datalayer rows.
- Beneath it, add an appropriate Data Layer element to retrieve the data with the addressing information. If possible, use a query that includes a filter to eliminate records that have Null email addresses.
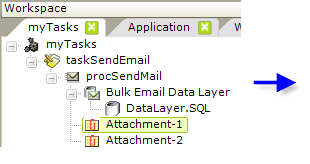
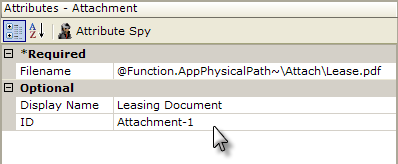
- Optionally, add one or more Attachment elements beneath the Procedure.Send Mail element:
Set its Filename attribute to the fully-qualified file path and file name of the file to be attached. Note that the @Function token for your application folder can be used here, as shown above. Set the Display Name attribute to the text that you wish to appear identifying the attachment in the recipient's mail reader.
Keep in mind that your mail server may impose restrictions on the size of file attachments.
In v11.0.727 the Procedure.Send Mail element was updated to support TLS/SSL encryption, allowing GMail to be used as an SMTP server. Set the related Connection.SMTP element's SMTP Authentication Method attribute to 3 to invoke this, and its SMTP Port attribute may need to be set to 587.
Caveat: Sending out thousands of emails may have an impact on your network bandwidth and your email server performance, so use caution before "opening the floodgates" and sending out a zillion messages!
DevNet includes a sample application that demonstrates the use of a process task to send email.
Error Handling in Tasks
Error handling is an important function for any application and tasks include a special element for this purpose.
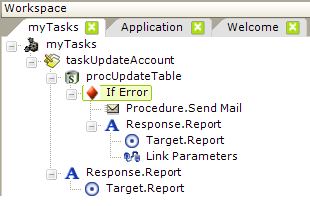
The If Error element allows you to handle errors that occur when running procedures in a task. The example above shows a typical implementation: if an error occurs when a table update is attempted, an email alert will be sent out and a redirect to a report page will occur (possibly back to the page that called the task). The actual error text can be passed to that report page as a Request variable.
The placement of the If Error element is important. Errors will "bubble up" through procedures until an If Error element is found, and if not found, up through tasks and the definition itself. You have the choice of placing your error handling elements in different locations to handle different situations. Without an If Error element, the application will return an error page if an error occurs.
You may use multiple If Error elements in a task, if desired. As mentioned in the previous paragraph, you can access the error message text. This is done using this special token: @Procedure.yourProcedureID.ErrorMessage~
Because the element ID of the procedure is part of the token, it limits the scope of the error message availability. You can also use
@Function.LastErrorMessage~ if you prefer, and its scope is application-wide.
The If Error element has an Error Filter attribute, which allows individual If Error elements to handle different errors. Set the Error Filter attribute value to any text found within the error message. If the text is found, the If Error element will handle the error. If not, the error will be ignored and the error will "bubble up." This allows you to target specific errors, and to react to them differently, if desired. If you use this approach, you'll probably want to include a final If Error element without any Error Filter text, to catch any errors not specifically handled by your other handlers.
The Error Filter also allows you to ignore errors, by specifying their error message text and then placing no child elements beneath the If Error element. When that error occurs, it will be considered "handled" and processing will continue with the next element after the failed procedure element.