Use Logi Scheduler
The Logi Scheduler provides the ability to execute reports and other activities on a scheduled basis. Developers can build Logi applications that take advantage of Scheduler features; this topic provides guidance in the use of these features.
- Quick and Easy Report Scheduling
- Developer Overview
- Communicating with the Scheduler
- Get Data with DataLayer.Scheduler
- The Schedule Element
- Create and Edit Scheduler Tasks
- Work with Process Parameters
- Run Tasks Every X Hours or Minutes
- Run and Deleting Scheduler Tasks
- Scheduler Results and Logging
- Scheduled Task Data Storage Options
- Implement Multiple Scheduler Instances
- Customize Scheduler UI Appearance
Quick and Easy Report Scheduling
Developers or administrators who just want to run Logi reports or tasks on a scheduled basis can do so by:
- Installing the Logi Scheduler,
- Downloading the SampleSchedulerCons Application (in the General category) from DevNet,
- Registering the sample application with your web server via Logi Studio,
- And running it to create and manage Scheduler tasks.
The remainder of this topic discusses how to configure the Scheduler, and how to build user- and administrative-scheduling applications.
Developer Overview
Developers who have not already done so are encouraged to read Introduction to Logi Scheduler in order to get a basic understanding of the Scheduler product and its installation before proceeding.
From a development perspective, the Logi Scheduler consists of three parts:
- An autonomous service that automatically runs scheduled reports and other Logi application activities without direct user interaction (much like the Windows Task Scheduler).
- A database of scheduled tasks which is read and updated by the Scheduler service.
- Special elements that let developers build definitions for creating and managing the scheduled task database. These may be used to create administrative tools for system admins, or they may be incorporated into reports so that end-users can do their own runtime scheduling. The Schedule element, for example, is a "super-element" with built-in user input controls for presenting scheduled task data.
The first half of this topic focuses on Part 3, describing techniques for writing definitions that interact with the Scheduler and its database. The rest of it discusses some of the operational details of configuring and managing the Scheduler service.
Communicate with the Scheduler
The first step in using the Scheduler with a Logi application is to create a connection to the Scheduler service or daemon.
The Connection.Scheduler element is used, in a Logi application's _Settings definition, to create this connection. The ID of this element is then used in other elements to connect them to the service.
The Scheduler has its own communication settings and Connection.Scheduler must be configured to match them in order for a connection to be made.
![]() Beginning with v11, for enhanced security, any Logi application that contains Process Tasks that will be called by a Logi Scheduler instance in a different Logi application needs to have a properly configured Connection.Scheduler element connecting it to the scheduler.
Beginning with v11, for enhanced security, any Logi application that contains Process Tasks that will be called by a Logi Scheduler instance in a different Logi application needs to have a properly configured Connection.Scheduler element connecting it to the scheduler.
Default values are provided that allow communication "out of the box", but in case you wish to change them, the Connection.Scheduler attributes are:
| Attribute/Setting | Description |
|---|---|
| ID | (Required) Specifies a unique value identifying this connection; used by other elements to access the connection. |
| Pass Key |
(Required) Specifies the pass key, a password-like string used to secure access to the Scheduler service. Must match the PassKey value set in the Scheduler service's _Settings.lgx file. |
| Port |
Specifies the TCP/IP port used to gain access to the Scheduler service. Must match the Port value set in the Scheduler service's _Settings.lgx file. The ability to have multiple instances of the Scheduler service was introduced in v11 and a comma-delimited list of port values can be entered if multiple instances are being used. The order of the port numbers in the list must correspond with the order of names in the Server Name attribute. |
| Server Name |
Specifies the name or IP address (IPv4) of the server computer where the Scheduler service is installed. The ability to have multiple instances of the Scheduler service was introduced in v11 and a comma-delimited list of server names or IP addresses can be entered if multiple instances are being used. The order of the names in the list must correspond with the order of port numbers in the Port attribute. |
The Scheduler's Settings File
In most cases, communication with the Logi Scheduler will work fine without any further configuration, using default values. However, details of the settings file are presented here in case custom configurations are desired.
The Scheduler's settings are stored in its own settings file. In a Windows environment, using default installation options, this is:
(.NET) C:\Program Files\LogiXML IES Dev\LogiXML Scheduler Service\_Settings.lgx
(Java) C:\Program Files\LogiXML IES Dev\LogiXML Scheduler Service Java\_Settings.lgx
In a Linux/UNIX environment, the Scheduler folders and files are installed in a folder selected by the developer, and the _Settings.lgx file can be found there.
|
The _Settings.lgx file's default contents, shown above, contain a RemoteApi tag with Port and PassKey values, which need to match the Connection.Scheduler element attribute values discussed earlier.
In addition, the file can contain these WebRequest values, which can be altered manually if necessary:
- Timeout - Specifies the number of minutes allowed for a task to complete before the
Scheduler abandons it. Default value: 20 minutes.
- ConcurrencyLimit - (v10.0.169+) Specifies the maximum number of concurrently running requests/tasks allowed. When the limit is reached,
additional scheduled tasks must wait for one of the other running tasks to
complete before it can start. Default value: 5 tasks.
- Stagger - (v10.0.169+) Specifies the number of seconds to wait before starting the next request/task. Default value:
1 second.
- LoggingLevel - (v11+) Specifies the logging level for events, using these values: ERROR, WARNING, INFO, DEBUG, or NONE.
The Scheduler Service for .NET logs operational events to the Windows Event Log, under "LogiXML"; the Scheduler Service for Java logs events to <installFolder>/Log/LogiScheduler.log. The INFO value provides a moderate amount of detail about Scheduler events, while the DEBUG value records every web request made, including creating a task, querying the task list, getting a task, updating a task, deleting a task, and many details about running tasks. This value should not be used casually, as it will generate many, many log entries. Default value: WARNING. - PollingFrequency - (v11+ - not shown) Specifies the number of seconds that elapse before the database is polled for a task to run. This should normally not be modified. Default value: 60 seconds.
![]() You may need to stop and restart the LogiXML Scheduler service or daemon after saving changes to this settings file.
You may need to stop and restart the LogiXML Scheduler service or daemon after saving changes to this settings file.
The settings file also includes an explanatory comments section. In v11, this section includes example tags for configuring connections to database servers. These are used if you want to store your schedule task data in a networked SQL database rather than in the standard, file-based database. Information about configuring these connection can be found in this topic, in the section Scheduled Task Data Storage Options.
Once you've added and configured a Connection.Scheduler element to your Logi application, you're ready to begin working with the other Scheduler elements.
Get Data with DataLayer.Scheduler
A special datalayer element, DataLayer.Scheduler, is used to retrieve data from the Scheduler database. The query it uses can be restricted by providing default values for some of the element's attributes. When examining or editing a Scheduler task with User Input elements, this datalayer is typically used with Local Data so that the data retrieved is widely available to other elements in the definition, using @Local tokens. It can also be used beneath a Data Table to display all Scheduler tasks.
DataLayer.Scheduler has the following attributes:
| Attribute | Description |
|---|---|
| Connection ID | (Required) Specifies the element ID of a Connection.Scheduler element in the _Settings definition. Connects the datalayer to the Scheduler database. |
| ID | Specifies a unique element ID. |
| Include Task Result Error Message | Specifies whether task error messages will be included in the data. If set to True, the datalayer will include an ErrorMsg column containing error message text from any failed Scheduler tasks. The default value is False. |
| Scheduler Application ID | Specifies the first 20 characters of the name of a Logi application or any other categorizing text developers want to use. If not blank, acts as a Condition Filter and limits the datalayer query results to Scheduler tasks with matching values for this column. Max: 20 characters. |
Scheduler Custom Column 1 | Specifies a value of any kind with a maximum length of 1,000 characters. If not blank, used to limit the datalayer query results to Scheduler tasks that match this column's value. |
| Scheduler RunAs | Specifies a User Name value to be used when a Scheduler task is executed and Logi Security is enabled. The name is provided to Logi Security in order to ensure that reports are run with appropriate security control. Leave blank if Logi Security is not enabled. Max: 50 characters. |
| Scheduler Task ID | Specifies the unique ID of a Scheduler task (these IDs are created and returned when new Scheduler tasks are created). If not blank, used to limit the datalayer query results to Scheduler tasks for the specified task ID. |
| Scheduler Task Name | Specifies a unique name given to a Scheduler task, generally for easier task identification. If not blank, used to limit the datalayer query results to Scheduler tasks for the specified task name. Max: 50 characters. |
When DataLayer.Scheduler runs, it retrieves the following data columns for each stored Scheduler task:
| Column | Description |
|---|---|
| TaskID | Unique Scheduler task ID. |
| ApplicationID | Logi application name. |
TaskName | Descriptive name for Scheduler task. |
| CustomColumn1 | Value selected by developer. |
| CustomColumn2 | Value selected by developer. |
| IsDisabled | "True" or "False" - Indicates state of this Scheduler task; disabled tasks are not executed. |
| ScheduleXML | XML data containing date-time-interval specific information. Example: |
| ProcessXML | XML data containing Process-specific information. Example: |
| TimeCreated | ISO format timestamp for creation of this Scheduler task. |
| TimeModified | ISO format timestamp for modification of this Scheduler task. |
| TimeLastRun | ISO format timestamp for this Scheduler task's last run. |
| TimeNextRun | ISO format timestamp for this Scheduler task's next scheduled run. |
| RunAs | The User Name to pass to Logi Security when the Scheduler task is executed. Ignored when the Schedule task runs if Logi Security is not enabled. |
| WasSuccessfulLastRun | "True" or "False" - Indicates if last run of this Scheduler task was successful (i.e. occurred without errors). |
| TaskResults | Fully-qualified path and name of task results file on the server. Will not exist if tasks have never been run. Examples: |
| IsRunning | "True" or "False" - Indicates if this Scheduler task is currently running. |
ErrorMsg | If the datalayer's Include Task Result Error Message attribute is set to True, this column will include the error message text for any failed tasks. |
| ScheduleDescription | Plain language description of date-time-interval information for this task: |
| ProcessUrl | URL for the web application in which the Process definition file named in the next field resides. Example: http://localhost/myWebApp |
| ProcessFile | Name of the Process definition file, without a file extension, that contains process task to be executed when the Scheduler task runs. Do not include the .lgx file extension. |
| ProcessTaskID | Name of the process task, within the process definition named in the previous attribute, that will be executed when the Scheduler task runs. |
| ProcessParams | List of parameters to be passed to the process task that will be executed when the Scheduler task runs. Example: <LinkParams CategoryID="4" /> |
In order to edit an existing Scheduler task, it's the developer's responsibility for retrieve the data for the task and then provide it to the Schedule element, described below.
The Schedule Element
The Schedule element makes it easy to create and edit Scheduler Tasks. Because it's a super-element, adding it to a report definition automatically creates a user interface for a Scheduler task.
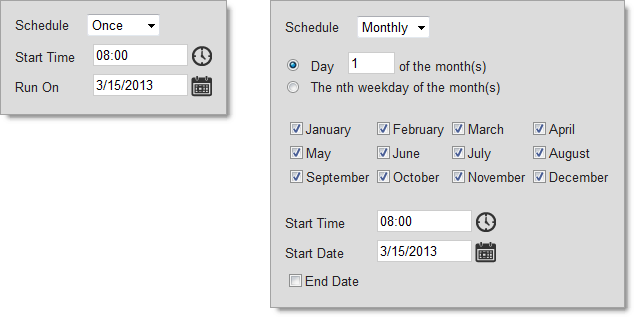
As shown above, the user interface presented by the Schedule element allows the user to select criteria for the Scheduler task. It's dynamic and will present more or fewer controls as required. For example, in the image above right, when a Monthly schedule is selected, the element expands vertically to display the months (a horizontal expansion, to the right, instead is also an option).
The Schedule element is built as an HTML table and has typical table attributes, such as Layout, Width, and Width Scale, used to control its size. The Schedule element also uses the following other attributes:
| Attribute | Description |
|---|---|
| Format | Specifies the format of the Start and End dates in the UI. Other format choices are shown but have no effect. Default: System Short Date format |
| Schedule Intervals | A comma-separated list of the interval modes that will be displayed in the UI. This can be used to limit the type of Schedules tasks that can be created and saved. Valid choices are Once, Daily, Weekly, and Monthly. In v10.0.355+, also Minutes and Hourly. Default: All modes |
| Schedule Orientation | Specifies how the UI expands when certain interval modes are selected. Horizontal places the configuration options for the selected interval mode to the right of the interval, start date, end date and start time inputs. Vertical (the default) places the configuration options below them. |
| ScheduleXML | A string of XML data that represents the date-time-interval data for a Scheduler task. This can be typed into this attribute's value as a "hard-coded" string or placed there using tokens such as @Local. This provides the mechanism for reading a schedule task, using Local Data and DataLayer.Scheduler, from the Scheduler database and placing the retrieved data into the Schedule element for manipulation by the user. |
| Show Days Of The Week | Specifies that a checklist of days-of-the-week will be displayed when the Weekly interval mode is selected. Default: True |
| Show Months | Specifies that a checklist of months will be displayed when the Monthly interval mode is selected. Default: True. |
| Show Process Parameters | Specifies that additional controls, used to add any number of name-value pairs of parameters used to run a Scheduler task, will be displayed. This is primarily used for administrative applications. Default: False. |
| Show Schedule XML | Specifies that, as options are selected in the UI and the XML data is generated, it will be displayed to the developer below the element. This is intended to be used for debug purposes only. Default: False |
| Template Modifier File | Specifies the name of a template modifier file that can be used to alter the user interface. Can be used, for example, to change language- and culture-specific control Captions. |
The element's UI does not display the ProcessXML value, a string of XML data that includes the task name, application URL, process definition file name, and process task ID, nor does it display the Task Name and Run As values. These values are available, however, from the Scheduler database as columns for retrieval using DataLayer.Scheduler and, if desired, the developer can create a UI to display and update them outside of the Schedule element interface.
As mentioned above, the Schedule element has a Show Schedule XML attribute which can be turned on during development to assist in understanding scheduling intervals:
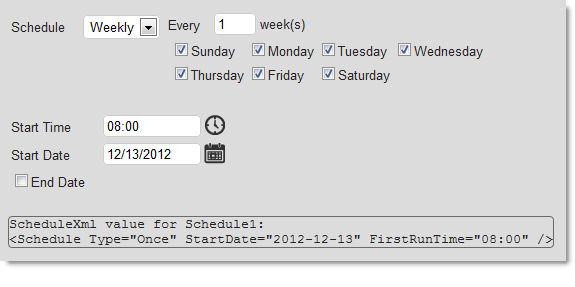
The image above shows what the display looks like when the Show Schedule XML attribute is set to True. If you change the interval selections, the ScheduleXML display will be immediately updated with new values.
Parameters that are to be passed to the process task at runtime can also be stored in the Scheduler task. See the section that follows about working with process parameters.
Use CSS with the Schedule Element
Many presentation aspects of the Schedule element can be customized through the use of CSS classes. The default style sheet used by the element is <application folder>\rdTemplate\rdSchedule\rdScheduleStyle.css
Classes in this default style sheet can be overridden by copying them into, and altering them in, your own application style sheet. Do not modify the default style sheet.
For example, this class adds additional space between the UI's labels and input controls:
|
and this one adds a background color to the element:
|
Note that HTML tables are used within the Scheduler super-element, and so you can count on working with table-related HMTL tags to make some CSS changes.
Create and Edit Scheduler Tasks
Developers need to create Process definition tasks to create and edit the Scheduler task data that, typically, has been collected using the Schedule element.
The Procedure.Scheduler Create Task and Procedure.Scheduler Update Task elements are used for this purpose and have identical attributes, with the exception that the Scheduler Update Task element also includes a Scheduler Task ID attribute. They have the same attributes as the Schedule element, which was discussed on the previous page.
Both of these elements are used in Process tasks that might, for example, be called from a report definition using a "Create a New Scheduled Task" or an "Edit a Scheduled Task" link on a report page.
![]() They require Target.Process child elements and use them in an unusual fashion. Instead of identifying a destination for program flow to be redirected to, as most Target-type elements do, these child elements' attributes are used instead to supply the Scheduler database with the Process definition file name and Process task name for the Scheduler task being created or updated.
Typically these are in the form of Request tokens passed from the calling report definition.
They require Target.Process child elements and use them in an unusual fashion. Instead of identifying a destination for program flow to be redirected to, as most Target-type elements do, these child elements' attributes are used instead to supply the Scheduler database with the Process definition file name and Process task name for the Scheduler task being created or updated.
Typically these are in the form of Request tokens passed from the calling report definition.
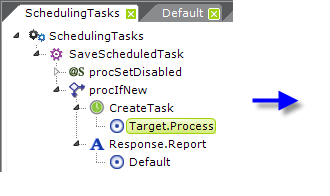
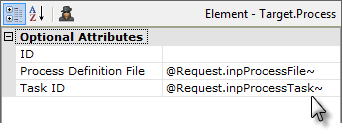
As shown in the example Process definition above, a Procedure.Create Scheduler Task element ("CreateTask") has been added to a Process task. Beneath it, a Target.Process element is used to identify the Process definition file and Process task that will be "called" by the Scheduler. A definition using Procedure.Update Scheduler Task looks very similar.
When a new Scheduler task is created, its Task ID is returned and can be accessed using a procedure token. In the example shown above, it would be available as: @Procedure.CreateTask.TaskID~ (remember that tokens are case-sensitive).
Work with Process Parameters
Parameters, in the format of name-value pairs, can be stored with a Scheduler task and passed to the target Process task when the Scheduler task runs. The Schedule element includes an user input control set that it displays for entering and editing these parameters. Its appearance in the UI is controlled by the element's Show Process Parameters attribute.
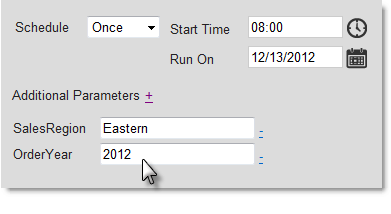
As shown above, the Schedule element's interface can be used to add a number of parameters at runtime. As the parameters are entered, they're assembled into an XML string and placed into a hidden input control with the ID rdProcessParams_<Schedule Element ID>.
Save the Parameters
When a Process task is called to save the task data, the XML string of parameters is passed to it as a request variable. The elements used to store Scheduler data, Procedure.Scheduler Create Task and Procedure.Scheduler Update Task, will automatically look for and use this request variable and store the parameters with the Scheduler task.
Retrieve the Parameters
We need to reverse the previous process to retrieve the stored parameters and load them into the Schedule element:
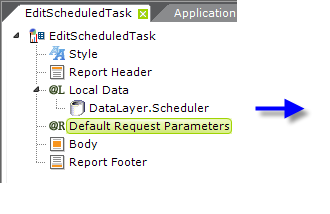

The example shown above is of a definition that will allow users to edit stored Scheduler tasks. A DataLayer.Scheduler, a child of Local Data, is used to retrieve data for the desired Scheduler task. Then a Default Request Parameters element is used with a Local token to create a request variable named rdProcessParams_<Schedule Element ID> with the value of the ProcessParams column in the datalayer. This will automatically load any stored parameters into the Schedule element interface, so that they can be edited.
Run and Delete Scheduler Tasks
When the Scheduler runs one of its scheduled tasks, it calls a task in a Process definition:
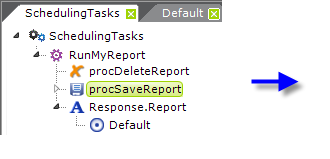
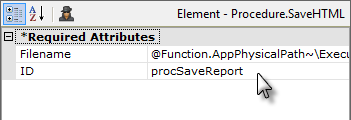
The example shown above is of a task that runs a report and saves it as an HTML file. First, any older version of the file needs to be deleted, then a Procedure.Save HTML element is used to save the desired report as a file on the web server. After that users could presumably browse it or further procedure tasks could distribute it as email, etc. Finally, the task needs to end with some kind of Response element (although its target report will never be visible to anyone because the Scheduler runs tasks in their own session). So, at the correct time, the Scheduler would simply call the RunMyReport task to get the job done.
Two other elements, Procedure.Scheduler Run Task and Procedure.Scheduler Delete Task, can be used to immediately run Scheduler tasks, and to delete them. These elements only require the connection ID of the Connection.Scheduler element and a TaskID.
For instance, you may wish to give your users the option to run a report immediately, instead of waiting for the scheduled time. This is done by creating a Process task that tells the Scheduler to run the desired Scheduler task right now.
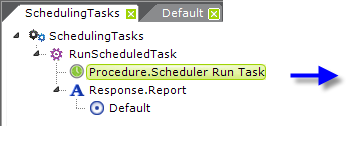
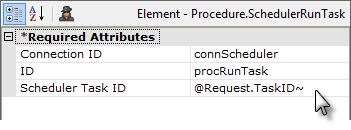
As shown above, this is done in a Process task using the Procedure.Scheduler Run Task element. Its attributes identify an existing Scheduler task by ID. A Process task for deleting a Scheduler task is identical, except that it uses a Procedure.Delete Task element.
Run Tasks Every X Hours or Minutes
In v10.0.366, the Schedule element user interface was enhanced to include options for scheduling tasks using an interval of Hours or Minutes. If you're using v10.0.366 or a later version, skip this section.
Developers using earlier releases, who want to schedule tasks using an interval of Hours or Minutes, must manually configure the Schedule elements ScheduleXML by entering the date, time, and occurrence-specific information for each event into it. Specifically, the following four attributes, which are not displayed in the UI, are available; each attribute value requires a whole number
greater than zero:
| XML Attribute | Description |
|---|---|
RunEveryXMinutes | Sets how often, in minutes, the process task will run. |
RunEveryXHours | Sets how often, in hours, the process task will run. |
RunForXMinutes | Sets the maximum amount of time, in minutes, that the process task will be allowed run. |
RunForXHours | Sets the maximum amount of time, in hours, that the process task will be allowed to run. |
For example, this XML would schedule a task to run every hour:
<Schedule Type="Daily" StartDate="2009-02-05" EndDate="2009-02-27" FirstRunTime="13:48" RunEveryXHours="1" />
This XML would schedule a task to run every 20 minutes and not allow it to run each time for longer than 2 minutes:
<Schedule Type="Daily" StartDate="2009-02-05" EndDate="2009-02-27" FirstRunTime="13:48" RunEveryXMinutes="20" RunForXMinutes="2"/>
And this example ensures that a task doesn't run for longer than 30 minutes:
<Schedule Type="Daily" StartDate="2010-08-05" EndDate="2011-08-05" FirstRunTime="13:48" RunForXMinutes="30" />
Here's one that runs a task every 2 hours during weekdays only:
<Schedule Type="Weekly" StartDate="2010-08-05" FirstRunTime="08:00" RunEveryXWeeks="1" DaysOfWeek="62" RunEveryXHours="2" />
These attributes allow developers using earlier versions to schedule events with greater flexibility and with finer granularity than the once-a-day frequency the user interface offers.
Scheduler Results and Logging
The Scheduler service can write out two types of information about its attempts to run tasks: results files and an operational log.
The results file contains details about the parameters passed to the targeted Process task, time stamps, a final status, and any error message passed through the Logi Server Engine.
Operational logs contain lower-level details about the internal operations of the web service itself and any errors it encounters. Starting in v11, whether there will be any logging and the amount of detail in the log depends on the "logging level" specified in the Scheduler's _Settings.lgx file, as discussed on page one.
In addition, the Scheduler updates a scheduled task's database record after each run attempt. For example, the success or failure of each Scheduler task's last attempted run is written in its database record in the "WasSuccessfulLastRun" column, and the fully-qualified path and filename of the results file generated for each run attempt is written to the "TaskResults" column. This allows easy programmatic access to run attempt results from within reports, using DataLayer.Scheduler, and
can also be very helpful in diagnosing problems.
Results Files
As mentioned above, a results file will be created for each run attempt. These are .xml text files and are stored in:
(Windows .NET) C:\Program Files\LogiXML IES Dev\LogiXML Scheduler Service\Log
(Windows Java) C:\Program Files\LogiXML IES Dev\LogiXML Scheduler Service Java\Log
(Linux/UNIX) <installFolder>/Log
A typical results file name is: rdSchedulerTask-8-d55cadb8-e243-437d-8587-d190417bdcb2.xml
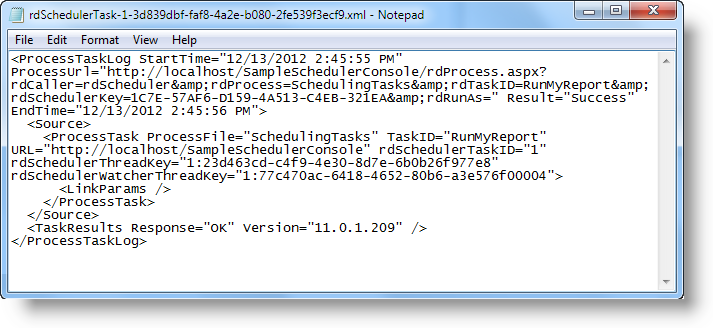
The example above shows the XML data in a results file. The contents will vary and may include an error message. These files can be read using a Logi report definition for the purpose of displaying task run status information (this is how the Scheduler Console sample app get's its task status).
![]() Results files are small, typically about 800 bytes, but they will accumulate over time and may consume excessive server storage if ignored. It's the developer's or server administrator's responsibility to manage these files.
Results files are small, typically about 800 bytes, but they will accumulate over time and may consume excessive server storage if ignored. It's the developer's or server administrator's responsibility to manage these files.
Operational Log
As mentioned above, if the Scheduler's settings file is so configured, operational details will be written to a log. The log is:
(Windows .NET) The Windows Event Log
(Windows Java) C:\Program Files\LogiXML IES Dev\LogiXML Scheduler Service Java\Log\LogiScheduler.log
(Linux/UNIX) <installFolder>/Log/LogiScheduler.log
The Java log file, "LogiScheduler.log", is a text file written using the Apache log4j Logging Library and it can be viewed with any generic text reader or log viewer tool.
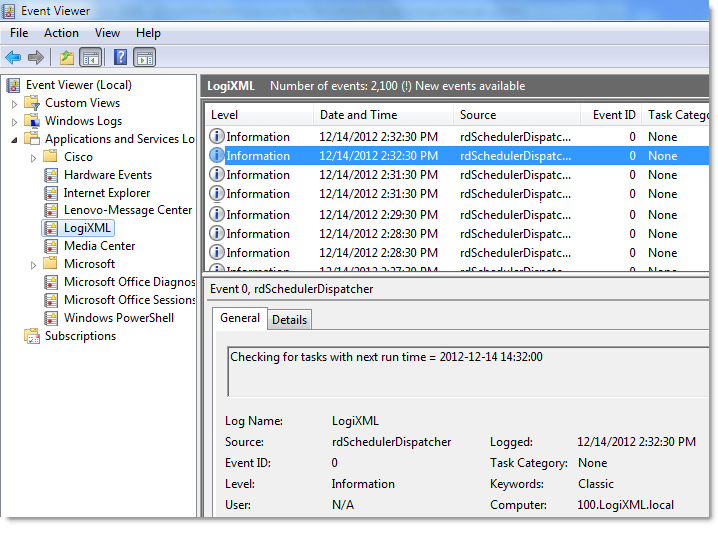
The Windows Event Log, shown above, can be viewed using the Event Viewer administrative tool, and entries are listed in Applications: "LogiXML".
Scheduled Task Data Storage Options
The Scheduler Service for .NET normally stores its scheduled task data using an embedded instance of VistaDB, a text-based database; for the Scheduler Service for Java, an embedded instance of Apache Derby is used.
The scope of the Scheduler database is significant, as it can contain records for scheduled events for multiple Logi applications on the same web server. It's important to keep this in mind when developing applications using the Scheduler, so that the correct application is identified when creating or modifying stored data.
For developers upgrading from early versions of Logi Info, which used the Windows Task Scheduler to schedule reports, there is no way to import or migrate schedules established in the Windows Task Scheduler into the Logi Scheduler. However, any legacy scheduled events created with the Windows Task Scheduler will still run in later Logi Info versions.
Back Up the Scheduler Database Files
As mentioned earlier, the default Logi Scheduler configuration stores scheduled event information in embedded database files that can be backed up using any standard file copy or backup methods. The relevant files are:
(Windows .NET) C:\Program Files\LogiXML IES Dev\LogiXML Scheduler Service Java\Schedules.vdb3
(Windows Java) C:\Program Files\LogiXML IES Dev\LogiXML Scheduler Service Java\Schedules\*.*
(Linux/UNIX) <installFolder>/Schedules/*.*
These files can even be backed up from within a Logi Process definition, so the Scheduler can schedule and run its own backup. See the Scheduler Console sample application (SchedulingTasks.lgx) for an example of how this is done.
Use a Database Server
In v11, the option of storing Scheduler task data in a networked Microsoft SQL Server, Oracle, or MySQL database was introduced.
If you choose to use Microsoft SQL Server, for the best performance, we recommend that it be SQL Server 2008 or later, in order to avoid the "8KB page size" issue found in older SQL Server versions. This script will also work with earlier SQL Server versions but you may experience performance degradation if the data in your fields exceeds 8KB and the number of stored Scheduler tasks is large (exceeding 8KB triggers behind-the-scenes row splitting in older SQL Server versions).
In order to use one of these SQL database servers, you must first create the Tasks table in a database of your choice, and then configure the Scheduler's _Settings.lgx file to use it.
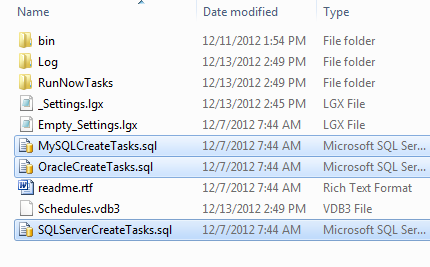
In your Scheduler installation folder, three example SQL scripts shown above have been provided to help you create the Tasks table, and they include comments about their use. Modify a copy of the appropriate script and run it on your database server to create the table.
![]() Using a case-sensitive database? The Scheduler service issues a SQL query that uses mixed case: "SELECT
TaskID, ProcessXml, RunAs FROM Tasks WHERE..." so be sure to edit the example script you use to create the table to match this case.
Using a case-sensitive database? The Scheduler service issues a SQL query that uses mixed case: "SELECT
TaskID, ProcessXml, RunAs FROM Tasks WHERE..." so be sure to edit the example script you use to create the table to match this case.
|
To complete the configuration, you must edit the Scheduler service's _Settings.lgx file to include a connection element for the database server you're going to use. The settings file is distributed with example connection elements in its comments section; copy the code for your database server type, paste it into the file as shown above, and configure it.
Stop and restart the Scheduler service to begin sending Scheduled task data to the database.
![]() If you have concerns about the security of the database credentials stored in the Scheduler's _Settings.lgx file, you can use the Batch Obfuscation Tool (see Use Studio 11) installed with Logi Studio to obfuscate the file. This
is done from
a command prompt (Windows only) with a command like this (assumes default Logi
Info installation location):
If you have concerns about the security of the database credentials stored in the Scheduler's _Settings.lgx file, you can use the Batch Obfuscation Tool (see Use Studio 11) installed with Logi Studio to obfuscate the file. This
is done from
a command prompt (Windows only) with a command like this (assumes default Logi
Info installation location):
C:\Program Files\LogiXML IES Dev>LogiObfuscation "C:\Program Files\LogiXML IES Dev\LogiXML Scheduler Service\_Settings.lgx" yourPassword /obfuscate
A similar command, using the /deobfuscate argument, can be used to de-obfuscate the file for maintenance. Note that Logi Analytics has no way to de-obfuscate the file for you if you forget your password.
If you wish to transfer existing data from the default database files into a SQL database, you will find that there are export tools for both VistaDB and Derby, either built-in or available online, that allow you to export data in a variety of formats (CSV, XML, etc.) for subsequent insertion into SQL databases.
Implement Multiple Scheduler Instances
Support for storing task data in networked databases, discussed in the previous section, allows multiple instances of the Scheduler service to run at the same time, on multiple servers, creating a fault-tolerant configuration. If one of the Scheduler instances goes down, the remaining instances will continue to function.
A multi-instance configuration is not supported when using the standard embedded VistaDB (.NET) or Derby (Java) file databases.
Assuming you've already set up data storage on networked database server, the first step in using multiple instances is to install the Scheduler service on multiple servers and configure the Scheduler's _Settings.lgx file as desired. To facilitate this, the Scheduler service can be installed independently of the full Logi Info product.
For the purpose of this discussion, let's assume you've installed the Scheduler on four separate servers, with these settings file values:
| Server Name or IP Address | Port | Pass Key | MySqlServer |
|---|---|---|---|
Production1 | 56982 | myKey | adminData2 |
Production2 | 56012 | myKey | adminData2 |
184.32.43.6 | 56982 | myKey | adminData2 |
38.60.200.11 | 56034 | myKey | adminData2 |
Note that each of the Scheduler services has been configured to access the same networked database server where the Scheduler task data is stored.
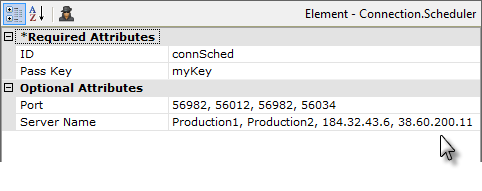
Now, to engage the instances, in the application's _Settings definition, the Connection.Scheduler element's Port and Server Name attributes must be given a comma-delimited string of the ports and names/addresses, as shown above. Notice that the first port number in the list correlates to the first server name in the list, the second port to the second server, and so on.
Having multiple Scheduler service instances will not result in a task being run more often than its designated frequency.
Customize Scheduler Appearance
The Schedule element uses a "template file" to define certain element properties that are not otherwise available as attributes to the developer for modification. These include language- and culture-specific Caption attributes that you may want to change for locale-based reasons (or you may simply want to change the captions to better suit your application).
The element's Template Modifier File attribute identifies a custom XML file developers can create containing special tags that will override elements in the template file, changing the appearance and some functionality.
More detailed information about template modifier files can be found in Template Modifier Files.