Template Modifier Files
Template Modifier Files (TMFs) allow Logi Info developers to modify the "super elements", such as the Analysis Grid, which behave like mini-applications, have a UI, and let users control visualizations at runtime. In addition, Logi Info and Logi Report developers can use TMFs to create Themes. These interesting files are discussed in this topic.
- About Template Modifier Files
- Set Hidden Underlying Element Attributes
- Manipulate Existing Underlying Elements
- Insert and Remove Underlying Elements
- List of Special XML Tags
For more information about Themes, see Themes.
About Template Modifier Files
Super elements are a complex combination of standard elements and style classes. The following super elements can be customized using a TMF:
- Analysis Chart
- Analysis Grid
- Dashboard
- Dimension Grid
- OLAP Grid
- Schedule
Super elements are rendered at runtime using a special definition file and standard Logi Info elements. A TMF is a separate definition file that's processed after a super element's definition file, providing an opportunity to alter the super element at runtime, without editing the fundamental super element blueprint. UI customizations can be placed in a TMF to alter the appearance and behavior of the super element.
Examples of these customizations include language- and culture-specific text changes for internationalization, and hiding some of the controls, such as Export buttons.
A TMF is an XML file that contains special tags for customizing the super element. It can be stored in any folder accessible to the web application and it's specified in a super element's Template Modifier File attribute. If a fully-qualified file path is not provided in the attribute value, then the application expects it to be in your application's _SupportFiles folder.
Tokens can be used in the Template Modifier File attribute to provide the TMF filename. This allows you to specify different TMFs (or no TMF) for different situations, users, etc.
Template modifier files are also a primary component of Logi Themes technology, available beginning with Logi v10. The power of the TMF is quite obvious in this scenario, as it effectively "scripts" the output of the designated report to adopt the desired appearance.
<Column> Element vs. <Column> Tag
Although the proper terminology for an XML object is "element", the term "tag" will be used in the following discussion in order to avoid confusion between super elements, underlying elements, and XML elements.
Set Hidden Underlying Element Attributes
As mentioned earlier, some aspects of the appearance and behavior of a super element can be configured using its exposed attributes (those that appear in Studio in the Attributes Panel). Further customization can occur by using XML to change its hidden attributes: the attributes of the underlying elements that make up the super element.
The key to configuring hidden attributes is knowing the ID of the underlying elements.
The IDs of these underlying elements can be found by examining the special definition file that defines each super element. These files are located in your application's rdTemplate folder. Here are a few of them:
| Super Element | Template File |
|---|---|
| Analysis Chart | rdTemplate\rdAnalysisChart\rdAcTemplate.lgx |
| Analysis Grid | rdTemplate\rdAnalysisGrid\rdAg10Template.lgx |
| Dashboard | rdTemplate\rdDashboard\rdDashboard2Template.lgx |
| Dimension Grid | rdTemplate\rdOlapGrid\rdDgTemplate.lgx |
| OLAP Grid | rdTemplate\rdOlapGrid\rdOgTemplate.lgx |
| Schedule | rdTemplate\rdSchedule\rdScheduleTemplate.lgx |
![]() Never edit these files directly; only examine them to determine element IDs!
Never edit these files directly; only examine them to determine element IDs!
Here's a simple example of how TMFs are used. Suppose we want to change the Layout "descriptive text" that appears in an Analysis Grid.
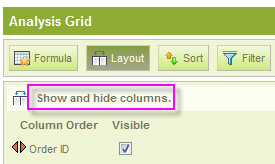
When the Layout button is clicked and the Table Layout section opens in an Analysis Grid, as shown above, the highlighted descriptive text is displayed.
To change this text to French, we first examine the Analysis Grid's definition file, rdAg10Template.lgx, with Notepad or a suitable text editor:
|
If we search the file for "hide columns", we'll find the fragment from the file shown above. It contains a Label element, with an ID attribute of "lblLayoutDescription", that sets the text we want to change. Note the ID of this element for use in our TMF.
|
To cause the change, we create a TMF, as shown above, which we'll give the arbitrary filename AGFrenchTMF.xml.
This is a standard XML file, which starts and ends with the <TemplateModifier> tag. It uses a special <SetAttribute> tag to make the change: the element to be changed is identified using its ID from the Analysis Grid's template definition file ("lblLayoutDescription") and the attribute to change is identified as the Caption and given its new French value.
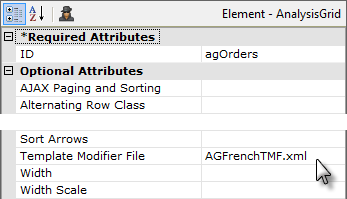
Next we save the TMF file to the application's _SupportFiles folder and, finally, enter its filename as the Analysis Grid's Template Modifier File attribute value, as shown above.
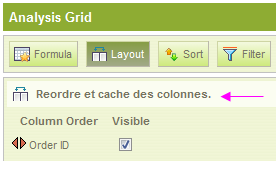
And the resulting change, shown above, can be seen when the report is run again.
Now that you've seen the basic concept in action, here's a more complicated TMF example:
|
Note that the actual <TemplateModifier> tags are not required; any tags that properly open and close the XML are acceptable. Also note that comments can be embedded into the XML using the HTML <!-- ... --> comment syntax.
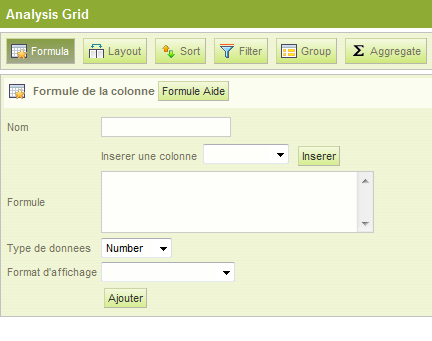
The resulting changes are shown above. This example changed the section description, field captions, and button captions to French.
Using XPath Notation
The TMF examples shown so far have used element IDs to identify elements whose attributes are to be changed. However, XPath notation can used instead, if preferred.
|
The example shown above uses an earlier TMF example with XPath notation, instead of an element ID.
See this site for more information about XPath syntax.
Manipulating Existing Underlying Elements
The super elements include static data sets, such as Format options, that are presented in drop-down selection lists. TMFs can be used to alter this data as well.
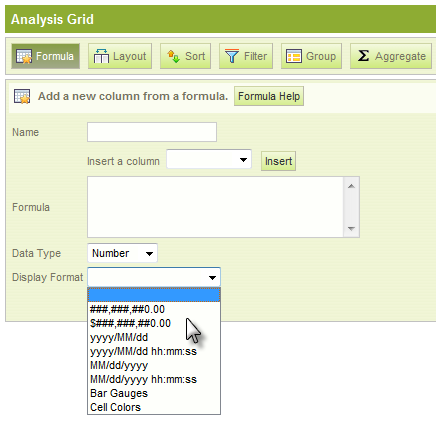
For example, in the Analysis Grid's Formula Column section, the user can select from a list of eight pre-defined display format options, shown above. Let's see how we can use a TMF to change the format options.
|
An examination of the Analysis Grid's template definition file, above, shows that a DataLayer.Static element and child Static Data Row elements are used by default to create the eight standard format options. In order to change that list, we need to do two things:
- Provide an XML data file that contains the data for our custom option list, and
- Override the existing datalayer, replacing it with a DataLayer.XML File element that will read our custom option list file.
Here's the XML data file with our 11 custom options:
|
Note that the column names ("Format" and "FormatName") in our file must match those used in the original Static Data Row elements in the Analysis Grid template definition file. Our custom format options file is stored in the application's _SupportFiles folder as MyFormats.xml
|
Finally, we need to create the TMF shown above. It uses XPath notation to replace the existing template DataLayer.Static element with a DataLayer.XML File element and specifies MyFormats.xml, our custom options file, as the datasource. When this file has been created and saved to _SupportFiles, all we need to do is set the Analysis Grid's Template Modifier File attribute to our TMF filename and preview it.
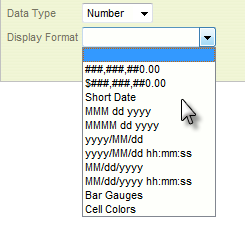
The resulting selection list is shown above and now contains our 11 custom format options. This example demonstrates that TMFs are not limited to mere text changes, but can be used to manipulate existing elements in more interesting ways.
Work with Underlying Datalayers
In many cases, the text that appears in super element interfaces is drawn from internal static datalayers. Suppose you needed to change specific text that comes from one of these datalayers, for example, into a different language. To do this you would:
- Provide an XML data file, in _SupportFiles, that includes the translated text.
- Use a TMF to change the relevant internal datalayer element type from "Static" to "XML File" and to point it at your XML data file.
- In the TMF, change the internal Label element that displays the text to use @Data tokens.
There is one complication here: tokens inside the TMF itself are evaluated prior to being used in the modification. This is because you might have @Local, @Request, or other tokens that need to be evaluated in this file prior to being used. However, that won't achieve the "later" evaluation that we need to put the token values in the user interface. To get around this, you need to "escape" the @Data token used in your TMF for Step #3 above like this:
![]()
This presents a "token-within-a-token", where @Data.dummy~ is an arbitrary, dummy token and Data.columnName is the @Data token and column name from the XML data file. When the report runs and the TMF is evaluated, the dummy token will be evaluated to an empty string, leaving the real @Data token to be recognized and evaluated later. The odd construction above has the result of masking the fact that @Data.columnName~is a token during the first evaluation.
Insert and Remove Underlying Elements
TMF features also allow underlying elements to be inserted, removed, and remarked. This is accomplished using these XML tags:
- <PrependChildElement>
- <AppendChildElement >
- <InsertBeforeElement >
- <InsertAfterElement >
- <Remark >
- <RemoveElement >
The first four tags use a child tag, <NewElement>, to delimit the new element to be affected. The Prepend- and Append- tags make the new element the first or last child element in a group. Here's a practical example of some of these elements in action:

An Analysis Grid can display three Export buttons, as shown above, and its Hide Exports attribute can be used to hide all three of them from users. However, it's All or None situation: developers cannot choose to show a subset of the export buttons. The solution for those who wish to show a subset is to use the new TMF tags. In the following example, we'll remove the CSV export button and add a Print button that mimics the PDF export functionality.
One important thing to know when looking at the Analysis Grid's definition file to get the appropriate element IDs is that the export "buttons" are really Label elements made to look like buttons using CSS.
Assuming the elements have been found and identified, the TMF can be written as follows:
<InsertAfterElement ID="lblExportPdf"> <AppendChildElement ID="lblPrintBtn"> <AppendChildElement ID="actExportPrint"> <InsertAfterElement ID="tgtExportPrint"> </TemplateModifier> |
The first thing this TMF does is remove the CSV button ("lblExportCsv") using the <RemoveElement> tag.
Then three elements are appended, using the <InsertAfterElement> and <AppendChildElement> tags, creating the new Print button, its child Action element, and that element's child Target element. Where they are appended is specified in the tag's ID attribute. Note the use of the <NewElement> tag to delimit each element being added.
Finally, <InsertAfterElement> is used to add a LinkParams element at the same element hierarchy level as the Target element.

The resulting interface change is shown above.
Note that it's possible to write the first part of the TMF in a more compact way, taking advantage of tag nesting:
<InsertAfterElement ID="lblExportPdf"> |
As shown above, only one <InsertAfterElement> tag is necessary, as long as the opening and closing tags for the nested elements are arranged correctly.
<Remark> <InsertAfterElement ID="lblExportPdf"> <InsertAfterElement ID="tgtExportPrint"> </TemplateModifier> |
Finally, the <Remark> tag allows developers to temporarily "comment out" portions of the TMFs, as shown above.
List of Special XML Tags
This table provides a complete list of the special XML tags available for use in TMFs:
XML Tag | Description | In Release |
AppendChildElement | Appends new child element as the last element beneath the element identified in its XML "ID" attribute. | 9.5.55 |
| CutElement | Used as a child of the Insert tags, this tag deletes the element identified by its XML "ID" attribute and makes it available for insertion. Used primarily to "move" elements within the definition. | 10.1.46 |
| CycleAttributeValues | Used primarily with Themes, allows assignment of values to elements such as charts that have multiple layers. Elements to be modified are identified in its XML "CycleOnChildElement" attribute; uses child tag CycleValue. | 9.5.91 |
| CycleValue | Used to provide values for CycleAttributeValues tag. | 9.5.91 |
| InsertAfterElement | Inserts new element after the element identified in its XML "ID" attribute. | 9.5.55 |
| InsertBeforeElement | Inserts new element before the element identified in its XML "ID" attribute. | 9.5.55 |
| PrependChildElement | Adds new child element as the first element beneath the element identified in its XML "ID" attribute. | 9.5.55 |
| Remark | "Comments" the XML tag it encloses, so it has no effect. | 9.5.55 |
| RemoveElement | Removes the element identified in its XML "ID" attribute. | 9.5.55 |
| SetAttribute | Sets the attribute value identified for the element identified in its XML "ID" attribute, overwriting any value already there. | 9.5 |
| SetAttributeWhenEmpty | Sets the attribute value identified for the element identified in its XML "ID" attribute, but only if that attribute does not have a value already. | 9.5.91 |
| SetAttributeWithInsert | Inserts an additional attribute value before any existing value identified for the element identified in its XML "ID" attribute. This order is important, as it allows existing values related to CSS to "win" any conflicts by being last in the order. | 10.x |
| UpdateOrAppendChildElement | If the child element does not exist, appends it as the last element beneath the element identified in its XML "ID" attribute. If the child element exists, updates its attributes. | 9.5.91 |