Use Logi SecureKey Authentication
The Logi SecureKey authentication method provides improved integration for applications requiring secure access to a Logi application. It supports the "single sign-on" model while enhancing security: user authorization is established and requests are made to Logi applications using a special security key. This topic discusses the use of SecureKey Authentication.
- Why use SecureKey Authentication?
- How SecureKey Authentication Works
- Configure SecureKey in a Logi Application
- Get User Roles and Rights
- Configure the Parent Application
- Work within NAT or Proxy Environments
- Manage SecureKey Sessions
Logi SecureKey is an extension of Logi Security; if you're unfamiliar with Logi Security, see Introduction to Logi Security 10.
A sample SecureKey application, complete with parent app, is available in the Sample Applications section of DevNet.
Why Use SecureKey Authentication?
Logi SecureKey Authentication is provided in our products for use in development scenarios where a Logi application is integrated with another non-Logi application (the "Parent" application), which conducts the initial user authentication.
Sometimes called "single sign-on", this arrangement allows users to login just once to the Parent application and yet have their security information propagated to other, integrated applications, creating a seamless and secure user experience. This, of course, means that users can't be allowed to "go around" the Parent application and directly access the other applications. In the stateless world of web applications, this requires some special mechanisms to ensure security and they are provided in Logi applications through our SecureKey technology.
The "authentication" part of SecureKey Authentication refers to the method used by the two applications to verify the validity of requests from users; this is a secondary authentication that occurs separately from the initial, standard user login authentication.
How SecureKey Authentication Works
There are five steps involved in the typical SecureKey Authentication scenario:

- A "Parent" application, which integrates with a Logi application, is responsible for initially authenticating a user (the "single sign-on"). The user logs into the Parent application; the exact method it uses to determine that a user is valid is irrelevant to this process, except that user roles and/or rights, if applicable, should be retrieved as part of the authentication.

- After the Parent application authenticates the user, he begins using the application and eventually clicks a link to view a Logi report. The Parent application sends the Logi application a request for a "SecureKey". The request includes the user ID, any user roles and/or rights, and the user's machine IP address (the "client browser IP address").

- When it receives the request for a SecureKey, the Logi application first verifies that the request came from a valid source. This is done by automatically determining the Parent app's server IP address and ensuring that it's in a pre-configured list of approved addresses. If so, the Logi application stores the user information from the request and returns a unique security key, the "SecureKey", to the Parent application.

- The Parent application then redirects the user's report request to the Logi application, appending the SecureKey to the query string.

- Upon receiving the report request, the Logi application automatically determines the client browser IP address and uses it, along with the SecureKey, to authenticate the request. If authenticated, a session is started for the user and any roles and rights (stored in Step #3) associated with the SecureKey are used to authorize access to the correct reports, data, and other resources. The requested report is then generated and returned to the user.
When the Logi application session is started for the user, the SecureKeyexpires and cannot be used again. Any subsequent reports requested from within the context of the Logi application will use the user's session to control access to reports, data, and resources. The user is then communicating directly from his or her browser to the Logi application for reports and the Parent application is no longer involved, as long as the Logi app session persists. ![]() Developers need to ensure that the Parent application does not try to reuse the expired SecureKey!
Developers need to ensure that the Parent application does not try to reuse the expired SecureKey!
If the user's Logi application session ends, and he or she subsequently wants to access reports again, then the process of requesting and using a new SecureKey will have to be repeated.
So, to briefly summarize the process:
- The Parent app authenticates the user
- The user requests a Logi report, in the Parent app
- The Parent app requests a SecureKey for the user, and receives it
- The user's report request, with the SecureKey added to it, is redirected to the Logi app
- The Logi app validates the SecureKey, starts a session for the user, and the SecureKey expires
- The requested report is generated and returned to the user
- Subsequent report navigation and display within the Logi app relies on the user's Logi app session
- Subsequent report requests from the Parent app need a new SecureKey (back to Step #3)
Once a SecureKey is used, it cannot be used again in a different session, and "sharing" keys across clients isn't possible, as the client browser IP address is referenced within
the key when it's created, making it valid only for the client that made the initial request.
SecureKey Information Storage
Normally, the information associated with a SecureKey (user name, roles, rights, browser IP address, etc.) is stored as a web server "application scope" variable.
However, if you're using a clustered server configuration, you can specify a physical folder for temporary storage of SecureKey information as XML files. Using a shared network folder for this purpose allows common access to the SecureKey information by the clustered servers. This shared folder is specified in the SecureKey Shared Folder attribute of the Security element, in the Logi application's _Settings definition. The SecureKey files created by this option are deleted whenever the automatic "temporary cache file clean-up" occurs (which is configurable - see DataLayer.Cached).
Configurec SecureKey in a Logi Application
Implementing SecureKey Authentication in a Logi application builds upon existing techniques for implementing Logi Security.


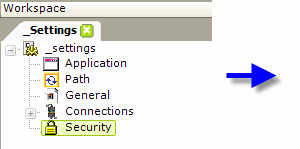
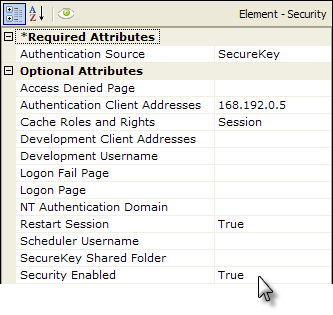
As shown above, a Security element is added to the application's _Settings definition. Its relevant attributes are:
| Attribute | Description |
|---|---|
Authentication Source | Select SecureKey from the drop-down list of available values. |
Authentication Client Addresses | This is the IP address of the web/application server making the SecureKey requests (not the end-user's IP address), identified as the "Parent App" in the five images above. This value can be determined by "pinging" the application server from the web server hosting your Logi applications. If one computer serves both purposes and the Logi apps are being called using localhost in the URL, enter 127.0.0.1 for this value (or ::1 in IPv6). If multiple servers will be making SecureKey requests, multiple IP addresses can be entered here, separated by commas. Wildcard characters are not supported in these addresses.
SecureKey requests from servers with IP addresses not in this Authentication Client Addresses list are rejected. |
Cache Roles and Rights | When Authentication Source is set to SecureKey and this value is left blank, the setting defaults to Session; SecureKey will not work if it's set to False. |
Restart Session | Added in v10.0.117. When set to True, all security-related session variables are cleared with each new login attempt. This prevents session variables that were established during one user's session from being used during a subsequent user's session. |
SecureKey Shared Folder | As discussed earlier, this attribute allows SecureKey to be used with clustered server configurations in web farms and web gardens by saving information in commonly-accessible files. The account used by (or impersonated by) the Logi application must have network access rights to read, write, and delete files in this folder. Set the SecureKey Shared Folder value to a network path, such as: //mySharedServer/SecureKeyFolder. Files in the SecureKey shared folder are automatically deleted over time, so do not use this folder to also store other files. If using this attribute for development diagnostics, enter a fully-qualified path on the web server. You can use the @Function.AppPhysicalPath~ token here as part of the path. |
Security Enabled | Must be set to True to enable security. |
More About the IP Addresses
Due to the stateless nature of browser interactions, IP addresses play an important role in ensuring security. Developers are occasionally confused about the two IP addresses used with SecureKey authentication, so here's some additional explanation:
Authentication Client Address - This address ensures that the Parent application and the Logi application are allowed to talk to one another. It's the IP address of the server hosting the Parent application. It is not the IP address of the end-user computer used to request reports through the Parent application.
This address is never passed in a URL when requesting a SecureKey from the Logi application. Instead, the Logi application automatically determines the address of incoming SecureKey requests from the Parent application and, if it matches one of the IP addresses specified in the Security element's Authentication Client Address attribute, then the Logi application will accept and begin processing the SecureKey request
We do not recommend using partial wildcard masks; however, if this set up is absolutely required, you can provide a partial mask as long as it conforms to the pattern where the last part (3 digits) in the IP is less than the last part (3 digits) in the mask. For example:
10.158.48.128 0.0.0.218 will work, but
10.158.48.128 0.0.0.105 will not work.
You can use the the DHCP service, provided here, to set max and min IPs within the desired subnet.
Client Browser Address - This address is used to verify that each report request to the Logi application is coming from a source that has been authenticated by the Parent application. It's the IP address of the end-user computer used to request reports through the Parent application. It is not the IP address of the server hosting the Parent application.
This address is passed in the URL of every request for a SecureKey. It should not be specified in the Security element's Authentication Client Address attribute. The Logi application automatically determines the address of incoming report requests and, if it matches the IP addresses associated with the specified SecureKey, access to the Logi application is allowed.
![]() During development, it's not at all unusual for the Parent application to be hosted by a web server that's on the same machine as the browser used to make test requests. In this case, the Authentication Client Address and the Client Browser Address are very likely going to be the same, such as 127.0.0.1 or ::1. This can contribute to the confusion over these two addresses, and perhaps produce
a rude surprise when the applications are deployed and the addresses change. We highly recommend testing SecureKey implementations using a separate machine to represent the
"end-user machine"
in order to avoid this confusion.
During development, it's not at all unusual for the Parent application to be hosted by a web server that's on the same machine as the browser used to make test requests. In this case, the Authentication Client Address and the Client Browser Address are very likely going to be the same, such as 127.0.0.1 or ::1. This can contribute to the confusion over these two addresses, and perhaps produce
a rude surprise when the applications are deployed and the addresses change. We highly recommend testing SecureKey implementations using a separate machine to represent the
"end-user machine"
in order to avoid this confusion.
Get User Roles and Rights
Your Logi application may need to use any security Roles and/or Rights held as part of the SecureKey information. Various security-related elements are used for this purpose, as follows:
Logi Security 10
Developers using Logi Security 10 (v10.0.189 products and later) will use these techniques to get user Roles and Rights:

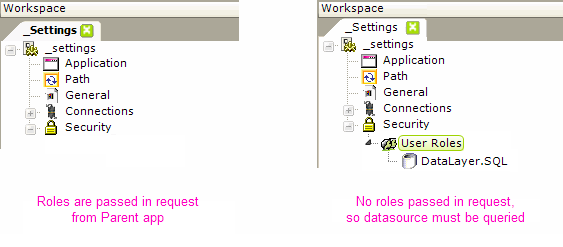
If user Roles information was included in the SecureKey request from the Parent application (as described in the following section), then subsequent report requests will cause that information to be automatically available in the Security element, as shown above, left.
If no Roles information is included in the SecureKey request but is desired, it can still be retrieved from a datasource, using a User Roles element and a datalayer, as shown above, right. The datalayer should retrieve data with a role value in the first column of each row, or multiple roles in a single row as a comma-delimited list.
User Rights can also be used to prevent users from viewing reports, report elements, and data rows which they should not see. If Rights information was included in the SecureKey request from the Parent application (as described in the following section), then subsequent report requests will cause that information to also be automatically available in the Security element.
If no Rights information is included in the SecureKey request but is desired, it can be retrieved in several ways, all of which begin with the addition of the User Rights element.

The examples shown above include the use of a User Roles element, but it is not necessary if Roles are supplied to the Security element via the SecureKey request. The separate techniques and elements used to retrieve the Rights are described below:
| Element | Technique |
|---|---|
Rights From Roles | Builds the list of rights directly from the Roles values. The roles and rights are the same. |
Rights From DataLayer | Builds the list of rights directly from its child datalayer. The data returned should include a right in the first column of each row, or multiple rights in a single row as a comma-delimited list. |
Right From Role | Defines each right individually, with one Right From Role element for each right. The element's ID is the right value, which corresponds to Security Right ID attributes in elements in report definitions. Right From Role works with user roles: if a user has a role that is returned by this element's child datalayer, then he is allowed the right specified by the element's ID. The child datalayer should retrieve data with a role value in the first column of each row, or multiple roles in a single row as a comma-delimited list. |
These elements may be used in any combination; the rights
retrieved by each are combined together into a comprehensive rights list.
Logi Security 9
To receive Role information, developers using Logi Security 9 (products prior to v10.0.189, not available in v11) will use these techniques to get any Roles and Rights:

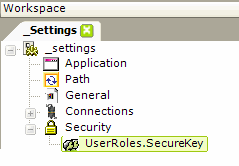
As shown above, a UserRoles.SecureKey element has been added beneath the Security element. This causes the Logi application's list of Roles to be populated from the Roles in the query string of the SecureKey request sent by a Parent application.
Rights elements are then added, as usual, beneath the Security element in order to retrieve rights information and associate Roles with Rights.
Configure the Parent Application
The Parent application is responsible for authenticating the user (the "single sign-on") when he or she first connects. The authentication process should produce a valid user ID and optional lists of security Roles (which correspond to Roles established in the Logi application) and security Rights.
When the user first requests a report or web page from the Logi application, the Parent application issues a SecureKey request to the Logi application's authentication service, using this basic format:
http://myServer/myLogiApp/rdTemplate/rdGetSecureKey.aspx?Username=bob&ClientBrowserAddress=192.168.4.75
If using Logi Security 10, the URL may also optionally include a list of Roles and/or Rights, using this format:
http://myServer/myLogiApp/rdTemplate/rdGetSecureKey.aspx?Username=bob&ClientBrowserAddress=192.168.4.75&Roles=Worker,Manager&Rights=View,Update,Delete
The rdGetSecureKey.aspx service called in the URL expects or accepts these standard query string values in the URL:
| Parameter | Description |
|---|---|
| Username | (Required) The user ID authenticated during the single sign-on process. In your Logi application this can be referenced using @Function.Username~. This token is available for the current user's session and may be referenced in any Logi definition file, including within other child elements of Security, such as Roles and/or Rights. |
ClientBrowserAddress | (Required) The IP address of the requesting user's computer. This IP address is not the address of the Parent application server. In the Parent application, this IP address should be determined dynamically; in the example code provided below, for example, the address is determined using Request.UserHostAddress. See the next section of this topic for additional information relevant to NAT or proxy environments. |
Roles | (Optional) A comma-separated list of the security roles for this user, determined during the single sign-on process. This comma-separated list becomes your list of Logi application user Roles. The list can be referenced using @Function.UserRoles~ throughout the Logi application, and may be used to assign user rights within the security element. |
| Rights | (Optional) A comma-separated list of the security rights for this user, determined during the single sign-on process. This comma-separated list becomes your list of Logi application user Rights. The list can then referenced as @Function.UserRights~ throughout the Logi application. |
You may also create your own custom query string variables to send other information into the Logi application:
http://myServer/myLogiApp/rdTemplate/rdGetSecureKey.aspx?Username=bob&ClientBrowserAddress=192.168.4.75&Roles=Worker,Manager&myCustomParam1=10&myCustomParam2=120
These extra values will be assigned to session variables in the Logi application and can be accessed using @Session tokens. For example, @Session.myCustomParam1~ would equal 10, @Session.myCustomParam2~ would equal 120, etc. Remember
that theses tokens are case-sensitive and you will need to match the spelling in the query string exactly when using them.
Use POST vs GET
For additional security, or if you have a lot of custom query string variables or really long values, starting with v10.0.405, you may elect to POST the URL and its query parameters. The Logi application will examine the HTTP request for them automatically, regardless of whether they were sent using POST or GET.
Use the SecureKey
The Logi application's authentication service returns a SecureKey to the Parent application, which then redirects the user's request to the Logi application, passing the SecureKey as an additional query string parameter. The URL for this redirect will look something like this, using the two keywords rdReport and rdSecureKey:
http://myServer/myLogiApp/rdPage.aspx?rdReport=myDesiredReport&rdSecureKey=1a34c56f7b89
Sample Code
The following Visual Basic.NET code provides an example of the two things you'll need to do in a Parent application: request a SecureKey and redirect the user's report request using the SecureKey.
Your Parent application may have multiple links to the Logi application, so the following code is an example of a function that can be called from the click event handlers for any of those links. It assumes the user name, user Roles, and user Rights have been placed into session variables as part of the login authentication process and that the Logi application base URL has been specified in the Web.config file.
' define parts of the SecureKey request URL ' define web request and response receiver ' send the SecureKey request to the Logi app ' receive the response and return it as function result End Function
|
The event handler code for the links to the Logi application might look like this:
' identify the Logi report definition to be displayed by this menu item or link ' get the Logi application base URL, which is set in the Web.config file ' get a SecureKey for this request 'redirect to Logi app End Sub |
Additional coding examples in other languages are available in SecureKey Code Examples.
Debug SecureKey Requests
It can be very helpful, when developing applications, to view the information being sent between the parent application and the Logi application during the SecureKey request.
To do this, temporarily provide a value for the Security element's SecureKey Shared Folder. This will cause SecureKeys to appear there as XML files, so you can see when they're created. You can open and examine them in order to determine what's being passed in the SecureKey requests.
We also offer a SecureKey test program (.NET environment only) which is available for download from DevNet; it displays the SecureKey information in a test exchange: http://downloads.logianalytics.com/info/TestSecurekey.zip
Work within NAT or Proxy Environments
If a company has set up a firewall with NAT'd addresses or another form of network proxy that flows all traffic to the Logi application through a single IP address or a range of IP addresses, then client IP address checking in SecureKey needs to be suppressed because individual user locations will not be unique.
This can be achieved by modifying the parent application's request to the Logi application so that it passes a Client Browser Address value of 0.0.0.0. For example:
http://myServer/myLogiApp/rdTemplate/rdGetSecureKey.aspx?Username=bob&Roles=Worker,Manager &ClientBrowserAddress=0.0.0.0
When using this approach, security can be further enhanced by limiting requests to those from certain parts of the network by using an IP address mask in the web server's security configuration. For IIS, this is accomplished in the IIS Manager's Directory Security tab; for Tomcat this is accomplished by adjusting some of its XML configuration files.
Manage SecureKey Sessions
Logi SecureKey allows you to securely authenticate from the parent application and establish a session in the Logi application. Once a user is finished working with the Logi application, you want to ensure that the session is terminated. Here are three related considerations:
Application Server Time-out Configuration
Automatic sessiontime-out after a period of inactivity is managed in the web server and, for example, the IIS default setting is 20 minutes. You may want to adjust this to a shorter interval in order to increase session security, which is done in a variety of ways. For example, for IIS, this is set in IIS Manager tool or in the web.config or machine.config files; for Tomcat, it's set in the web.xml file. While this, by itself, is not completely secure (it still presents a window of opportunity
until the time-out occurs), it's a good practice
that helps minimize security exposure.
Session Exit Elements
The Action.Exit and Response.Exit elements immediately end the current session and redirect the browser to a URL. In Logi Info, you can initiate this from your parent application by browsing directly to a process task in the Logi app, which runs Response.Exit. Otherwise, both actions are usually initiated by a user action, such as clicking a "Logout" button or link (however, user behavior in this regard may not always be reliable).
Restart Session Attribute
The Security element's Restart Session attribute causes previous session information to be cleared with each new SecureKey authentication attempt. Turning this feature on is the recommended method of ensuring that users do not "piggyback" onto a previous user's session.
This requires, however, that your parent application be designed correctly: the authentication routine in the parent app always needs to include a Logi SecureKey authentication request. It should not, for example, include code that tests to see if a Logi session exists and then skips issuing a new SecureKey request if it does. Ensuring that there's a new SecureKey request with each report request will guarantee that other sessions that are not valid (such as those created by using browser bookmarks or shared links) will be rejected and redirected back to the parent app for authentication. It will also ensure that different users on the same machine/browser will also have to authenticate properly (providing that the original user logs out of the parent application session).