Ribbon Menu, Shortcuts, and Search
Studio operations can be controlled using the Ribbon Menu at the top of the screen. Here are its tabs and major menu items:
The Home Tab

| Feature | Description |
|---|---|
New Application | Create a new application with the assistance of the New Application wizard. |
Open Application | Open an existing application from the File Explorer, the recent apps list, or a list of apps registered with the local web server. |
New File | Create a new file by selecting a file category. |
Recent | Re-open a recently closed file. |
Save, Save All, Close | Save the file in the current Workspace editor tab, save all edited files, and close the current application, with a prompt to save any unsaved files. |
Edit Actions, Remark, | Standard editing actions including Cut, Copy, Paste and more. Comment and uncomment elements and rearrange their order. |
Search/Replace | Search current, or all, definitions and supporting text files, and replace text, if desired. |
Element Navigation, | Navigate to previous or next element in the Element Tree navigation history. Expand or collapse all child elements beneath the selected element. |
Test Actions | Control debugging, and preview a definition in a browser or in a separate "live" window. |
The Design Tab

| Feature | Description |
|---|---|
Master Report Layout | Launch the Master Report Layout wizard, which allows you to design a header-menu-footer template for use with each report definition. For more information, see Master Reports. |
Theme Editor | Launch the Theme Editor wizard, which allows you to create and edit your own custom themes. For more information, see Use the Theme Editor |
Themes | Apply the selected standard theme to the current report, or to the entire application. |
The Tools Tab

| Feature | Description |
|---|---|
Application Deployment | Deploy the application to other servers using the Application Deployment Tool. |
Application Obfuscation | Render definitions unreadable by humans to prevent tampering and theft using the Application Obfuscation Tool. |
Server Manager | View registered applications and change their Logi Engine versions individually or in bulk. |
Git Extensions | Provides quick-and-easy access to Git, when it's being used as the application's source control repository. |
Team Development | Manage built-in Logi source code control with file check-in/out and change history. |
Database Browser | View schema and basic data samples from databases with connections in _Settings file. |
Bookmark Storage | Create a SQL database table for Bookmark storage and migrate Bookmarks stored in the file system into it. For more information, see Bookmarks. |
Dataview Authoring | Create, edit, and manage Dataviews - representations of data that can be used and re-used throughout an application. For more information, see Dataview Authoring.Menu item is only visible when Discovery 3.x is installed. |
SuperWidget Authoring | Create, edit, and manage client-side components, such as charts and Dashboards, to create single-page applications that make use of Dataviews. For more information, see SuperWidgets. Menu item is only visible when Discovery 3.x and SSRM 12.5+ are installed. |
Elements/Attributes Panel | Specify the arrangement and order of the Element Toolbox and Attributes panels in Studio. |
Options | Specify Studio options including file encoding and definition editor colors. |
The Tools tab items Application Deployment, Application Obfuscation, Server Manager, Team Development, and the Database Browser are discussed more detail in separate sections in this topic.
The Wizards Tab

The Wizards tab appears when an element that has supporting wizards is selected. The number of wizards available varies depending on the selected element.
Some European keyboards use a key combination that includes the Alt key to produce characters like @ and ~ which are used frequently in Logi code. By default, the Alt key will shift focus to the Ribbon Menu, making it difficult to type these characters on European keyboards. An option to disable this focus shift is available in Tools![]() Options.
Options.
Ribbon Menu Controls
The following controls are located outside the tabs, at the right end of the Ribbon Menu:

The Ribbon Menu items can be collapsed vertically to get more screen real estate, using the arrow highlighted above. The menu can be expanded again by clicking the arrow again, or by selecting a different menu tab.

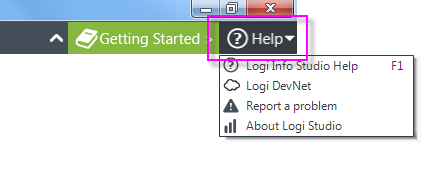
The menu's Getting Started button, shown above, will redisplay the Getting Started dialog box whenever needed.

The menu's Help button, shown above, displays a drop-down list of resources for getting assistance and reporting problems.
Keyboard Shortcuts
The following keyboard shortcuts are available for those who may prefer to save mouse clicks:
| Application and Files | Editing |
|---|---|
Ctrl n = New application | Ctrl f = Find |
Ctrl o = Open application | Ctrl h = Replace |
Ctrl l = Open application from local web server | Ctrl z = Undo |
Ctrl s = Save selected file | Ctrl y = Redo |
Ctrl, Shift s = Save all open files | Ctrl r = Remark/unremark |
F1 = Studio Help | Ctrl x = Cut |
F2 = Rename selected file | Ctrl c = Copy |
F5 = Run current definition in browser | Ctrl v = Paste |
F7 = Move element up (includes children) | Ctrl + = Next navigation history item |
F8 = Move element down (includes children) | Ctrl - = Previous navigation history item |
Ctrl |
You can download and print our handy Studio Keyboard Shortcuts quick-reference card, if desired.
Search & Replace
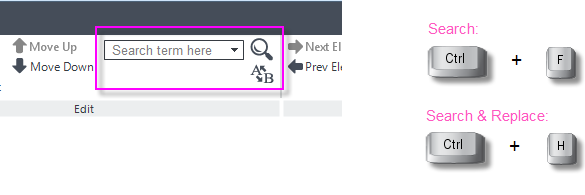
Logi Studio includes a Search feature, including a Search control right on the main menu:

As shown above, the ribbon menu includes a text input control for entering new search terms and it keeps a historical list of terms sought during the current program session. Clicking the magnifying glass icon starts a new search using the displayed terms. Searches are not case-sensitive initially and can also be initiated using the Ctrl + F keys. Clicking the A-B icon, or using the Ctrl + H keys, will open the Search and Replace feature.

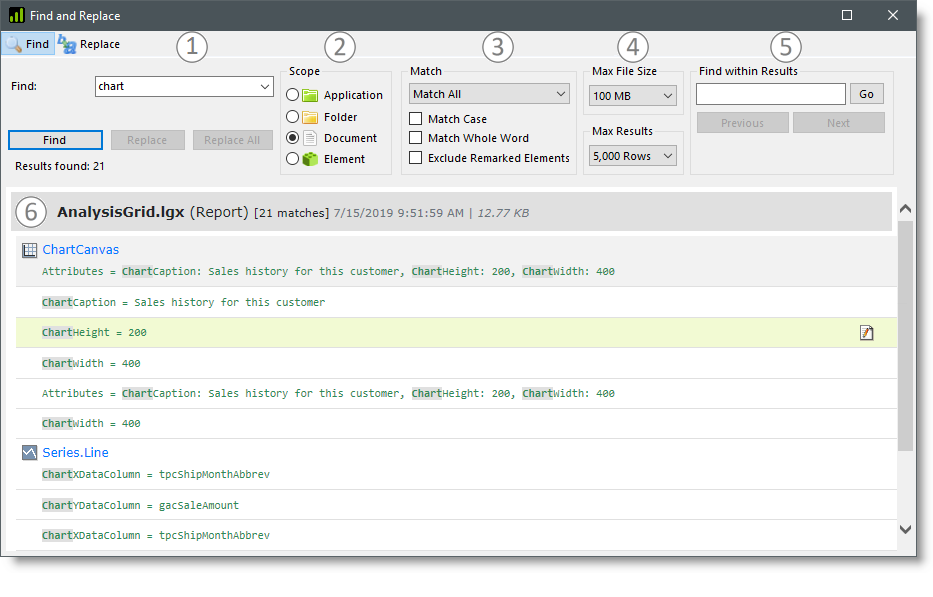
Search results are displayed in the Find and Replace dialog box, shown above.
The search results have been modified to provide more flexibility and to mimic web search results.
Controls in the dialog box, keyed to the numbers at the top, are:
- Find / Replace - Enter or select the desired search term and, if Replace is selected in the top menu, enter the term to replace it. Click Find, Replace, or Replace All to achieve the desired result.
- Scope - Select the desired scope: to search the entire application or to limit the search to the current folder, the current definition or document, or the current element.
- Match - Return results for all occurrences of the search term, for occurrences found in an element attribute value, or for occurrences found in element and attribute names. You can also filter results to match search term spelling case, to match only whole words, and to ignore elements that are remarked.
- Maximums - Limit searches to files no larger than the selected maximum file size, or limit the result set to the selected number of rows.
- Find within Results - Search within the results of the previous search.
- Results - Search results are grouped by file. Click a result row link to open the file and view the related element; click the row to view the element, or click the pencil/paper icon at the right end of a row to open the Attribute Zoom window for a specific attribute.
Additional searches can be launched from here with more selective scope and criteria, if desired. Results returned are listed by definition and are active links: clicking a result row will open the corresponding definition in the Workspace panel and highlight the specific occurrence in it.
Clicking the Replace tab in the dialog box reveals controls in which you can enter a replacement term and selectively make replacements.