Organizing Bookmarks
Users may want to group and organize the bookmarks they create. The Bookmark Organizer element allows users to place their bookmarks into "bookmark folders" at runtime.
A bookmark folder is not an actual folder in the web server file system; instead, the bookmark data is referenced in the master bookmark data file in a hierarchy that creates "logical folders". The Bookmark Organizer lets users manage bookmarks and folders. Multiple bookmarks can be collected into a folder and folders can have sub-folders.
Runtime Display and Manipulation
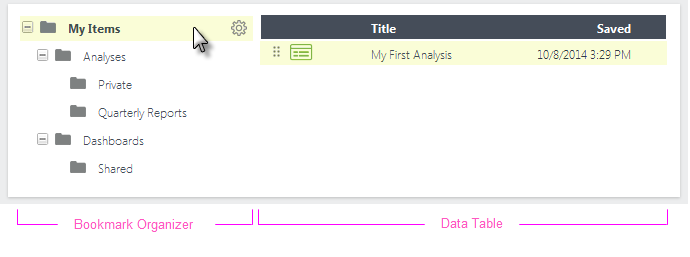
The Bookmark Organizer displays the bookmark folders and works with a Data Table element, in the same definition, that lists the bookmarks. Clicking an entry in the Data Table runs the "bookmarked" report. When a folder is clicked, the Data Table is refreshed to show the contents of that folder. Folders can be created, renamed, and deleted, and bookmarks are organized by dragging them into folders. Here's an example:

The example above shows a Bookmark Organizer and its companion Data Table. They can be physically arranged on the page however you desire, and theme selection and/or styling can vary their appearance.
The example shows the default "My Items" bookmark folder and several sub-folders created by the user. When bookmarks are first created, they're placed in the My Items folder by default. The "gear" icon appears when the mouse hovers over a folder and allows you to add new sub-folders, and rename or delete sub-folders. The Data Table displays the bookmarks in each folder (the selected folder name is shown in bold text).

To move a bookmark from one folder to another, the user just drags the Data Table row's drag icon to the desired folder, as shown above.

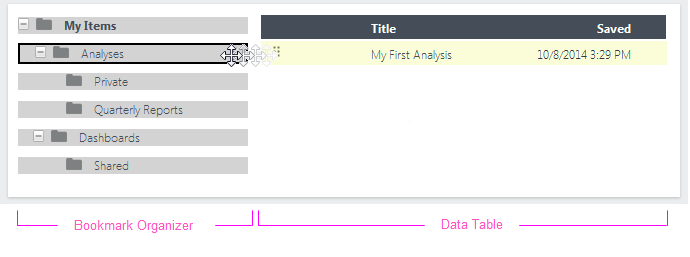
Sub-folders can also be rearranged into other folders by clicking their folder icon and dragging, as shown above.
Implementation
As mentioned above, to implement this you'll need to add a Bookmark Organizer element and a companion Data Table element. Here's how:
- Implement manual or automatic bookmarks, as discussed in earlier sections.

- Include a Bookmark Organizer element in your report definition (one possible arrangement is shown above). Set its Data Table ID attribute to the element ID you'll give its companion Data Table.

- Add the companion Data Table, as shown above, and ensure its ID matches the one entered in the previous step.

- Add a DataLayer.Bookmarks element beneath the Data Table, as shown above. Unless you want to override the Bookmark Collection Default value set in _Settings.lgx, you can leave the collection name blank here.

- Add a Compare Filter beneath the datalayer and set its attributes as shown above. The Bookmark Organizer element automatically creates and updates the session variable rdSelectedFolderID each time the user selects a folder, so this filter causes the Data Table to only show the bookmarks in the selected folder.

- Add Data Table Column, Image, and Action.Drag Bookmark elements, as shown above. If you prefer, you can use a Label or Button element instead of the image. Set the action element's attributes as shown.
 If you want to use the standard "drag icon" image -
  - provided with Logi Info, enter the following for the Image element's Caption attribute value: ../rdTemplate/rdBookmarkOrganizer/rdDragHandle.png
- Enter one or more Data Table Column and Label elements, as shown above, to display information identifying the bookmarks.

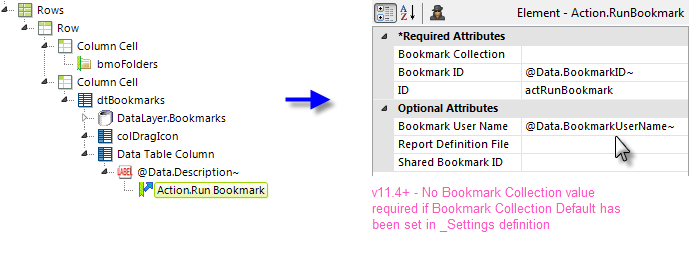
- Finally, in order to actually run the bookmarks, add an Action.Run Bookmark element beneath the Label element and set its attribute, as shown above.

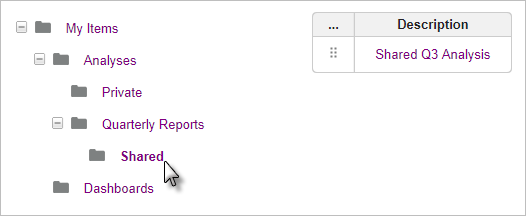
When run, with the Clarity theme applied, this simple example looks like the image shown above. The bookmark can be dragged into any of the folders and clicking its bookmark description will run the report and apply the bookmark.