Receiving Messages
The data components (tables, charts, crosstabs and geographic maps) in a library component can be used as the message receivers to receive messages that are sent out from the current library component or another library component. When a data component receives a message at runtime, it will perform the web actions defined in the message, such as filtering, sorting itself using conditions specified in the message, running the current or another library component with predefined parameter values, or changing its object properties.
To make a data component receive messages and respond corresponding web actions, take the following steps:
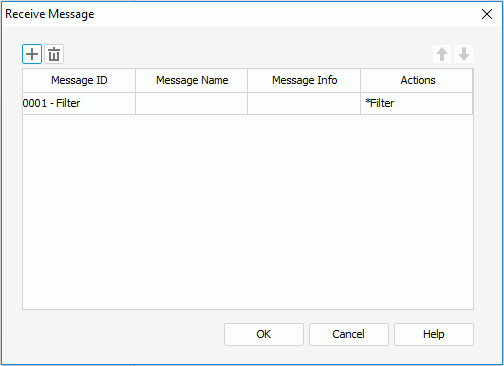
- Right-click the data component and select Receive Message from the shortcut menu. The Receive Message dialog appears.
- Select
 to add a message line.
 - Select the message you want the data component to receive from the Message ID column.
- 0001 - Filter
When the data component receives this message, it will filter itself based on the filter condition defined in the message. - 0002 - Sort
When the data component receives this message, it will sort itself based on the sort condition defined in the message. - 0003 - Parameter
When the data component receives this message, the library component that contains the data component will re-run with the parameter values defined in the message. - User Defined
A data component in a library component can also receive user defined messages and then respond web actions, such as Filter, Sort, Property and Parameter.The Filter web action enables you to filter the records of the data component when it receives the message.
The Sort web action enables you to sort the records of the data component when it receives the message.
The Property web action enables you to change properties of the data component itself when it receives the message.
The Parameter web action enables you to run a library component, especially a library component with parameters using predefined parameter values, or re-run the current library component with predefined parameter values when the message is received.
- 0001 - Filter
- If a built-in message is selected, the action the message will respond cannot be changed, but you can edit how the action will be performed as you want.
If a user define message is selected, you can specify the action the data component will respond when it receives the message and define how the action will be performed.
- Repeat the above steps to add more messages to receive and define the actions to respond the messages.
To delete a message, select it and select
 . To adjust the display order of the messages in the message box, select a message and select
  or
or  .
. - Upon finish, select OK to close the dialog.
To receive the built-in Filter message:
- In the Receive Message dialog, select 0001 - Filter from the drop-down list of the Message ID column. The filter condition defined in the message will be automatically applied.
- If you want to edit the filter condition, select in the Actions column and select
 that appears in the text box. The Filter dialog appears.
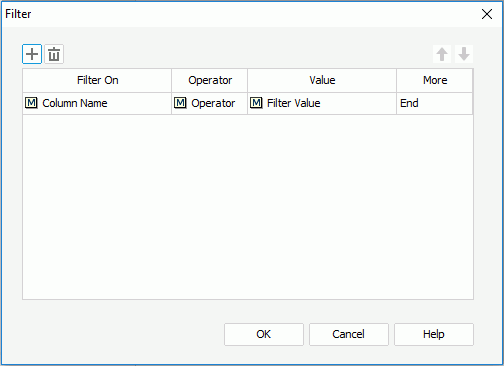
- Specify the filter condition by selecting the field on which the filter will be based from the Filter On drop-down list, the operator to compose the condition from the Operator drop-down list and the value of how to filter the field from the Value drop-down list.
- If necessary, select
 to add more filter conditions to filter other field values and specify the relationship between the conditions in the More column.
To delete a filter condition, select the condition and select
 . To adjust the order of the filter conditions, select
  or
or  .
. - Select OK to finish defining the filter conditions.
To receive the built-in Sort message:
- In the Receive Message dialog, select 0002 - Sort from the drop-down list of the Message ID column. The sort conditions defined in the message will be automatically applied.
- If you want to edit the sort condition, select in the Actions column and select
 that appears in the text box. The Sort dialog appears.
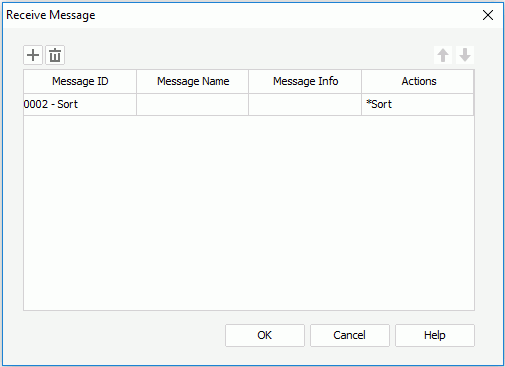
- Specify the sort condition by selecting the field on which to sort the records from the Sort On drop-down list, and in which order to sort the records from the Sort Value drop-down list.
- If necessary, select
 to add more sort conditions to sort other fields.
To delete a sort condition, select the condition and select
 . To adjust the order of the sort conditions, select
  or
or  .
. - Select OK to finish defining the sort conditions.
To receive the built-in Parameter message:
- In the Receive Message dialog, select 0003 - Parameter from the drop-down list of the Message ID column.
- Choose a message type from the Message Info column: Automatic or Customized.
- When Automatic is selected, all the parameter values specified in the sent message will be automatically applied. If you want to edit the parameters,
- Select in the Actions column and select
 that appears in the text box. The Parameter dialog appears.
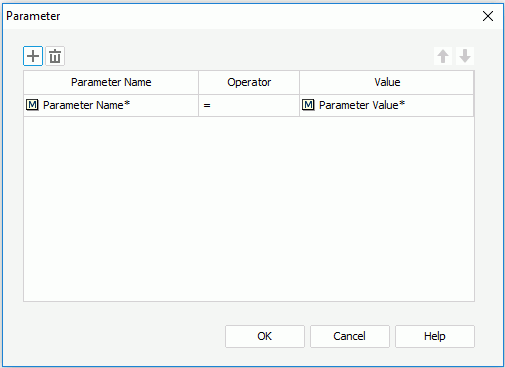
- Specify the parameter and the value of the parameter from the Parameter Name and Value drop-down lists. The operator can only be =.
Parameter Name* in the Parameter Name drop-down list means that all the parameters defined in the message will be used to re-run the library component, and its corresponding value can only be Parameter Value* that represents all the parameter values.
- If necessary, select
 to add more parameter lines to specify other parameter values. If you specify a parameter value more than once, the last setting takes effect.
To delete a parameter line, select it and select
 . To adjust the order of the parameters, select
  or
or  .
. - Select OK to accept the settings. Then at runtime, when the data component receives the message, the library component which contains it will re-run, using all the predefined parameter values.
- Select in the Actions column and select
- When Customized is selected, the parameter value defined in the sent message will be automatically applied.
If you want to edit the parameter,
- Select in the Actions column and select
 that appears in the text box to open the Parameter dialog.
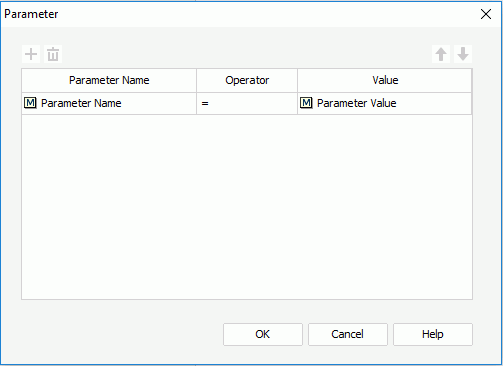
- Specify the parameter and the value of the parameter from the Parameter Name and Value drop-down lists. The operator can only be =.
- Select OK to accept the settings. Then at runtime, when the data component receives the message, the library component which contains it will re-run, using the predefined parameter value.
- Select in the Actions column and select
In the Parameter Name and Value drop-down list, you may find some items have the icon
 ahead of them and they are listed under the Message Key node. If you choose an item of this type, it means the item will not be used directly in the parameter condition, instead, it will be mapped to a key in the message and Logi JReport will search for the value that is specified to the key from the message first and then use that value to compose the parameter condition.
 - When Automatic is selected, all the parameter values specified in the sent message will be automatically applied. If you want to edit the parameters,
To receive a user defined message and respond the Filter web action:
- In the Receive Message dialog, input the ID and name of the user defined message in the Message ID column and Message Name column separately, then select in the Actions column and select
 that appears in the text box.
 - In the Web Action List dialog, select *Filter in the Action Name column and select OK.
- In the Filter dialog, specify the filter condition as required.
- Select OK to accept the settings.
To receive a user defined message and respond the Sort web action:
- In the Receive Message dialog, input the ID and name of the user defined message in the Message ID column and Message Name column separately, then select in the Actions column and select
 that appears in the text box.
 - In the Web Action List dialog, select *Sort in the Action Name column and select OK.
- In the Sort dialog, specify the sort condition as required.
- Select OK to accept the settings.
To receive a user defined message and respond the Property web action:
- In the Receive Message dialog, input the ID and name of the user defined message in the Message ID column and Message Name column separately, then select in the Actions column and select
 that appears in the text box.
 - In the Web Action List dialog, select *Property in the Action Name column and select OK. The Change Property dialog appears.
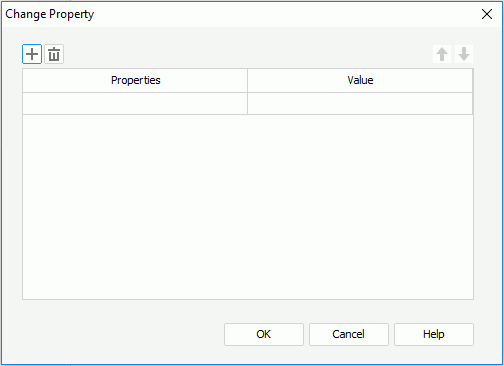
- Specify the property you want to change and the value for it respectively from the Properties and Value drop-down lists. Only the properties of the data component itself can be changed at runtime.
In the two drop-down lists, you may find some items have the icon
 ahead of them and they are listed under the Message Key node. If you choose an item of this type, it means the item will not be used directly in the property changing condition, instead, it will be mapped to a key in the message and Logi JReport will search for the value that is specified to the key from the message first and then use that value to compose the property changing condition.
 - If necessary, select
 to add more property lines to change values of other properties.
To delete a property line, select it and select
 . To adjust the order of the properties, select
  or
or  .
. - Select OK to accept the settings.
To receive a user defined message and respond the Parameter web action:
- In the Receive Message dialog, input the ID and name of the user defined message in the Message ID column and Message Name column separately, then select in the Actions column and select
 that appears in the text box.
 - In the Web Action List dialog, select *Parameter in the Action Name column and select OK. The Parameter dialog appears.
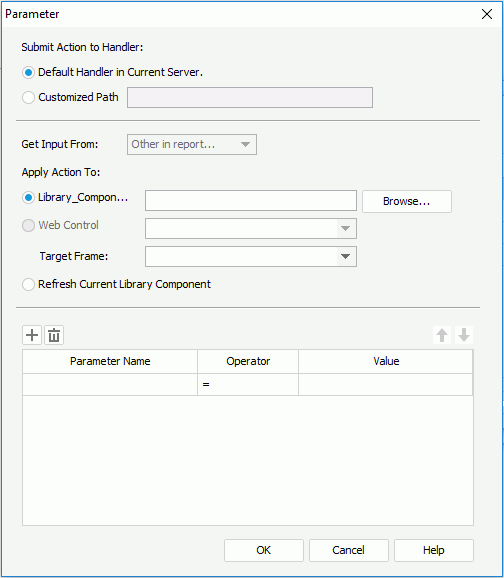
- Specify the handler which will receive the parameters of the web action. The handler may be the default one in the current server, or in another server specified by Customized Path.
- Specifies whether to apply the action to run another library component or refresh the current. If you choose to run another library component, select the Browse button to specify the library component, then select the window or frame in which the library component will be opened from the Target Frame drop-down list.
- If the specified library component contains parameters, the parameters will be automatically listed in the parameters box. Specify the value for each parameter. You can also select
 to add more parameter lines to specify other parameter values.
In the Parameter Name and Value drop-down list, you may find some items have the icon
 ahead of them and they are listed under the Message Key node. If you choose an item of this type, it means the item will not be used directly in the parameter condition, instead, it will be mapped to a key in the message and Logi JReport will search for the value that is specified to the key from the message first and then use that value to compose the parameter condition.
 - To delete a parameter line, select it and select
 . To adjust the order of the parameters, select
  or
or  .
. - Select OK to accept the settings.
Note: In the drop-down lists for editing the conditions to respond a message, you may find that some items have the icon  ahead of them and they are listed under the Message Key node. If you choose an item of this type, it means the item will not be used directly in a condition, instead, it will be mapped to a key in the message and Logi JReport will find the value that is specified to the key from the message first and then use that value to compose the condition.
 Previous Topic