The Report Center Menu
Logi Info developers often have a requirement to provide a menu of the reports in their Logi application. The ReportCenter family of elements, available beginning in Logi Info v10.0.455, provides an easy and flexible way to implement such a menu. These elements and their use is discussed in this topic.
- About the ReportCenter Elements
- Include Reports in the Menu
- Create the Menu
- Schedule Report Distribution
About the ReportCenter Elements
The ReportCenter elements provide a simple way to create a menu of report links that can be included in any report definition. They also provide a way to display and manage bookmarks (see ), without needing to build these elements separately. And, finally, they provide a quick and easy way to create and manage email-based report distribution schedules without the need to build separate elements or use process tasks.
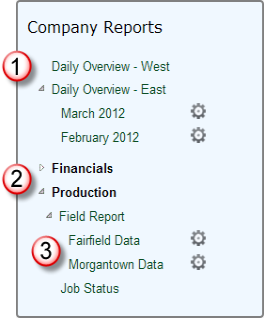
An example of a typical menu is shown above. Menu items can be presented as:
- Individual Report links
- Report links grouped beneath a menufolder
- Saved Bookmark links - developers can enable option link icons to allow users to manage bookmarks and/or schedule them for delivery via email, at runtime.
Reports can be run in the current, or in a different, browser window and individual menu items can be dynamically shown or hidden in the menu, based on tokens and security rights.
As an element, the ReportCenter Menu sits within a report definition that you create, giving you the flexibility to position it and style it to match the surrounding page appearance, as desired.
![]() The ReportCenter Menu cannot provide a menu of reports and bookmarks available in multiple Logi applications; its scope is limited to the Logi application in which the ReportCenter Menu element resides.
The ReportCenter Menu cannot provide a menu of reports and bookmarks available in multiple Logi applications; its scope is limited to the Logi application in which the ReportCenter Menu element resides.
The menu background and border colors, border style, fonts, and other appearance-related qualities can be specified using container elements, themes, and/or style classes.
A ReportCenter Menu Sample Application is available on DevNet and can be reviewed for more implementation examples.
Now, let's see how the ReportCenter elements are used.
Include Reports in the Menu
Including a report definition in a menu is very easy: it starts by "tagging" it to be in the menu:
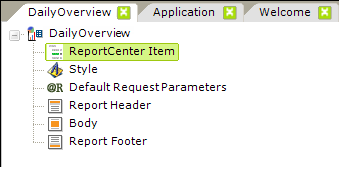
This is done by adding a ReportCenter Item element, as shown above, to a report definition.
The actual text of the menu item link for a report will be either a) the root element's Caption attribute value or, if that's blank, b) the report definition filename (without its file extension). Using the Caption attribute lets you introduce spaces in the link text, which can't be included in a definition filename.
You don't have to do anything else and the report will be automatically included in the menu. However, the ReportCenter Item element has the following optional attributes, which can be used to provide additional functionality:
| Attribute | Description |
|---|---|
| ReportCenter Allow Schedule | When
set to True, a clock icon will appear next to menu links for report bookmarks. This icon allows the user to schedule the report to
be run and distributed via email. Used when Include Bookmarks attribute (see below) is True, and the Logi Scheduler has been installed. Scheduling
is only available for report bookmarks, not for reports. Default value: False |
| ReportCenter Allowed Export Formats | Specifies the formatting options, HTML, PDF, and/or NativeExcel, that will be available to the user when scheduling report bookmarks for email distribution at runtime. Multiple formats can be specified in a comma-separated list. These options appear in a selection list in the scheduling pop-up panel. |
| ReportCenter Exclude | Allows the developer to programmatically control the visibility of this menu item, by using tokens in this attribute value which resolve to True (Hidden) or False (Visible). |
| ReportCenter Export Table ID | Used when bookmarks for reports that contain multiple data tables are made available for scheduled distribution. Specifies the element ID of the data table to be exported. Information outside of the data table,
such as headers and footers, will not be included in the export. |
| ReportCenter Folder | Specifies the text for the menu folderitem that the current report link will appear under. Creates the folder item if it doesn't exist. Folders can have multiple levels of depth. To create multiple levels,
separate each folder name with a the "pipe" ( | ) symbol. For example, to create a
"Sales" folder under an "Accounting" folder, enter Accounting|Sales |
| ReportCenter Frame ID | Sets the target frame for display of the report when the menu item is clicked. Options include: |
| ReportCenter Include Bookmarks | Controls the appearance of saved bookmarks for the current report in the ReportCenter Menu. Default value: False |
Create the Menu
Once we've tagged all of the report definitions for the menu, we can build the actual menu:
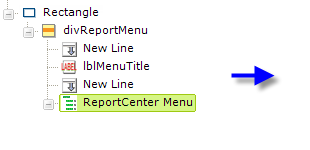
This is done by adding a ReportCenter Menu element to the report definition that presents the menu.
The elements used to create the menu example shown at the top of this topic are shown above. It was created by using Rectangle and Division elements to contain the menu, with style applied to the Rectangle to provide a border, background color, and padding. A separate Label element was used to provide the menu title. This is, of course, just one of many possible ways of presenting the menu.
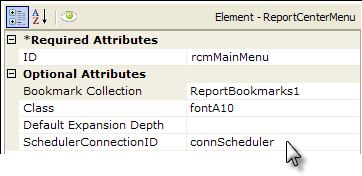
The ReportCenter Menu element's attributes are shown above, right and have been configured as follows:
| Attribute | Description |
|---|---|
Bookmark Collection | (Required) Saved bookmark collection name, e.g. myBookmarks1. If bookmarks have been created on a per-user basis, using a GUID or a user name, identify the collection with a token here. Note: The path to the folder where bookmarks have been saved must be configured in the General element's Bookmark Location attribute in the _Settings definition. |
ID | (Required) A unique identifier for the element |
| Class | Specifies the style class for the menu report links. Note that menu folder item font is specified by overriding the .rdFolder class, in your stylesheet. |
| Default Expansion Depth | Specifies which level of the menu folders items will be expanded by default. Blank or 0 = no expansion, or enter a number such as 1 or 2. |
Scheduler Connection ID | If users will be allowed to schedule reports for email distribution, this attribute specifies the ID of the Connection.Scheduler element configured in the _Settings definition (a pull-down list of connections is provided). |
Nothing more is needed for the basic menu; running the definition now will cause all of the other report definitions tagged with ReportCenter Item elements to appear in the menu.
Controlling the Report Links Dynamically
The ReportCenter Menu element creates its own internal DataLayer.Definition List element and filters it based on the tagged definitions. However, if you want more control over the included report definitions, you can override that internal datalayer by adding your own DataLayer.Definition List element beneath the ReportCenter Menu element and filtering it as desired.
Note that this datalayer type can retrieve root element
"custom attributes" along with the other definition information; these are attributes you enter manually by editing the source of a definition's root Report element. You might use a custom attribute, for example, to indicate whether definitions are to be included in the menu or not, then apply filtering to the datalayer based on the custom attribute's column value.
Ordering Menu Items
The menu items in a basic menu will normally be ordered alphabetically by their menu link text. However, if desired, you can rearrange the order of the menu items.
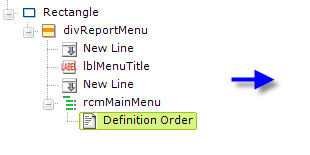

This is done by adding one or more Definition Order elements beneath the ReportCenter Menu element, as shown above, and assigning a report definition to them. The menu items will then appear in the top-to-bottom order of the Definition Order elements. Any remaining menu items not represented by a Definition Order element will be shown in alphabetical order in the menu, below those items that are represented by one.
Ordering Menu Folder Items
As described earlier, the ReportCenter Item element allows you to create folder items in the menu. In a manner similar to controlling the arrangement of menu items, you can also control the order of these folders within the menu items.
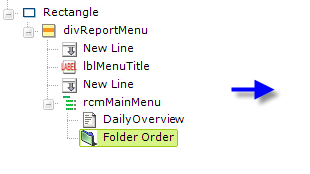

This is done by adding one or more Folder Order elements beneath the ReportCenter Menu element, as shown above, and assigning a report definition to them. The Folder Name attribute value must exactlymatch the ReportCenter Item element's ReportCenter Folder value. The menu folder items will then appear in the top-to-bottom order of the Definition Order and Folder Order elements. Any remaining menu items not represented by a Definition Order or Folder Order element will be shown in alphabetical order in the menu, below those items that are represented.
Additional child Definition Order and Folder Order elements can be placed beneath a Folder Order element in order to control the arrangement of child menu items and folders displayed when a menu folder is expanded.
Schedule Report Distribution
When report bookmarks are being used and the appropriate ReportCenter Item attributes have been set to allow scheduling, two icons will appear at the end of each bookmark menu link:
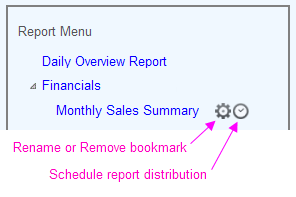
These icons allow users to rename or remove the bookmark, or schedule report distribution, as shown above.
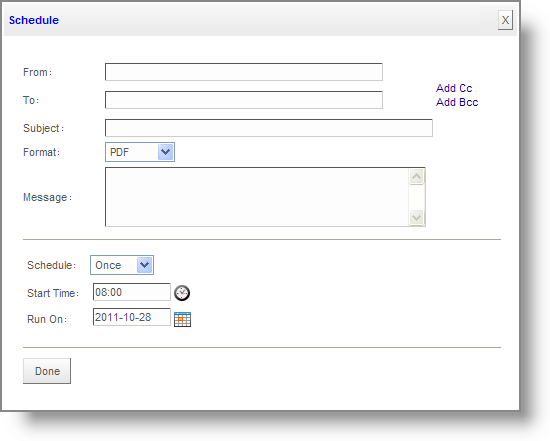
When the Schedule icon is clicked, the modal dialog box shown above, is displayed and the user can fill-in appropriate information.
Multiple addresses can be entered in the "To:" field by separating them with commas or semi-colons.
At the designated time, the Logi Scheduler will run the report, export it in the specified format and attach it to an email (for PDF and Excel formats) or embed it in an email (Web Mail format), and send the email using the first (top-most) Connection.SMTP
element found in the _Settings definition. This enables an administrator
to switch SMTP servers without having to change report schedules. The developer, of course, controls which export formats are available using a ReportCenter Item attribute.
If it's supported by your browser,
an HTML5 feature called "local storage" will be used to automatically store the email
addresses you enter, preserve them between sessions, and provide them back to
you in a list for selection in subsequent sessions. If your browser doesn't
support this feature, or if it's turned off in your browser options, obviously
the element won't be able to provide the list of addresses for re-use.