Configure InfoGo
InfoGo is a Logi application distributed with the Self-Service Reporting Module. It provides a complete self-service reporting experience for users. This topic is intended for Logi developers and discusses how to configure the application after it is installed.
IMPORTANT: If you wish to upgrade to JDK 8 release build 261 (1.8.0_261), or any later build of JDK 8, you will need to replace the mscorlib.jar file in the application folder with the new one and restart your server. The mscorlib.jar file can be found on our Product Download page. Please contact Support for additional assistance.
Topics in this document include:
|
About the InfoGo Application
Introductory information about the Self-Service Reporting Module (SSRM) and directions for installing it can be found in our document Install the Self-Service Reporting Module. If you haven't read it already, we recommend you do so before proceeding.
The SSRM includes a complete Logi application, InfoGO. It allows users to create and share visualizations, dashboards, and reports at runtime.
![]() Unlike Logi Sample Applications, InfoGO is distributed complete with Logi Engine files - these include required code and you should not downgrade this application to an earlier engine version or it may cease to work.
Unlike Logi Sample Applications, InfoGO is distributed complete with Logi Engine files - these include required code and you should not downgrade this application to an earlier engine version or it may cease to work.
![]() Developers should note that InfoGO is an extremely advanced example of Logi Info programming. It uses highly customized code and specialized techniques that may not work if copied into other Logi applications. While you can customize some portions of it, pulling it apart and reusing code in other applications, as you might with a regular Logi Sample Application, may not work well.
Developers should note that InfoGO is an extremely advanced example of Logi Info programming. It uses highly customized code and specialized techniques that may not work if copied into other Logi applications. While you can customize some portions of it, pulling it apart and reusing code in other applications, as you might with a regular Logi Sample Application, may not work well.
Deployment Strategies
You have two alternatives available for deploying the InfoGO application:
Single-Instance - You use the InfoGO application just as it was installed, configuring and modifying it right in its installation location. The default location is C:\Program Files\Logi Analytics\InfoGO.
Multi-Instance - In this strategy, the instance you installed in C:\Program Files\.. is left untouched and becomes a reference model for other instances. You use that instance as the source for deployments to other locations, and configure, modify, and run those other instances. As with any Logi app, you can deploy instances using the Application Deployment tool in Logi Studio.
![]() The choice is up to you, but has ramifications when you install Logi Info and SSRM updates. When installing an update on top of an existing version, the installer will not overwrite definitions you've modified. So, for example, with the Single-Instance strategy, your customizations won't ever be overwritten. However, if you use the Multi-Instance strategy, installing the new version in C:\Program Files\.. is straightforward enough but you'll have to be careful when making subsequent deployments to other instances, because then you are responsible for deciding what gets overwritten.
The choice is up to you, but has ramifications when you install Logi Info and SSRM updates. When installing an update on top of an existing version, the installer will not overwrite definitions you've modified. So, for example, with the Single-Instance strategy, your customizations won't ever be overwritten. However, if you use the Multi-Instance strategy, installing the new version in C:\Program Files\.. is straightforward enough but you'll have to be careful when making subsequent deployments to other instances, because then you are responsible for deciding what gets overwritten.
Java Applications
For example, if you want to deploy InfoGo as a Java-based application:
- Install the SSRM, including the InfoGo application, as usual.
- Use Logi Studio to create a new Java application.
- Copy all the folders and their contents from the installed InfoGo application root folder to the new Java application root folder, except bin and rdTemplate.
- Copy InfoGoReportManagementPlugin.jar from the applications _SupportFile folder to the new Java application's WEB-INF\lib folder.
- Ensure that the copied folders have inherited the file access permissions of the Java application root folder.
Configure the Java application as described in this topic, and make any customizations you desire.
.NET Applications
If you want to deploy InfoGo as a.NET-based application:
Install the SSRM, including the InfoGo application, as usual.
Use Logi Studio to create a new .NET application.
Copy all the folders and their contents from the installed InfoGo application root folder to the new .NET application root folder, except bin and rdTemplate.
Give full control to IIS_IUSRS on the .NET application root web folder (and its subfolders).
Ensure that the copied folders have inherited the file access permissions of the .NET application root folder.
Configure the .NET application as described in this topic, and make any customizations you desire.
Comple the Installation
After the SSRM installer has finished, you need to do several things before you can use the InfoGO application.
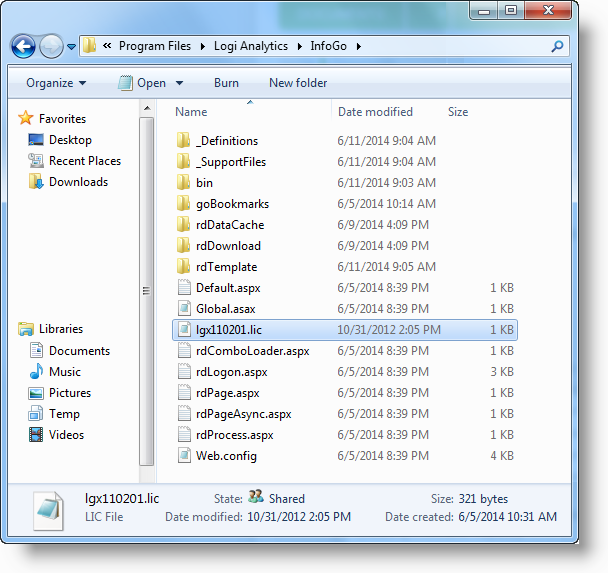
- Copy your Logi Info license file, from any existing Logi Info v11 application folder or your Logi Info installation folder (typically C:\Program Files\LogiXML IES Dev\LogiStudio) and paste it into the InfoGO application folder, as shown above.
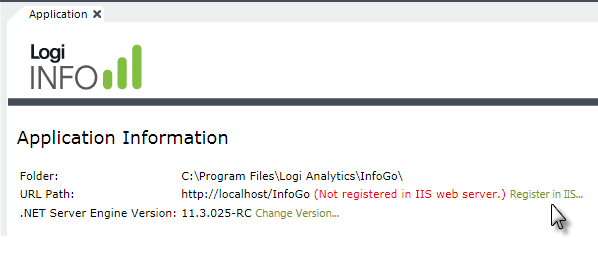
- Launch Logi Studio and open the InfoGO application by using Open Application, then navigating to and selecting the C:\Program Files\Logi Analytics\InfoGO folder. Register it with the IIS server, using the link shown above.

- Now you can test the application installation by previewing its "goHome" report definition in Studio or running the application in your browser. It should look like the example above.
Your installation is complete but... you must specify a datasource and metadata, as discussed in the next section, before it can be used.
Specify Application Metadata
InfoGO takes advantage of two special elements that are installed with it, the Metadata and Active Query Builder elements. They enable extended functionality in Studio and in the Analysis Grid super-element.
Developers use the Metadata Builder wizard to specify the data that will be available for use at runtime by creating a metadata file. Step-by-step instructions for creating or editing a metadata file are in our document Use the Metadata Builder Wizard.
After building your metadata file, return to this document and continue with the next section.
 Metadata can be retrieved instead from a REST-style web service by specifying the service's URL in the Metadata element's Metadata Url
attribute.
Configure Scheduler and SMTP Services
InfoGO allows you to schedule report production and delivery via email. This is an optional feature and you can skip this section if you don't want to use it.
![]() The scheduling feature is dependent on the Logi Scheduler, a service that must be installed with Logi Info. If the Scheduler is not installed, you can re-run the Logi Info installer at any time and install it.
The scheduling feature is dependent on the Logi Scheduler, a service that must be installed with Logi Info. If the Scheduler is not installed, you can re-run the Logi Info installer at any time and install it.
Use the following steps to configure these features:
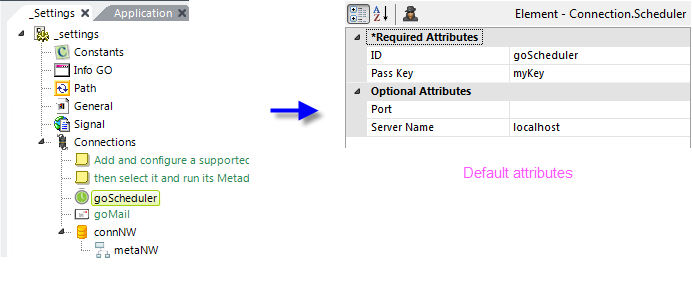
- Configure the Scheduler: In the InfoGO application's _Settings definition, uncomment the "goScheduler" element, as shown above. Its default attributes will work in most scenarios. For more detailed information about other configurations, see our document Use Logi Scheduler.
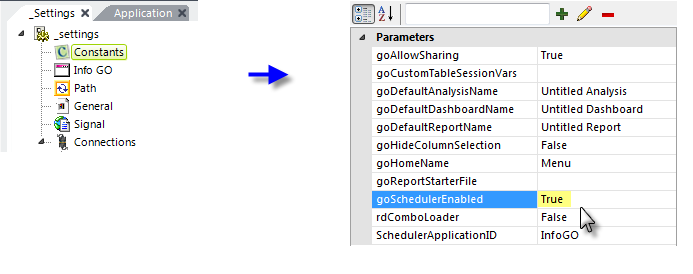
- Enable the Scheduler icons: In the _Settings definition, set the "goSchedulerEnabled" constant to True, as shown above.This controls the appearance of the Scheduler icons for items in the Home page.
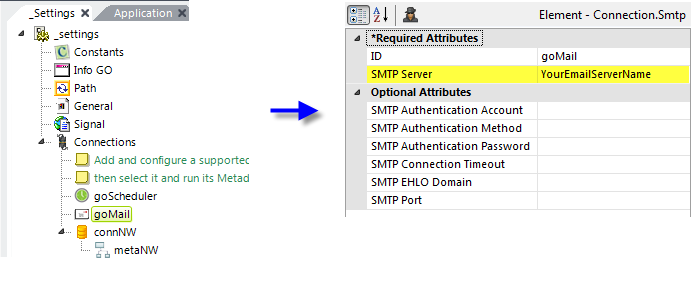
- Uncomment the "goMail" element and provide an email server name, as shown above.
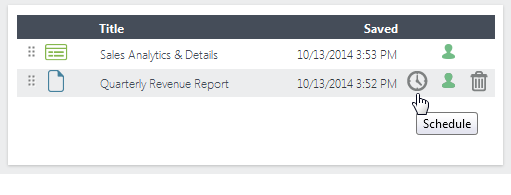
Once scheduling has been configured and enabled, a scheduling icon will appear for each Report item in the Home page resource list, as shown above. Users can click this icon at runtime to schedule report production and delivery.
Manage Scheduled Reports
![]() Administrators can make use of the goScheduleManager report definition included in the InfoGO application.
Administrators can make use of the goScheduleManager report definition included in the InfoGO application.
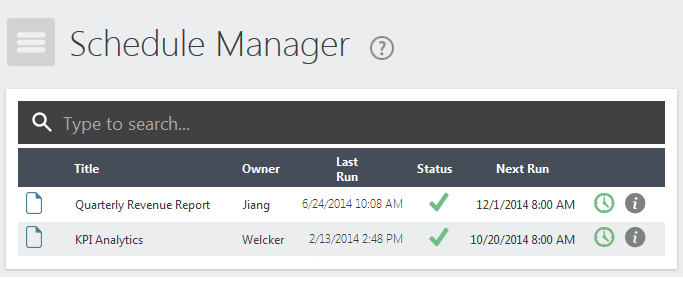
This report definition provides an overview of all scheduled reports, across all users, allowing an administrator to manage the schedules. As the developer, you're responsible for providing a link to this report and ensuring that security is implemented. As installed, the definition requires the administrative user to have the InfoGoScheduleManager security right ID.
Click the "Information" icon for any entry to toggle a display of its details:
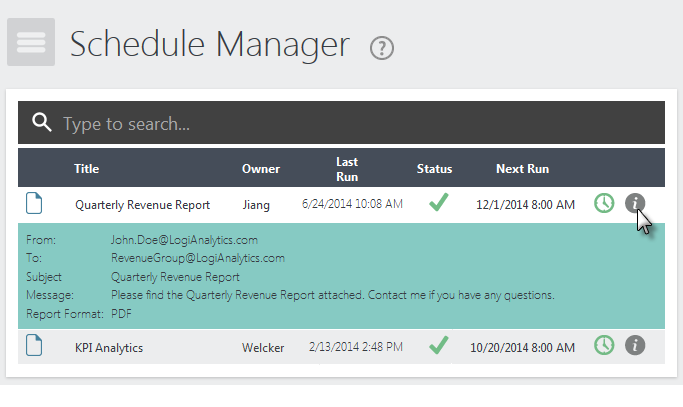
Click the "Clock" icon for any entry to open the Schedule panel so the details of any scheduled report can be edited.
If an error occurs, click the "Debug" icon in the Status column to view the error message.
Configure Security
Logi Security can be used with InfoGO to authenticate users and to control access to application features and data. This is optional and you can skip this section if you don't want to use security. For information about Logi Security in general, see our document Introduction to Logi Security 10.
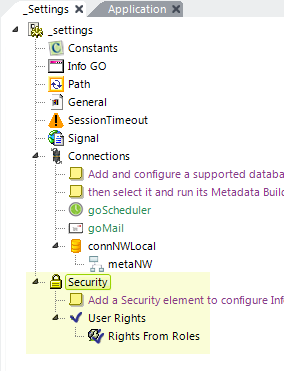
As shown above, to use Logi Security, add a Security element to the _Settings definition, along with whatever child elements are needed for your security scenario and configure them accordingly.
Access to features and data is controlled using the Security Right ID, which is an attribute of many elements. For example, the visibility of the Analysis Grid element in a report can be controlled by setting its Security Right ID attribute. You can use this approach to control the availability of many of the elements used in InfoGO.
There are two special opportunities to implement data security in the InfoGO application. Assuming you have Logi Security enabled:
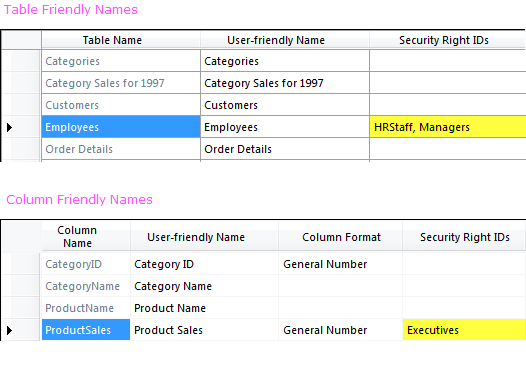
- When using the Metadata Builder wizard, you can assign Security Right ID values to tables and to columns, as shown above. These tables and columns will only appear in InfoGO's Analysis page's Data tab if the logged-in user has the appropriate security rights.

- The Metadata element has its own Security Right ID attribute. In the _Settings definition fragment shown, there are three Metadata elements in use. Normally, all three would appear in the Analysis page's Data tab, in the Source selector. However, if the metaMarket element is configured with a Security Right ID, as shown above, then the logged-in user will only see it in the Source selector if he or she has the appropriate security rights.
Configure InfoGO Constants
The application's _Settings definition includes several InfoGO constants you may want to configure. These constants are:
| Constant | Description |
| goAllowSharing |
|
goCustomTableSessionVars |
|
| goDefaultAnalysisName | Specifies the default title that will be used for each new Analysis created. The default value is: Untitled Analysis. |
| goDefaultDashboardName | Specifies the default title that will be used for each new Dashboard created. The default value is: Untitled Dashboard. |
| goDefaultReportName | Specifies the default title that will be used for each new Report created. The default value is: Untitled Report. |
| goHideColumnSelection | Specifies whether the column selection panel will be shown in the Analysis page's Data tab after a table is selected. When set to False, all columns are automatically selected. The default value is True. |
| goHomeName | Specifies the title of the Home page. The default value is Home. |
| goReportStarterFile |
@Function.AppPhysicalPath~\SaveFile\InitialReport.xml |
| goSchedulerEnabled | Controls whether the Schedule icon appears in the Home page list of reports. The default value is False. |
| SchedulerApplicationID | Specifies the ID that will be used for this task in the Logi Scheduler. The default value is InfoGO. |
Other constants, unrelated to InfoGO, may also exist.
Customize InfoGO
In addition to setting the constants identified in the previous topic, InfoGO can be customized or "branded" in several ways to make it look like "your" application. This is optional and you can skip this section if you don't want to do this.
| Reports | Customization Opportunity |
| goBookmarkSharingUserlist |
|
| goCustomizations.goWebHeader | Company name, logo, header colors, and separator line can be customized here. |
| goCustomizations.goWebFooter | Copyright statement, footer colors, and separator line can be customized here. |
| Support Files | Customization Opportunity |
| goCustomizations.Custom.css | Add your own custom CSS classes here; be sure to include this file using a Style or Global Style element. |
| goCustomizations.Custom.html | Include custom HTML for insertion within the HTML <Head> tags. Among other things, this is where you can specify the location of your Favicon file. |
| goCustomizations.Custom.js | Include custom JavaScript for use within the application. |
| goCustomizations.dmfAnlysisGrid.xml | Definition Modifier code for the goAnalysisGrid definition. A reference to this already exists in the definition. |
| goCustomizations.dmfDashboard.xml | Definition Modifier code for the goDashboard definition. A reference to this is already exists in the definition. |
| goCustomizations.dmfHome.xml | Definition Modifier code for the goHome definition. A reference to this is already exists in the definition. |
| goCustomizations.dmfReport.xml | Definition Modifier code for the goReport definition. A reference to this is already exists in the definition. |
| goCustomizations.dmfShared.xml | Definition Modifier code for the goShared definition. A reference to this is already exists in the definition. |
| goCustomizations.dmfSchedulerManager.xml |
|
Themes
You can also change the basic look of the application by changing its Theme, which is set in the _Settings definition.
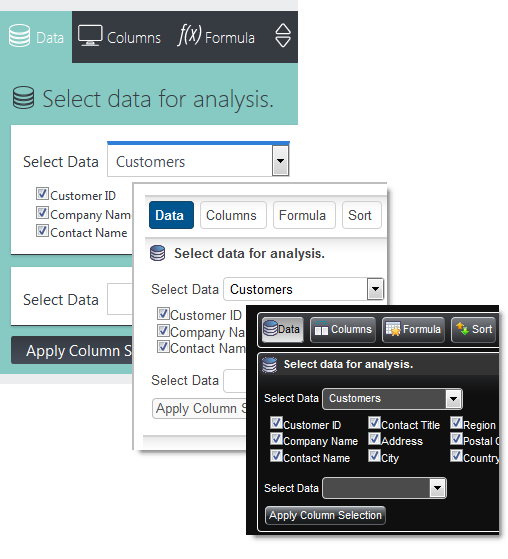
The default Theme is Signal but, as shown above, you can use other themes. More information about themes can be found in Themes.
Embed InfoGO
The InfoGO application can be embedded into other Logi applications or into non-Logi HTML pages.
Use InfoGO as the Base Application
One of the simplest ways to embed InfoGO is to use it as the base application, then add your own definitions and supporting files to it. This lets you "build out" the application with your own code and refer to InfoGO definitions directly.
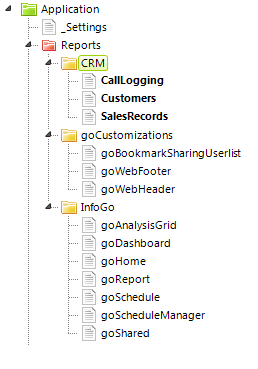
In the example above, Studio's Application Panel shows an additional folder ("CRM") and definitions that have been added to InfoGO in order to use this approach. It has the advantage of a single code base, does not use an iFrame, and the security scheme in InfoGO can be used by the rest of the application.
Embed in an iFrame without SecureKey
The following example shows one way to embed InfoGO into another Logi application using an iFrame, but without using Logi Secure Key.
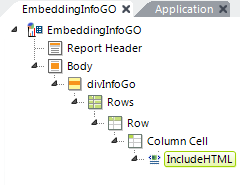
As shown above, an Include HTML element is added to the report definition. Width control is exercised by placing it inside a container, like an HTML table Column Cell or a Division, whose width can be set. Here's the HTML code to include:
<iframe src='http://yourServer/InfoGO' style="width: 100%; min-height: 1200px; |
The same code can be used to embed InfoGo into a non-Logi application.
Embedin an iFrame with SecureKey
If you want to embed InfoGo using an iFrame and make use of Logi SecureKey authentication, you first have to get the SecureKey value from the InfoGO application.

One way to do this is shown above. Under a Local Data element, DataLayer.CSV is used to retrieve the key value. This datalayer type is used because it can use a URL to retrieve the data. Its CSV File attribute value will be similar to:
|
That retrieves one row into Local Data, with a column named SKey, containing the SecureKey value. Then, using the same embedded script from the previous example:
<iframe src='http://yourServer/InfoGO/?rdSecureKey=@Local.SKey~' style="width: 100%; |
Add the rdSecureKey parameter and Local Data token, shown in blue above, to the iFrame source URL to complete the authentication process when embedding the InfoGO application.
Special Update Configurations
This section discusses special configuration changes you may need to make manually when upgrading from one version to another.
![]() If upgrading from versions earlier than SSRM v1.1.41, you may need to manually edit your _Settings definition:
If upgrading from versions earlier than SSRM v1.1.41, you may need to manually edit your _Settings definition:

- Open your _Settings definition and select the General element, as shown above. Look at its attributes to see if the highlighted Bookmark Collection Default attribute exists. If so, you don't need to do anything and you're done.
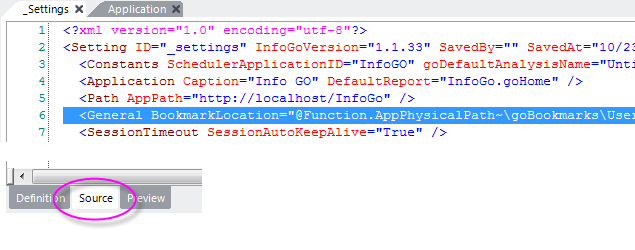
- Otherwise, if you don't see that attribute, click the Source tab at the bottom of the Workspace panel to edit the source code manually. Find the <General tag, highlighted above, and paste the following attribute text into it, before the BookmarkLocation attribute:
BookmarkCollectionDefault="@Function.UserName~goCollection"
Be sure there's a space before and after this text. This is the default value - if you've used a different bookmark collection naming convention, you'll need to adjust the value accordingly.
- Switch back to the Definition tab and save the _Settings definition.
That completes the special upgrade configuration.
![]() Back to top
Back to top

