Upgrade Logi Products and Apps
Each new release of Logi Analytics managed reporting products provides feature enhancements and improvements. Customers are encouraged to take advantage of these improvements by upgrading to the latest releases when they become available.
IMPORTANT: If you wish to upgrade to JDK 8 release build 261 (1.8.0_261), or any later build of JDK 8, you will need to replace the mscorlib.jar file in the application folder with the new one and restart your server. The mscorlib.jar file can be found on our Product Download page. Please contact Support for additional assistance.
These instructions provide guidance for the process of upgrading, modifying, and uninstalling your Logi product installations and managing the related versions of your Logi applications.
- General Requirements
- Upgrade Impacts
- Upgrade the Products
- Change .NET Versions in Studio
- Change .NET Versions with Server Manager
- Change Java Versions
- Create Application Pools in IIS 7
- Create Application Pools in IIS 6
![]() The installation tool, InstallShield, does not remove any files or folders created or modified after the initial installation, including Sample Applications provided with Logi products that you may have modified.
The installation tool, InstallShield, does not remove any files or folders created or modified after the initial installation, including Sample Applications provided with Logi products that you may have modified.
General Requirements
- Logi products for the Windows environment, and Logi Studio, require the .NET Framework. Prior to v11.0.127, .NET v2.0 or 3.x was required; for v11.0.127 and later, .NET 4.x is required. If not already in place, with your consent, appropriate versions of the .NET framework are installed when Logi products are installed. They are also available for free from the Microsoft Download Center.
- Separate installations of different versions of Logi products and applications can co-exist as long as they are installed in different folders.
- IIS 6 users may need to implement Application Pools to isolate Logi applications using different .NET framework versions. This is an IIS configuration task and is explained later in this topic. Application Pools are a standard feature of IIS 7+.
- Logi v10 and 11 Java applications require the JDK 1.6, 1.7, or 1.8 (the JRE is not sufficient, but OpenJDK 1.7 and JRockit 1.6 or 1.7 may be used).
Upgrade Impacts
![]() Logi v10 and 11 products include several changes you should know about before upgrading:
Logi v10 and 11 products include several changes you should know about before upgrading:
- Logi v11 products include stylistic and appearance improvements in charts, super elements, themes, etc. which are noticeably different. You may care to do a test upgrade before committing to a comprehensive upgrade.
- Starting with v11.0.518, when using IIS 7+, you must use Application Pools that use .NET 4.x. If such an application pool doesn't exist, Studio will generate a warning when you upgrade an existing Logi application. When you create a new application, Studio will create a new application pool, named "Logi Info .Net v4.x", and will assign the application to it.
- Logi Info v10 and v11 include a free, 15-day trial license but, when it expires, you will need to purchase a regular license. If you're a customer in good standing, Logi Customer Service will assign that license to you in advance, but you will need to go to DevNet and download the license file.
- A new version of the Logi scripting engine was included with v10. In any application being upgraded to v10 or 11 from earlier versions you will need to engage it manually by adding the following case-sensitive constant, using the Constants element, to the application's _Settings definition: rdScriptingEngine = Version10
- Logi Report has been discontinued as a free product. Existing Logi Report installations, and applications developed with it, will continue to work as before. Logi Report v10 or v11 users who registered on DevNet and secured a free, standard (non-trial) license are still able to manage their license files on DevNet. Those with
OEM, maintenance plans, or other contracts involving Logi Report will experience no change in their use of the product.
You are urged to visit the DevNet Release Notes page for your product to understand the technical changes in new versions, before upgrading.
Upgrade the Products
Upgrading to a new version involves two steps: installing the new release of your Logi product, and upgrading the version of any existing Logi applications. You can do the former without doing the latter; applications are not automatically upgraded. Original and upgraded applications can co-exist, so upgrading can be phased in as desired.
Get an Upgrade
How do you get an upgrade? Customers who have purchased a maintenance plan for Logi Report or Logi Info, or are using them under an OEM agreement, may be able to download new product releases directly from our DevNet web site. See Support![]() Product Downloads.
Product Downloads.
If the download links are not available to you, contact Logi Customer Service via email or telephone (703-752-9700) for alternate instructions for downloading upgrades. Customer Service can also answer questions you may have about purchasing or renewing a maintenance plan.
To upgrade your Logi product, run the downloaded installation program and install the new version into the same location as the previous version, or to a different location if you wish to have both versions installed. No un-installation of the original version is required, and existing definitions or data will not be overwritten. The upgrade installation will take 2-3 minutes to complete.
Evaluations
If you wish to install an upgrade for evaluation purposes, we recommend that you install it into a different folder than any previous version, such as C:\Program Files\LogiXML IES Dev Test. This will preserve the previous version of Studio. If you install an update into the same folder as a previous version, Studio will be updated and you will not be able to roll it back without uninstalling and re-installing the previous version
entirely.
Backup Scheduler Data
![]() If you have previously installed and used the Logi Scheduler service, we recommend that you make a safety copy of your existing schedule data, before upgrading:
If you have previously installed and used the Logi Scheduler service, we recommend that you make a safety copy of your existing schedule data, before upgrading:
(Windows .NET) C:\Program Files\LogiXML IES Dev\LogiXML Scheduler Service Java\Schedules.vdb3
(Windows Java) C:\Program Files\LogiXML IES Dev\LogiXML Scheduler Service Java\Schedules\*.*
(Linux/UNIX) <installFolder>/Schedules/*.*
and then proceed with the upgrade installation. Your existing data file should be upgraded in place without any difficulty.
Change .NET Versions in Studio
In order to use all of the features in the latest Logi release, you will need to change application versions on all machines, development or production, where you upgrade your Logi product. You can use one of two methods to change application versions:
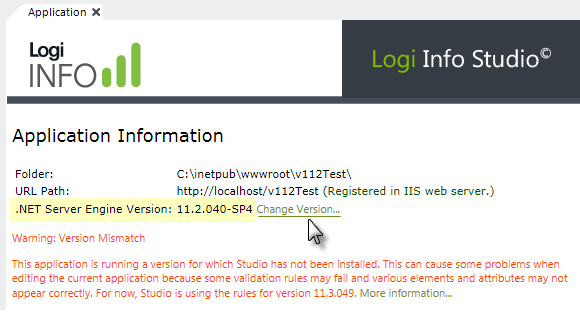
When you open an application, Studio displays a warning in its Application tab, as shown above, if the application's version does not match the version of the Logi product being used. Clicking the Change Version... link will cause the application's version-specific binary files to be replaced with the files for a version you select from a list of installed versions. This will not affect any definitions or support files.
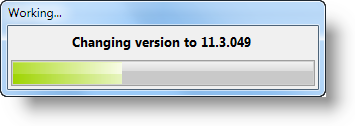
A progress indicator, like the one shown above, will be displayed.
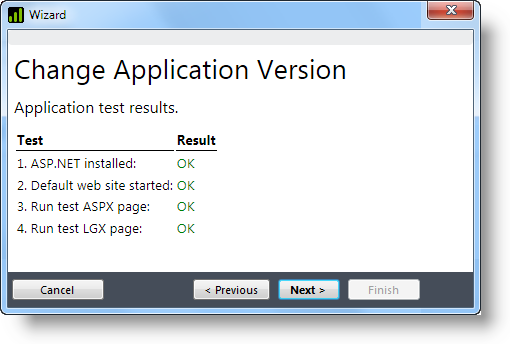
Changing an application version to v11.0.127 or later will also trigger some web server diagnostics to run after the upgrade and you'll see some information about that process. Once the tests end, you'll the results, as shown above.
![]() The failure of any test indicates that something is wrong with your web server environment's ability to run the upgraded application. This could be caused by a number of things, such as failing to install the new Logi version as an Administrator, or having incorrect file permissions on the application folder, or failing to have the correct version of .NET installed. Contact Logi Support for assistance.
The failure of any test indicates that something is wrong with your web server environment's ability to run the upgraded application. This could be caused by a number of things, such as failing to install the new Logi version as an Administrator, or having incorrect file permissions on the application folder, or failing to have the correct version of .NET installed. Contact Logi Support for assistance.
Change .NET Versions with Server Manager
Another method of changing an application's version is by using Server Manager, which is installed with Studio and is available via Studio's Tools menu or the Start Menu. It's a tool that allows you to examine all of the Logi applications on the web server and manage them individually or in a batch.
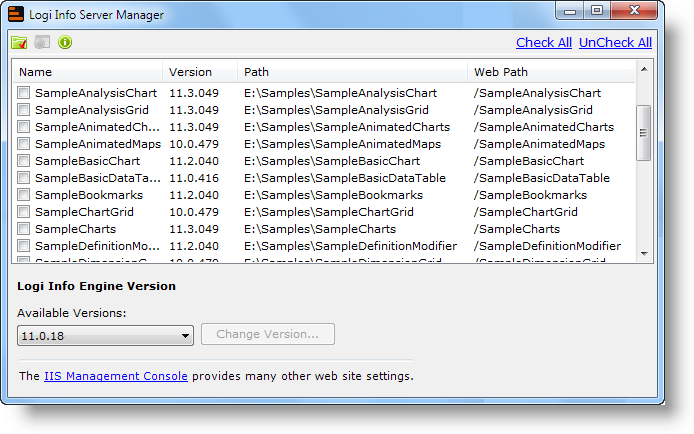
Server Manager, shown above, only works with .NET applications, using the IIS or Cassini web servers; if neither of these servers is installed, Server Manager will prompt you to install them.
The Server Manager dialog box displays a table showing each application installed on the local web server and a list of all the Logi product versions installed on the machine. To change an application's version, check one or more applications, select the version desired, and click Change Version. The process usually takes less than a minute for each application selected. Versions can be upgraded or downgraded.
Change Your Java Application Version
In order to use all of the features in the latest Logi release, you will need to change application versions on any machines, development or production, where you upgrade your Logi product.
The process for upgrading a Logi application on your development machine is the same as it is for .NET apps: use the Change Version link in Studio as discussed in the previous section.
The Server Manager tool discussed above is intended for use only with .NET applications, and expects to work with the IIS or Cassini web servers. You cannot use Server Manager for Java applications.
Changing your Java application version on a Linux/Unix production server (which won't have Logi Studio or Server Manager installed as they are Windows apps) is a little more complicated. You could just copy the application files and folders from the development machine to the production machine but that will likely result in an undesirable proliferation of .jar files over time. Instead, we recommend the following:
- Change the version of your Logi app on your development machine using Studio or Server Manager.
- On the production server, create a new folder which will become your new Logi app folder.
- Copy everything from the app folder on your development machine (which is the new version) to this new folder.
- Copy any files specific to the production app, such as _Settings.lgx, which might have different connection settings, from the original Logi app folder on the production server to the new app folder on the production server.
- Rename the old and new app folders, or adjust any references so the new app folder is now the recognized location for your Logi app.
- You may need to change the General element's Application Path attribute in _Settings.lgx if the path or folder name have changed.
- Test your application.
- Archive or delete the old app folder on the production server.
Create Application Pools in IIS 7
The Application Pool is a method of isolating different .NET applications within the web server, in order to provide improved reliability. In IIS 7, the default application pool, "DefaultAppPool" is created at installation and all virtual directory applications, when created, are assigned to this default pool.
However, applications using different .NET versions can't be run at the same time in the same pool. If they are, error messages will appear for whichever application is started last. The recommended practice is to create a new application pool and assign all applications that use the same .NET version to it.
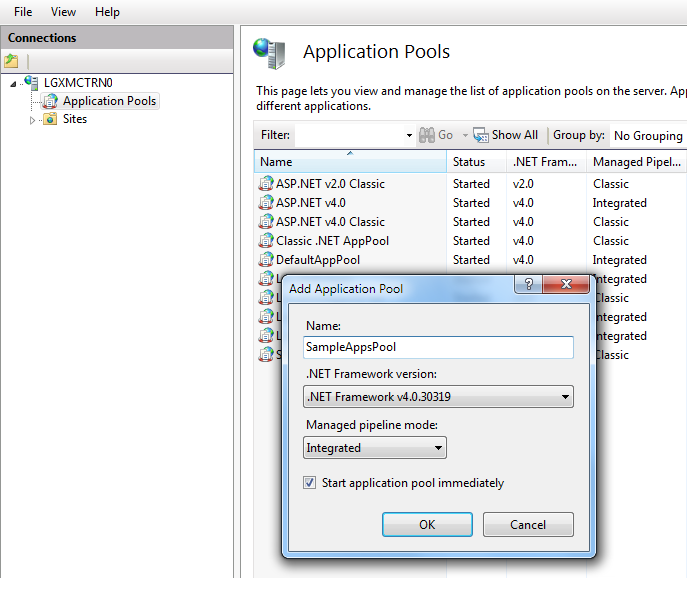
To create a new application pool:
- Open the IIS Manager (see All Programs
 Administrative Tools )
 - Select and right-click the Applications Pools item in the list on the left. Select Add Application Pool... from the pop-up menu.
- Enter the new name of your choice as the Application Pool ID and leave the default pool settings selected. Click OK
- Right-click the Application Pools item in the list on the left and click Refresh to see your new pool.
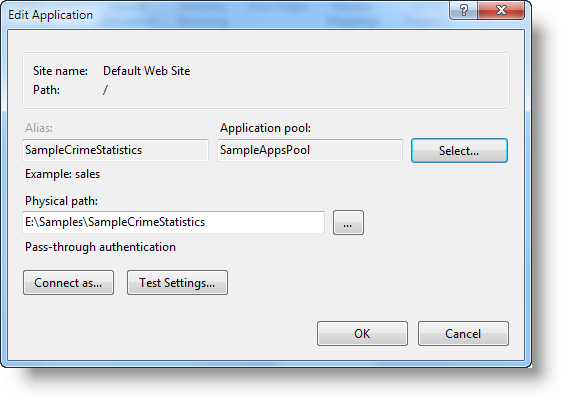
To assign an application to the new Application Pool:
- Expand the Sites item in the list on the left, then expand the Default Web Site item below it.
- Find and select your application in the list.
- In the right-hand Actions Panel, click Basic Settings...
- A dialog box like the one shown above will appear. Click Select... and choose your new Application Pool from the list.
- Click OK.
Your application is now assigned to your new Application Pool.
Create Application Pools in IIS 6
Microsoft IIS 6 introduced Application Pools as a method of isolating different applications within the server, in order to provide improved reliability. The "Default Application Pool" is created by default at installation and all virtual directory applications, when created, are assigned to this default pool.
However, applications using different .NET versions can't be run at the same time in the same pool. If they are, error messages will appear for whichever application is started last. The recommended practice is to create a new application pool and assign all applications that use the same .NET version to it.
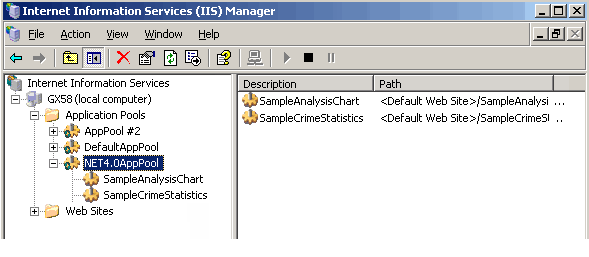
To create a new application pool:
- Open the IIS Manager (see All Programs
 Administrative Tools )
 - Select and right-click the Applications Pools item in the list on the left. Select New Application Pool... from the pop-up menu.
- Enter the new name of your choice as the Application Pool ID and leave the default pool settings selected. Click OK
- Expand the Application Pools item in the list on the left to see your new pool.
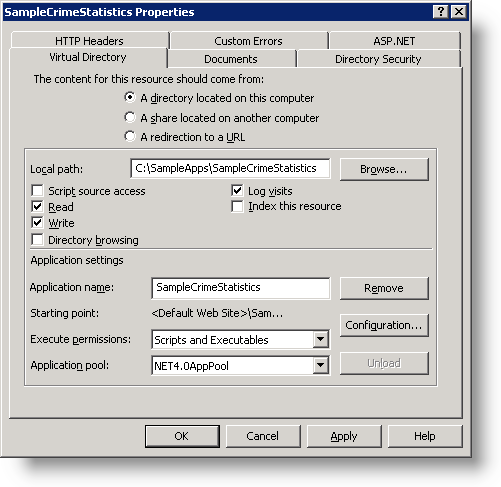
To assign an application to the new Application Pool:
- Expand the Web Sites item in the list on the left.
- Select and right-click the virtual directory representing your application. Select Properties from the popup menu.
- Select the new application pool you just created from the list of Application Pools in the Properties dialog box.
- Click OK
If you have any doubt about which version of .NET your application is set to use:
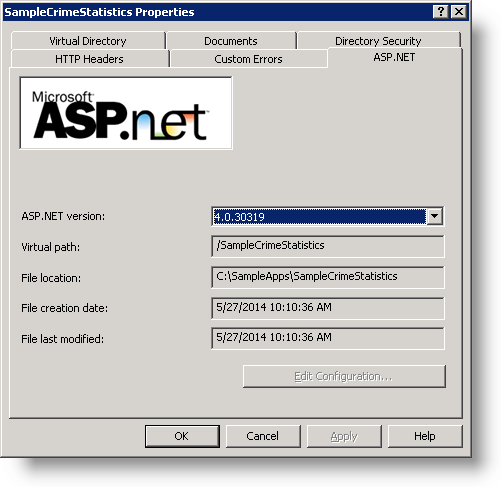
Click the ASP.NET tab on the Properties dialog box and inspect the ASP.NET version selection.