Work with Logi Security 10
Logi Security can be used to secure reports and data from being viewed by unauthorized users. This topic is provided for developers who already understand the underlying concepts of Logi Security 10 and discusses the elements and mechanisms involved in its implementation.
- The Security Element
- Authenticate the User
- Gather Role Information
- Work with Rights
- Secure Reports and Elements
- Secure Data
Developers who are unfamiliar with Logi Security should begin by reading Introduction to Logi Security 10.
"Logi Security 10" refers to a modified set of security elements released with v10.0.189 that make security easier to implement.
"Logi Security 9" refers to the security elements available in earlier releases and, though deprecated in the Logi Security 10 system, they are still supported, for backward compatibility, in Logi v10 products. In Logi v11 products, Logi Security 9 is no longer available. Developers using Logi Security 9 and upgrading to v11 products will have to adopt Logi Security 10.
The Security Element
Logi Security is built around the Security element in a Logi application's _settings definition file. It's the container for all other globally-configured security elements and handles both authentication and authorization.
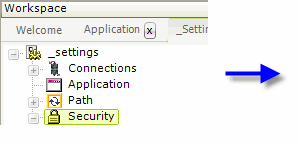
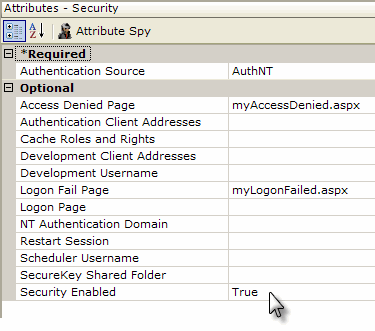
The Security element, shown in the example above, has a Security Enabled attribute, which turns Logi Security on and off. Its other attributes include:
| Attribute | Description |
|---|---|
| Authentication Source | (Required) Determines how the Logi Server gets its current user information. Choices include: AuthNT - Uses the Windows operating system's security to get the information. From the OS side, this is enabled by turning off IIS Anonymous Access for the report web site or using a .NET application to set an Authentication Ticket. Not available in our Java products. AuthSession - Uses a session variable, rdUsername, that's set in a custom logon process. Standard - Causes Logi application to display a form-based logon page. The supplied default logon page, rdLogon.aspx, or a custom page based on it, can be used. SecureKey - User information passed from anotherapplication, using a secure key. See Use Logi SecureKey Authentication. |
Access Denied Page | Users that attempt to access a report that they are not authorized for will be redirected to a standard error page, or to the page named here. This page should be an .aspx file, placed in the Logi application folder. |
| Authentication Client Addresses | (Required if the Authentication Source is set to SecureKey) A list of one or more, comma-separated IP addresses for approved external applications that will be requesting keys under Logi SecureKey Authentication. |
| Cache Roles and Rights | Determines when a user's roles and rights are retrieved. Selecting Session causes this to occur only once, at session start. If left blank or set to False, roles and rights are retrieved with every request. Must be set to Session if SecureKey authentication source is selected. |
| Development Client Addresses | (This attribute provides special functionality for testing during development.) A list of one or more, comma-separated IP addresses with a default value of 127.0.0.1. (beginning in v11, IPv6 addresses, such as ::1, are also supported). If a user browses the application from one of the IP addresses in the list, then the internal security username is automatically set to the value of the Development Username attribute, and the "usual" security is bypassed. |
| Development Username | (This attribute provides special functionality for testing during development) A value that becomes the internal security username if a user browses the application from one of the IP addresses in the Development Client Addresses list. |
| Logon Fail Page | Page that users will be redirected to if logon fails. If left blank and Standard authentication source is selected, this defaults to the standard logon page, rdLogon.aspx. A custom page named here should be an .aspx file, placed in the Logi application folder. |
| Logon Page | Used when Standard authentication source is selected. Names the page displayed at logon; if left blank, a default page, rdLogon.aspx, is used. Custom logon pages can be created by copying and renaming the default logon page and placing them in the Logi application folder. |
| NT Authentication Domain | Used when AuthNT authentication source is selected. Identifies the domain that will be authenticating users; the application will then only accept users authenticated from that domain. To authenticate users from multiple domains, leave this attribute value blank. |
| Restart Session | Valid only when AuthenticationSource = SecureKey. When set to True, this attribute clears almost all session variables at the start of an attempted
login (the exceptions are several Logi system variables). This feature allows a single browser instance to use different
user credentials and sessions from different tabs. Default: False. |
| Scheduler Username | Used when AuthSession or Standard authentication source is selected. Sets the name of the user account that will be used to run scheduled Logi processes. |
SecureKey Shared | Active only when AuthenticationSource = SecureKey, this attribute is used when working in clustered web farm and web garden configurations. In a single-server configuration, SecureKey keeps SecureKey requests in Application state. With multiple servers, this information must be stored in files in the folder specified by this attribute, which is shared among the web servers. The account used by (or impersonated by) the web application must have network access rights to read, write and delete files from this folder. Set this attribute value to UNC network path, such as: //mySharedServer/SecureKeyFolder Older files in the SecureKeyFolder are automatically deleted over time, so do not use this folder to store other files. |
Security Enabled | Enables or disables Logi security. The default value is False. |
Bypass Security During Development
Adding security to a Logi application complicates the development process, as security will be applied when you Preview a report in Studio or run a wizard. In order to make life a little easier for developers, two special Security element attributes can be used to disable, or apply special, security settings while developing and testing the application. These are the Development Client Address and Development Username attributes, described in the table above.
Authenticate the User
The first step in providing secure access to the Logi application is to authenticate the user, based on the login. The Security element's Authentication Source attribute value governs the behavior of some of the other security-related elements for this step.
When this attribute is set to AuthNT or SecureKey, the user is authenticated outside of the Logi application and the username session variable @Function.UserName~ is set automatically.
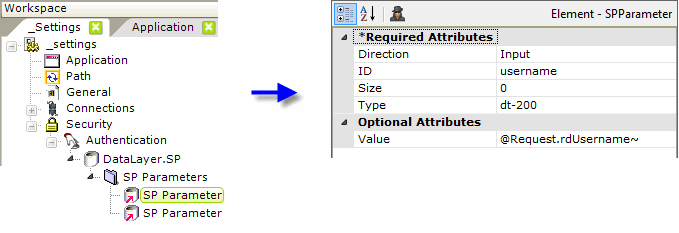
When the attribute is set to AuthSession or Standard, it may be the Logi application's responsibility to authenticate the user by querying a datasource.
An Authentication element, with a child datalayer, as shown above, is used for this purpose. The example above uses a DataLayer.SP element and its child elements to call an SQL database Stored Procedure (SP). The first SP Parameter element is configured, as shown above, to pass the login user name, and the second is configured for the login password, using the token @Request.rdPassword~.
The two case-sensitive token names, rdUsername and rdPassword, match the IDs of text input controls used in the standard login page provided with each Logi application, and should also be used as the input control IDs in any custom login page you might develop.
The authenticating stored procedure code should be similar to:
@username varchar(20),
@password varchar(16)
SELECT User_Name, User_ID FROM UsersTable
WHERE User_LoginID = LTRIM(@username) AND User_Password = LTRIM(@password)
![]() Parameters are passed to the SP in the top-to-bottom order of the SP Parameter elements and do not take the parameter IDs into account. Your SP should "receive" and define the parameters in the same order.
Parameters are passed to the SP in the top-to-bottom order of the SP Parameter elements and do not take the parameter IDs into account. Your SP should "receive" and define the parameters in the same order.
If the SP returns no data, then the user is not authenticated. A successful authentication will return two values: the first one will be automatically assigned internally to the token @Function.UserName~ and the second to @Function.UserID~.
For additional flexibility, beginning in v10.2.110, the Authentication element includes an attribute, Username Data Column, that lets you specify the name of the column in the result set that contains the user name.
![]() Different datalayer elements can be used with the Authentication element, so that users can be authenticated using a variety of datasources. However, we do not recommend using DataLayer.SQL with direct query text replacement using tokens; it's a possible avenue for "SQL Injection" attacks.
Different datalayer elements can be used with the Authentication element, so that users can be authenticated using a variety of datasources. However, we do not recommend using DataLayer.SQL with direct query text replacement using tokens; it's a possible avenue for "SQL Injection" attacks.
Gather Role Information
The gathering of role information, if used, is dependent on the Security element's Authentication Source attribute settings. When it's set to AuthNT, roles are automatically defined based on the NT Security or Active Domain group information from the OS. When it's set to SecureKey, roles are either passed to the Logi application as part of the SecureKey communication, or retrieved from another source. The actual "roles" are maintained internally as a list of values,
like "Executive" or "EndUser".
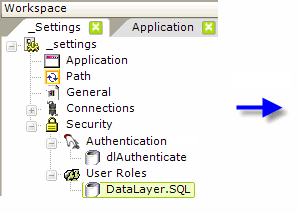
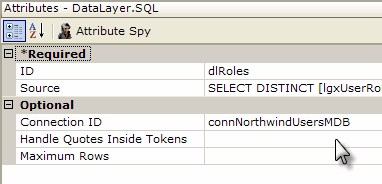
When the attribute is set to Standard or AuthSession, the Logi application must retrieve any role information for itself from a datasource, using the User Roles element with a datalayer, as shown above. When using SecureKey, there are two choices: the list of roles can be included in the communication from the parent application and will be received into the User Roles element directly, or they can be retrieved from other sources by using User Roles with a datalayer.
In cases where a datalayer is used beneath the User Roles element, roles are expected to be returned either as values in the first column in one or more records, or as multiple values a comma-delimited list in the first column of the first row. Example query:
SELECT Roles FROM myUserTable WHERE UserName = '@Function.UserName~'
For additional flexibility, beginning in v10.2.110, the User Roles element includes an attribute, Roles Data Column, that lets you specify the name of the column in the result set that contains the role information.
As with all datalayers, the results retrieved can be affected by adding Calculated Column and/or Condition Filter elements beneath them.
For more information about how user roles are included in SecureKey communications, see Use Logi SecureKey Authentication.
In all cases, the end result is that the roles for the current user are cached as a list that can be referenced internally by the application.
Work with Rights
Once again, the developer only needs to manually retrieve rights when the Security element's Authentication Source attribute is set to Standard or AuthSession. The actual "rights" are maintained internally as a list of values, like "ExecutiveReport" or "SalaryColumn". Rights are enumerated using a User Rights elements as a container and then one or more of these three rights retrieval elements:
- Rights From Roles builds the list of rights directly from the User Roles values (the roles and rights are the same) and uses no child elements.
- Rights From Datalayer retrieves all the rights at once from a datasource using a child datalayer. The datasource should return either multiple rows with a right in the first column of each row, or a single row with multiple rights in a comma-delimited list.
- Right From Role defines individual rights and uses
a datalayer
to associate roles with them. Multiple Right From Role elements and datalayers may be used.
The rights retrieval elements may be used separately or in combination as necessary to retrieve all the rights and build the rights list.
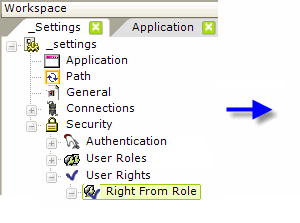
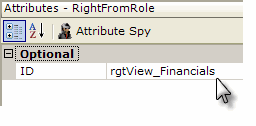
The example above shows the use of a Right From Role element to define a right. The ID attribute of the Right From Role element is set to the name of the right being defined.
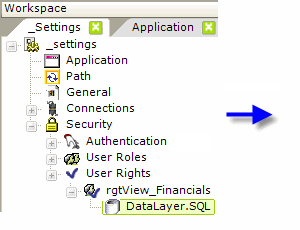
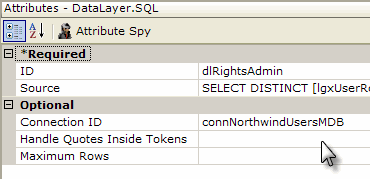
Then a datalayer is used to determine if the user has a specific role. A typical query might be:
SELECT DISTINCT Roles FROM myUserTable WHERE ROLE = 'Executive'
If the user has a role in his roles list that matches a role returned into the datalayer using this query, then the user is accorded the right specified by the Right From Role element ID. In other words, in this example, a user with the role of "Executive" would be given the right "rgtView_Financials".
Normally, queries return rights information in the first data column. However, for additional flexibility, beginning in v10.2.110, the Rights From Datalayer and Right From Role elements include an attribute, Roles Data Column, that lets you specify the name of the column in the result set that contains the rights information.
Secure Reports and Elements
At its most basic, Logi security prevents unauthorized users from viewing reports, which is the extent of the security available in Logi Report. Additional security features in Logi Info prevent unauthorized users from seeing or using individual elements.
Secure Reports
Securing an entire report is very easily accomplished by assigning one or more rights to the entire report; it will not be generated for unauthorized users.
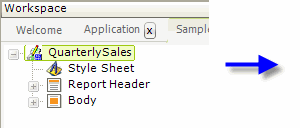
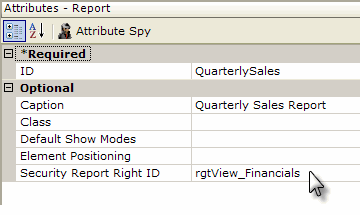
To secure a report, as shown above, enter the ID of previously-defined right element as a value for the Report element's Security Report Right ID attribute.
![]() Use caution when entering right IDs: if the identified right element ID can't be found, perhaps because of a typo, the report will be available to all users. Right IDs are case-sensitive.
Use caution when entering right IDs: if the identified right element ID can't be found, perhaps because of a typo, the report will be available to all users. Right IDs are case-sensitive.
Users who have not been accorded the identified right and who attempt to access this report will receive be redirected to the "Access Denied" page (based on the Security element's attribute of the same name).
Secure Elements
In Logi Info, over 70 elements have a Security Right ID attribute, including all of the Action, Input, Chart, and Table elements. All of them can be secured using their Security Right ID attribute. Element-level security is not available in Logi Report.
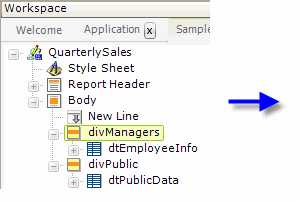
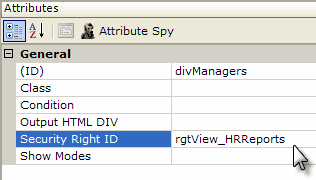
In the example shown above, a report's data tables are contained within two Division elements. Entering a previously-defined right as the Security Right ID attribute value for the first division and leaving that attribute blank for the second division causes two different versions of the report to be dynamically-generated at runtime, depending on the current user's roles. Users with roles that match roles for the "rgtView_HRReports" right will see both divisions and both data tables; everyone else will only see the second division and table.
In general, elements secured with a Security Right ID attribute are not generated in the page HTML at runtime for unauthorized users.
Note that when rights come only from Right From Role elements and this element�s Security Right ID does not match an ID from a Right From Role element, then the user does have access. You can enter multiple right IDs, separated by commas. In this case, the user sees the element if he has access to any one of the rights.
This example illustrates how Logi Security can help developers reduce the overall number of report definitions they must manage and maintain through dynamic report configuration at runtime, based on user rights.
Secure Data
The user-related security information collected when the user is authenticated is available in definitions through the use of tokens, including @Function.UserName~, @Function.UserID~, @Function.UserRoles~, and @Function.UserRights~. The last two tokens provide their values, if there's more than one, as a comma-separated list.
The availability of these tokens allows developers to use SQL queries and datalayer security filters to restrict data based on the user's rights.
Security Tokens and SQL Queries
Assume that the current user has been assigned two roles, "Accounting" and "Retail Division" (based on the organizational departments he belongs to) and needs to view a report that summarizes expenses by department. The report should only present data to him for the departments he belongs to. This can be accomplished with this SQL query:
SELECT * FROM ExpenseData WHERE Department IN (@SingleQuote.Function.UserRoles~)
The @Function.UserRoles~ token contains a comma-separated list of the user's two roles. The inclusion of the SingleQuote token prefix causes each of the individual roles in the list to be surroundedwith single quotes, which is the format required for the SQL query's "IN" clause. The result set will only include rows with data for the user's two departments.
Security Tokens and Filters
The same kind of comparisons can be used to filter data after it's been retrieved into a datalayer. In this example, assume users have been assigned a role that indicates their office region, such as "Northeast" or "Midwest", and they are only allowed to see report data for their region.
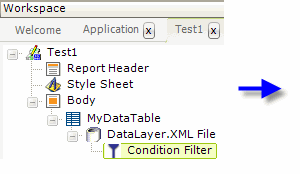

As shown above, the report definition can contain a Condition Filter beneath its datalayer. It will filter out any rows in the datalayer that cause its Condition attribute formula to evaluate to False. The VBScript function InStr is used to determine if the data from datalayer's Region column is one of the current user's roles. The datalayer will only include rows with data for the current user's office region.
The Security Filter Element
Logi Info also includes the ability to impose row-level security using the Security Filter element, which filters data after it has been retrieved into a datalayer. To restrict access to certain data rows, one or more Security Filter elements are added as child elements of a datalayer.
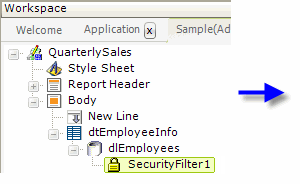
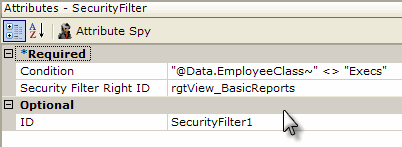
In the example above, a Security Filter element has been added to a report definition that displays employee info. The purpose of this filter element is to allow basic users to see all data rows retrieved into the datalayer except those of Executive-class employees. Datalayer rows that do not cause the formula in the filter's Condition attribute to evaluate to True will be removed. Its Security Filter Right ID is set to the right associated with the role of the basic user.
When the report is generated, this filter element will only
be applied if the current user has the role of the basic user.
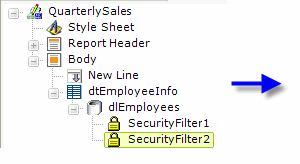
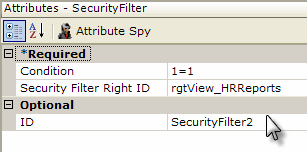
Now, as shown above, a second Security Filter element has been added. The purpose of this filter element is to allow privileged users to see all data rows retrieved into the datalayer. Its Condition attribute value, which is required, is set to a formula that will always evaluate to True and its Security Filter Right ID is set to the right associated with the role of the privileged users. When the report is generated, this filter element will only be applied if the current user has the role of those allow to view HR Reports, i.e. the privileged user.
Keep in mind that the Security Filter element is quite different from a Condition Filter element. Whereas the Condition Filter will remove datalayer rows that meet certain criteria but allow all others to be available, the Security Filter prevents the datalayer from providing any rows, unless the current user's rights match at least one Security Filter's rights. This prevents a user who has not been assigned any roles from seeing all datalayer rows.
The Include Condition Attribute
Beginning in v10.0.319, the Security Filter element has an Include Condition attribute. If the value of this attribute is left blank or contains a formula that evaluates to True, the Security Filter is applied to the datalayer. If the value evaluates to False, the filter is ignored and does not affect the datalayer. This powerful feature allows developers to dynamically determine if security will be applied to the datalayer or not, or to switch between different
security filters.
Column-level Security in Data Tables
Logi Info can also restrict data displayed in data tables at the column level by adding or removing table columns based on security rights.
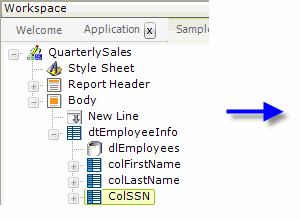
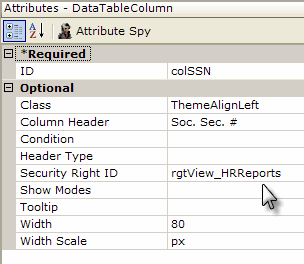
As shown above, a Data Table Column element can have its Security Right ID attribute value set so that the column will only appear in the table for users assigned the required role.
As discussed here, Logi Security provides opportunities to control the retrieval and presentation of data in Logi applications in a variety of ways. Developers are encouraged to experiment to find the approach best suited to their requirements.