Work with Scripting
Logi Info and Logi Report allow developers to take advantage of scripting objects and functions in their Logi applications. These include inline intrinsic functions that are immediately available and the ability to use external script files to access custom scripting. This topic describes the Logi elements available for working with scripting in your applications.
- About Scripting
- "OnLoad" Scripting
- Inline Scripting with "Formula" Attributes
- Scripting within Action Elements
- Scripting within External Files or Libraries
- Include Script Files
- Work with jQuery
- Process Tasks and Script Files
- Debug Script Files
About Scripting
Developers using Logi products have several different scripting language options available to them:
| Script Type | Description |
|---|---|
| Intrinsic | Modeled on VBScript, this is the set of built-in script functions available in the products. For many applications, these intrinsic functions are all that are required. For more information, see Intrinsic Functions and Operators. |
| JavaScript | For use with Logi .NET and Java apps, this is the standard Netscape JavaScript syntax |
| VBSCRipt | VB Script has been deprecated as of v11.1 and, though still supported, it's not recommended for use in any new development work. Use JavaScript instead for all new applications. For use with Logi .NET apps only, this is the standard Microsoft VBScript syntax. |
The Logi Server Engine, which renders report pages, includes its own scripting engine which executes the script function calls for all language options.
Standard functions in any language option can be used inline at any time. If you plan to include custom objects and functions using an external script file, then you must configure this functionality in the _Settings definition. The General element's Scripting Language attribute, can be manually set to VBScript or JavaScript. If you're using v10 or later, the New Application wizard in Studio will automatically set this constant to JavaScript.
![]() If the Scripting Language attribute was left blank, in earlier versions it defaulted to VBScript; in v11.0.127 this was changed to default to JavaScript.
If the Scripting Language attribute was left blank, in earlier versions it defaulted to VBScript; in v11.0.127 this was changed to default to JavaScript.
Another constant, rdScriptingEngine, can be set to Version10, to engage v10 scripting, or left blank for the older v9 system. If you're using a v10 product, the New Application wizard in Studio will automatically set this constant to Version10.
Where Does Scripting Execute?
It's important that developers understand where their scripts will execute in order to obtain the desired results from them. The following sections each indicate where the scripting they describe will execute.
Scripts that execute in the browser, or "client-side", recognize the browser's Document Object Model (DOM) with its Window and Document objects, and DHTML events, such as OnClick and OnChange, that occur in the browser. All the activity occurs within the browser and this can be useful for calculations, input validation, dynamic page changes, and other activities that do not require an exchange with the web server. This site documents the DOM objects and syntax.
![]() Note that all browsers do not recognize all objects, events, and scripting in exactly the same way, so cross-browser testing is highly recommended if your users will use a range of different browsers.
Note that all browsers do not recognize all objects, events, and scripting in exactly the same way, so cross-browser testing is highly recommended if your users will use a range of different browsers.
Scripts that execute at the server, or "server-side", are very efficient, but they cannot access browser objects or events. They may be able to access server system resources, using special objects. For example, a Logi application using VBScript or JavaScript, running on a 32-bit Windows platform, is able to instantiate an ActiveX FileSystemObject object and can therefore read and write files on the server. This kind of access is not available on a 64-bit Windows platform and is now understood to expose substantial security vulnerabilites - using them is very risky.
The availability of Java server system resources, using server-side JavaScript, varies by server and may rely on third-party APIs.
In v10.0.455, the Include Script and Include Script File elements were introduced. In earlier versions, the Include HTML and Include HTML File elements, and HTML with appropriate tags, were used achieve the same results.
"OnLoad" Scripting
Developers often want scripting functions to run as soon as the report page is loaded into the browser. Use-case examples include redirecting based on criteria such as a login, and setting user input focus to the first control. Let's see how this is done in a Logi application.
The Include Script element allows you to enter script directly into one of its attributes and have it included between <SCRIPT></SCRIPT> tags at the top of the page (but not in the HEAD section), where it will run in the browser.
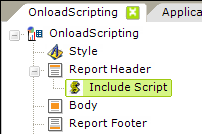
In this example, an Include Script element has been added beneath the Report Header, as shown above. The JavaScript code is entered directly into the element's Included Script attribute value.
And here's a JavaScript code example that redirects to the Login page if the user is not already logged in. It consists of code that attaches a custom function to the onLoad event, and the custom function itself:
/* cause login test function to run when page is loaded */ |
Note how the custom function is attached to the DHTML onLoad event, and that it has to be done in two different ways to accommodate the Event model in different browsers.
Using JavaScript and the DOM, you can access any of the components on the page. For example, to set the focus to a specific input control when the page loads, you would add
document.getElementById('myTextInputID').focus();
to the custom function.
Inline Scripting with "Formula" Attributes
Some element attribute values, such as the Label element's Caption attribute and the Calculated Column element's Formula attribute, are categorized as "formula" attributes, meaning they can evaluate inline script formulae and use the results as their values. For many, but not all, of these, the use of a leading equal sign (=) tells the Logi engine that scripting is being used and should be evaluated at the server. Under typical circumstances, the functions that are called
in these formulae
are the standard functions in one of the scripting options identified earlier and run at the server.
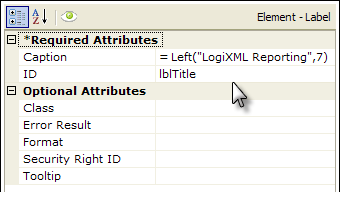
For example, consider the Label element shown above. The Caption attribute contains a formula that calls the intrinsic Left() function and it will result in the word "LogiXML" appearing on the page. This is an easy way to work with individual functions.
Later, we'll see how to include external files with custom functions that can be called in formula attributes.
Error Handling
Elements that support inline scripting also have an Error Result attribute. If something is specified in this attribute, it will be displayed or used instead of the formula result if an error occurs.
The default Error Result varies depending on the element. For example, for the Condition Filter, the default is False. For the Calculated Column and Extra Crosstab Calculated Column elements, the default is blank. For other elements, the default is ???.
In v11.2.040 SP6, two special constants were made available to control error handling related to formulae that have the possibility of causing a divide-by-zero situation. If needed, specify these constants in the _Settings definition:
rdInfinityErrorResult - Specifies a global result for formulae that may produce a divide-by-zero situation (result: infinity), sparing developers the task of specifying a result on a per-element basis in their Error Result attributes.
rdJavascriptInfinityIsError - When set to True, specifies that formulae that produce a divide-by-zero situation (result: infinity) will trigger an error, which is then handled by elements' Error Result attribute or, if set, the rdInfinityErrorResult constant. If rdJavascriptInfinityIsError is not specified, the Scripting Engine will return the value NaN (for "Not a Number") by default when a division by zero occurs.
Scripting within Action Elements
Scripting can also be entered using the Action.Javascript element, or the Action.Link and Target.Link element combination, and will run in the browser.
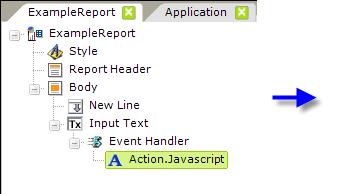
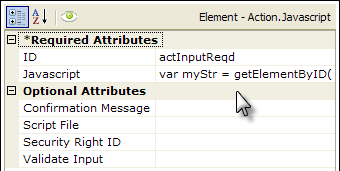
Developers using v10.0.259 or later, can use the Action.Javascript
element, shown above. JavaScript code can be
entered directly into the Javascript attribute value.
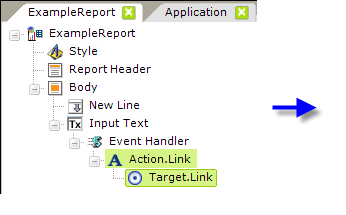
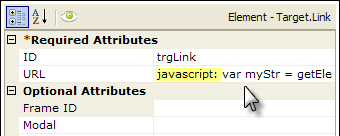
Developers using earlier versions can use Action.Link and Target.Link elements, as shown above, beneath an Event Handler. When used in this way, note that the word "javascript", followed by a colon, must be the first thing in the URL attribute.
Now, we're able to use the power of JavaScript and the browser's object model for activities such as validation. The AttributeZoom window comes in handy when entering code (double-click the attribute name).
Prior to v10.0.101, directly using more complex or nested function calls in an attribute value had its limitations, particularly when parsing or conditional processing was desired, but starting with that release, multi-line scripts are supported in these element attribute values.
INVALID - Uses curly braces: var mStr = document.getElementById('inpEmail').value; | VALID - No curly braces: var mStr = document.getElementById('inpEmail').value; |
However, you may not include code blocks that are set off by curly braces (curly braces are not valid XML). This means structures such as If...Then...Else blocks, shown above, left,
are not usable. You can, however, get around this by using multiple lines of code, each with a single If statement, as shown above, right.
Support for JavaScript "this" Keyword
Beginning in v10.0.319, the JavaScript "this" keyword is supported. In the context of event handlers in Logi apps, this generally means that instead of code like document.getElementById('inpEmail').value you can use this.value instead. This is nice bit of shorthand for referring to the "owner" of the event and saves a lot of keystrokes.
Here are some
JavaScript validation examples:
Example 1: Ensure some data is entered
|
It's beyond the scope of this topic to delve too deeply
into JavaScript or the object model, but essentially the code above
assigns the data in txtLoginID to a variable, then tests the
length of that variable's value, and displays a message box if the length
is zero. This is very similar to the Validation.Required element's
functionality. The Document object's getElementById method is very handy
in this situation (remember: JavaScript is case-sensitive).
Example 2: Ensure some data is entered but not more than 4,000 characters
|
The example script above does something special: it limits the length
of data that can be entered into an Input Text Area element, which does
not normally have maximum length attribute, and, if it's too long, reports the
actual number of characters currently entered. It also requires that some
data be entered.
Example 3: Replace all occurrences of '@' with '#'
|
Example 3 illustrates a method for replacing certain characters in the data entered, using a JavaScript regular expression. In the example, any @ characters that were entered by the user are replaced with the # character, and then the altered data is substituted for the data that was entered. Regular expressions are very powerful, can be quite complex, and can perform actions such as adding, replacing, or removing characters, changing character case, and expanding or contracting phrases.
As you can see, the ability to run JavaScript whenever data changes in user input elements provides developers with a very powerful validation tool.
Scripting within External Files or Libraries
We've already seen that the Include Script element can be used to insert script, entered into one of its attributes, directly into the HTML page. However, developers may want to create and user their own custom function libraries in a separate script file or use third-party libraries, such as JQuery. This can be done by including the external files using these elements:
| Element | Runs At | Description |
| Formula Script File | Server | Used in Report definition, specifies custom or third-party script library. |
| Include Script File | Browser | Used in Report definition, specifies custom or third-party script library. |
| Procedure.Script | Server | Used in Process definition, specifies custom or third-party script library. |
| Additional Script File | Server | Optional child of the other three elements, specifies additional external files that contain supporting functions. |
One advantage of using custom external libraries is that they can be shared and re-used in different Logi applications. Functions in these files can be directly called from a formula attribute.
Script files can be created and edited in Studio. Both VBScript and JavaScript files are listed as options when you right-click the Support Files folder in Studio's Application panel and select Add ![]() New File...
New File...
Scripting in files included using the elements listed above does not require <SCRIPT></SCRIPT> tags; they're added automatically. If you're using an older product version and including scripting using Include HTML or Include HTML File elements, then the tags should be part of the code.
Script files used with Logi applications are "regular" in their syntax and form. Everything that's normally available in the specified scripting language, such as comments, can be used. Here's a sample JavaScript file for use with the Formula Script File element:
function sayHello(sName) |
![]() Note that when using VBScript files, you must grant Write and Modify permissions for the rdDownload folder in your application folder to the web server's local ASPNET or NETWORK SERVICE account so that a temporary file can be created there when the script executes.
Note that when using VBScript files, you must grant Write and Modify permissions for the rdDownload folder in your application folder to the web server's local ASPNET or NETWORK SERVICE account so that a temporary file can be created there when the script executes.
Including Script Files
In order to include a script file in your Logi application, you need to configure one of the elements mentioned earlier. Here's an example:
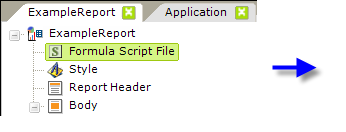
- Add a Formula Script File element beneath the root element, as shown above.
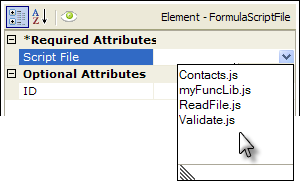
- Its Script File attribute value is set to the name of the script file. If the file has been placed in the Support Files folder in Studio, it will appear in a list of available files, as shown above. Otherwise, a fully-qualified file path can be used.
Once this has been done, the functions within the file are available for use within the report definition.
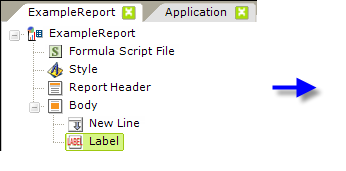
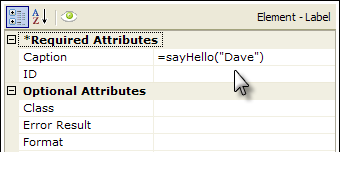
As shown above, a custom function in your formula script file is called in exactly the same way as a regular function: in a formula preceded by an equals sign (=).
The Additional Script File element, a child of the Formula Script File element, can be used to add additional script files to your report definition.
Scope
Once a Formula Script File element has been added, the functions in the script file it identifies are available directly to all "formula" attributes within the report definition.
Working with jQuery
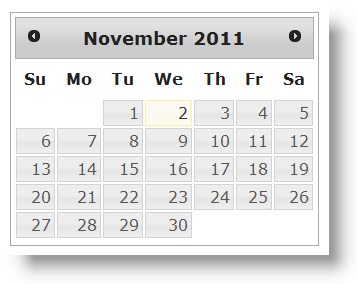
jQuery is a cross-browser JavaScript library designed to simplify client-side scripting and, in v10.0.455, special elements were added to make it easy for developers to work with this library. Here's a quick example that uses the jQuery "date picker" UI component:
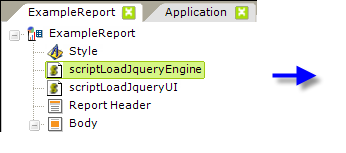


First, we configure our report definition's Style element to use an online Google API style sheet:
http://ajax.googleapis.com/ajax/libs/jqueryui/1.8/themes/base/jquery-ui.css
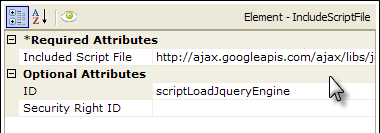
Then we add two Include Script File elements to our definition, as shown above, and configure their attributes to include an online version of jQuery libraries available from Google. The two URLs used are:
http://ajax.googleapis.com/ajax/libs/jquery/1.6.2/jquery.min.js
http://ajax.googleapis.com/ajax/libs/jqueryui/1.8.16/jquery-ui.min.js
You could, of course, use a local copy of the jQuery library, downloaded into _SupportFiles, and just enter their filenames instead.
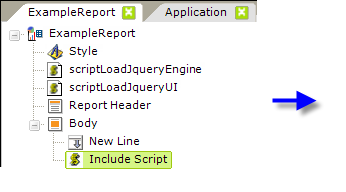
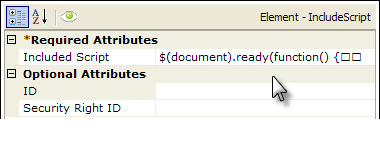
|
And finally, we need to add a container (a Division element) for the date picker:
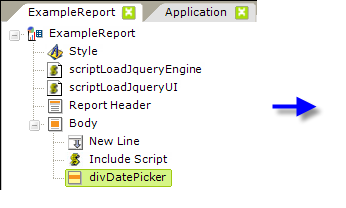
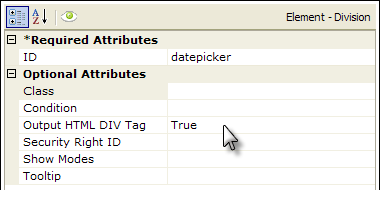
as shown above. Notice that the ID of the division is used in the jQuery code, which is case-sensitive.
Process Tasks and Script Files
Logi Info developers are able to use tasks, in a Process definition, to extend the operations of their reports, and scripting can also be used in tasks. Let's look at an example that uses scripting to read a text file on the web server:
In the example above, a Procedure.Script element has been added to a task, and its attribute values have been set to point to the script file and function to be called. The Language attribute's value options are VBScript or JScript (which equals JavaScript).
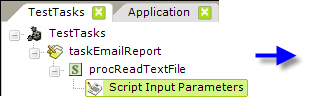

A Script Input Parameters element has been added beneath Procedure.Script. This is the element that passes arguments to the function and its attribute values have been set as shown. The arbitrary parameter name "Filename" will become part of a special token we'll use in the actual function to access the passed value. Its value is set to the name of the text file to be read. This assumes that the file is in the same folder as the script file; the value could instead include a more complete path or a combination of the @Function.AppPhysicalPath~ token and other folder/filename information.
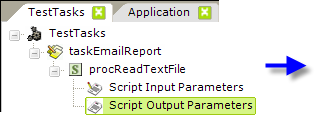

Script Output Parameters element has been added and its attributes set to arbitrary values. This is the element that receives the value (the text from the text file) the function returns. The parameter name "result" will be the return variable in the function and we'll reference the value "outputText" later in the task to view the returned text.
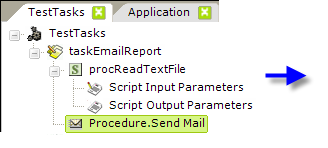
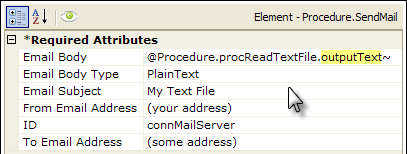
Finally, an element is added to do something with the returned text, in this case, a Procedure.Send Mail element. Its attributes are set as shown, and a token that incorporates the value from the Script Output Parameters is used to access the text returned from the function.
// JavaScript Example: This script reads a file and returns its contents.
//
// Note that it uses a Scripting engine object that is NOT available on
// Windows 64-bit or Java platforms.
// JavaScript Example: This script reads a file and returns its contents.
//
// Note that it uses a Scripting engine object that is NOT available on
// Windows 64-bit or Java platforms.var result = '';
function ReadFile()
{
var forReading = 1;
var fso = new ActiveXObject('Scripting.FileSystemObject');
var tf = fso.OpenTextFile('@Input.Filename~', forReading);
result = tf.ReadAll();
tf.Close();
}

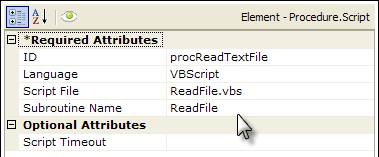
The JavaScript is shown above. Note the way in which the @Input token and result variables are used.
Debugging Script Files
As of v10.0.101, you can also cause debugging to extend to scripts. When enabled, a special link can be included in the standard Debugger Trace Report:
To enable this, configure the General element's Script Source Debugger Style attribute. Its None value is the default, or you can set it to OnError, in which case the View Script File link shown above appears in the Debugger Trace Page when an error occurs. This link displays the script as generated when the report was run. If the script is a simple, single line of script, the actual error may appear here instead of a link. A third value option, Always, causes the link to appear in the trace page at all times. The routine use of Always is discouraged as it will incur a significant performance hit.
