Defining Web Behaviors of Objects in a Report
A web behavior contains a trigger event and a web action to be triggered when the event occurs on a specific object at runtime. By adding web behaviors to objects in your report, you can customize the objects to make them respond to interactive events, and execute corresponding web actions such as Sort and Filter. For example, you can associate a web action with an object's Click event, then at runtime, when users run the report and select the object, Server performs the specified operation. This topic describes the events you can use to trigger web actions and how you can specify the web behaviors of different objects in your report.
Generally, you can add web behaviors to basic web controls, labels, data fields, and special fields in a report. In a library component, you can also define web behaviors on chart elements and geographic map markers and areas.
This topic contains the following sections:
- Trigger Events of Web Actions
- Specifying Web Behaviors of a Web Control/Label/Field
- Specifying Web Behaviors of a Chart
- Specifying Web Behaviors of a Geographic Map
Trigger Events of Web Actions
You can use the following events to trigger web actions.
| Event | Description |
|---|---|
| Blur | Fires when the object loses the input focus. |
| Data Change | Fires when the content of the object or selection changes. |
| Click | Fires when users select the left mouse button on the object. |
| onContextMenu | Fires when users select the right mouse button on the object, opening the shortcut menu. |
| Double_Click | Fires when users double-click the object. |
| Focus | Fires when the object receives focus. |
| Key Down | Fires when users press a key. |
| Key Press | Fires when users press an alphanumeric key. |
| Key Up | Fires when users release a key. |
| Mouse Down | Fires when users select the object with either mouse button. |
| Mouse Move | Fires whens users move the mouse over the object. |
| Mouse Out | Fires when users move the mouse pointer outside the boundaries of the object. |
| Mouse Over | Fires when users move the mouse pointer into the object. |
| Mouse Up | Fires when users release a mouse button while the mouse is over the object. |
| Resize | Fires when the size of the object is about to change. |
| Scroll | Fires when users reposition the scroll box in the scroll bar on the object. |
| Select | Fires when the current selection changes. |
Specifying Web Behaviors of a Web Control/Label/Field
You can specify the web behaviors of a basic web control while defining its web options, or of a label, data field, or special field while changing its display type, using the Display Type dialog box. However, for the basic web controls in the configuration panel of a library component, you need to use a different method to specify their web behaviors. See Using Basic Web Controls in Library Component Configuration Panel.
To specify the web behaviors of an object using the Display Type dialog box
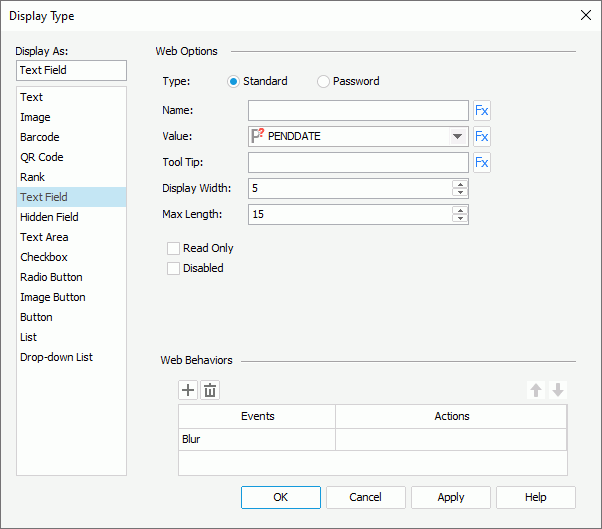
- In the Web Behaviors panel of the Display Type dialog box, choose an event from the Events column, then select in the Actions column and select the ellipsis
 .
. 
- In the Web Action List dialog box, select the required action and select OK. Designer displays different web actions in the dialog box according to the report type.
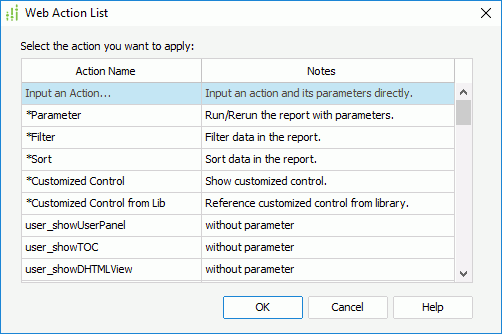
- When you select one of the following web actions: Parameter, Filter, Sort, Property, Go Down, Go Up, Go To, Send Message, or Customized Control, Designer displays the corresponding web action builder dialog box for you to build the action.
- When you select Customized Control from Lib, Designer displays the Manage Customized Controls dialog box, which shows all the customized control files in the customized control library. Select the one you want and select OK.
- When you select a user-defined action which requires no parameter, for example, user_showTOC, Designer applies the action to the web control and closes the Web Action List dialog box. You can use this type of web actions in query-based page reports only.
- When you select a user-defined action which needs parameters, for example, user_zoomTo, Designer displays the Parameters dialog box, which lists the parameters the web action requires. You can use this type of web actions in query-based page reports only. The following shows a sample dialog box.
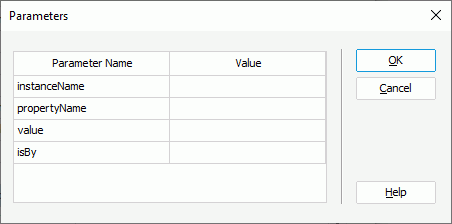
- Specify the parameter values in the Value column.
- For parameters that refer to instance name, you can type the mapping name of the instance, or the display name plus the prefix "&" as the parameter value.
- For more information about the parameter values, see Appendix 3: Parameters of User-Defined Web Actions.
You can also define your own web actions by adding API functions into the file API.js located at
<designer_install_root>\lib\html\javascript\dhtmland the same name file located at<server_install_root>\public_html\dhtmljsp\js. - Select Add
 in the Display Type dialog box and repeat the preceding steps to add more web behaviors to the object. To delete a web behavior, select it and select Remove
 .
. - Adjust the order of the web behaviors by selecting a web behavior and selecting Move Up
 or Move Down
 . Then, when an event that has been bound with more than one web action happens at runtime on the object, Server triggers the upper action first.
The following describes how to define a specific web action.
Applying the Parameter Web Action
You can use the Parameter web action to run a specified report, especially one with parameters using the predefined parameter values when the designated event occurs on the trigger object at runtime.
To define the Parameter web action
- In the Web Action List dialog box, select *Parameter and select OK. Designer displays the Parameter - Web Action Builder dialog box.
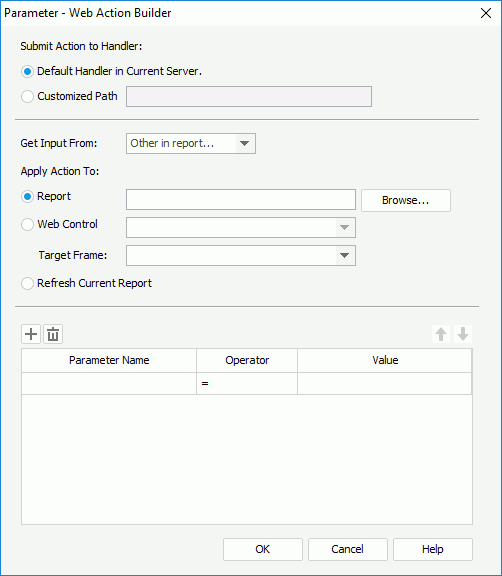
- Specify the handler which receives the parameters of the web action. The handler may be the default one in the current server, or in another server specified by Customized Path.
- From the Get Input From drop-down list, specify where to get the input, which may be a form (available to page report only), a parameter form control in the report, or "Other in report".
- In the Apply Action To section, specify how to apply the action.
- If you want to apply the action to run a report, select Report and select Browse to specify the report in the current catalog that you want to run when the event occurs on the trigger object at runtime; or select Web Control and select a web control in the current report to retrieve the report name at runtime. Then from the Target Frame drop-down list, select the window or frame to open the report.
- Select Refresh Current Report if you want to refresh the current report when the event occurs on the trigger object at runtime.
- In the parameter box, specify the parameters and the values with which to run or refresh the current report.
- When you select Report and specify a report, if the report contains parameters, Designer loads the parameters automatically into the parameter box. Edit the value for each parameter.
- When you select Web Control or Refresh Current Report, Designer lists all the parameters used by the current report in the parameter box if it contains parameters. Edit the value for each parameter.
- You can also use web controls in the current report to retrieve the name and value of a parameter from the values of the web controls at runtime.
- Select Add
 to add more parameter lines to specify other parameter values. If you specify a parameter value more than once, the last setting takes effect.
 - To delete a parameter, select it and select Remove
 . You can also use Move Up
 and Move Down
 to adjust the order of the parameter lines.
 - Select OK to accept the parameter values.
Applying the Filter Web Action
You can use the Filter web action to filter a specified data component in a page report, or several data components at a time in a web report/library component based on predefined filter conditions when the designated event occurs on the trigger object at runtime.
To define the Filter web action in a page report
- In the Web Action List dialog box, select *Filter and select OK. Designer displays the Filter - Web Action Builder dialog box.
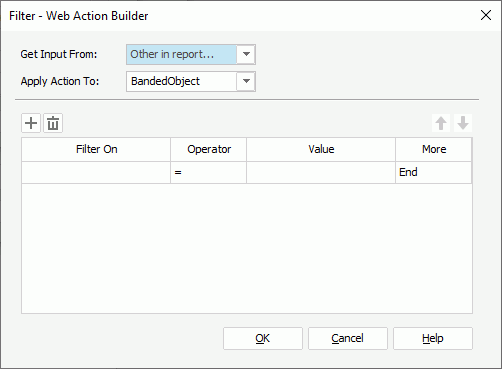
- From the Get Input From drop-down list, specify where to get the input, which can be a form, a parameter form control in the current page report, or "Other in report".
- From the Apply Action To drop-down list, select a data component in the page report the data of which you want to filter.
- In the Filter On column, specify the field on which to filter data. You can filter on a DBField in the query that the specified data component uses or a formula related to the query, or select a web control in the page report to retrieve the field name at runtime.
- In the Operator column, specify the operator to compose the filter condition.
- In the Value column, specify the value of how to filter the field. You can select <Input...> from the drop-down list and type the value in the text box, or select a web control to retrieve it at runtime.
When you type the value, if multiple values are required, you should separate them with ","; if a value contains the character "," or "\", type the character as "\," or "\\".
- Select Add
 to add more condition lines and specify the filter conditions. To delete a filter condition, select it and select Remove
 . You can also use Move Up
 and Move Down
 to adjust the order of the condition lines.
 - In the More column, specify the relationship between the filter conditions: "And" or "Or".
- Select OK to accept the filter conditions.
To define the Filter web action in a web report/library component
- In the Web Action List dialog box, select *Filter and select OK. Designer displays the Filter - Web Action Builder dialog box.
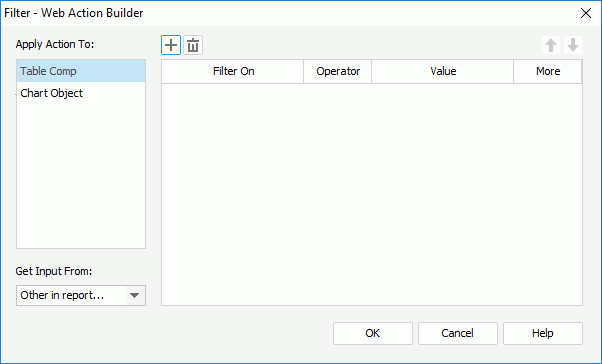
- In the Apply Action To box, select a data component in the current web report/library component the data of which you want to filter.
- From the Get Input From drop-down list, specify where to get the input, which can be a parameter form control in the web report/library component, or "Other in report".
- Select Add
 to add a filter condition line.
 - In the Filter On column, specify the field on which to filter data. You can filter on a field contained in the business view the specified data component uses, or select a web control in the web report/library component to retrieve the field name at runtime.
- In the Operator column, specify the operator to compose the filter condition.
- In the Value column, specify the value of how to filter the field. You can select <Input...> from the drop-down list and type the value in the text box, or select a web control to retrieve it at runtime. When you type the value, if multiple values are required, you should separate them with ","; if a value contains the character "," or "\", type the character as "\," or "\\".
- Add more condition lines and specify the filter conditions. To delete a filter condition, select it and select Remove
 . You can also use Move Up
 and Move Down
 to adjust the order of the condition lines.
 - In the More column, specify the relationship between the filter conditions: "And" or "Or".
- Select other data components in the Apply Action To box and take the preceding steps to specify the filter conditions on them.
- Select OK to accept the filter conditions.
Applying the Sort Web Action
You can use the Sort web action to sort a specified data component or group in a page report, or several data components and groups at a time in a web report/library component based on predefined sort conditions when the designated event occurs on the trigger object at runtime.
To define the Sort web action in a page report
- In the Web Action List dialog box, select *Sort and select OK. Designer displays the Sort - Web Action Builder dialog box.
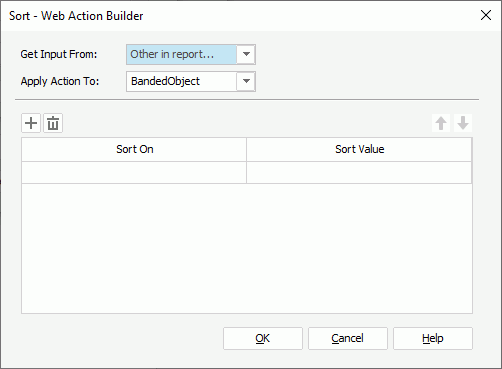
- From the Get Input From drop-down list, specify where to get the input, which can be a form, a parameter form control in the current page report, or "Other in report".
- From the Apply Action To drop-down list, select a data component in the current page report tab or a group of a table/banded object in the page report tab, the data of which you want to sort.
- In the Sort On column,
- If you select to sort a data component, you can sort on a field of the data component, or select a web control in the page report tab to retrieve the field name at runtime.
- If you select to sort a group, leave the cell in the column blank or select a web control to retrieve the field name at runtime.
- In the Sort Value column, specify the order to perform the sort: Ascending, Descending, or select a web control to get the sort order at runtime.
- Select Add
 to add more condition lines and specify the sort conditions. To delete a sort condition, select it and select Remove
 .
. - Adjust the order of the sort conditions using Move Up
 and Move Down
 . The order determines the sort priority of the conditions at runtime.
 - Select OK to accept the sort conditions.
To define the Sort web action in a web report/library component
- In the Web Action List dialog box, select *Sort and select OK. Designer displays the Sort - Web Action Builder dialog box.
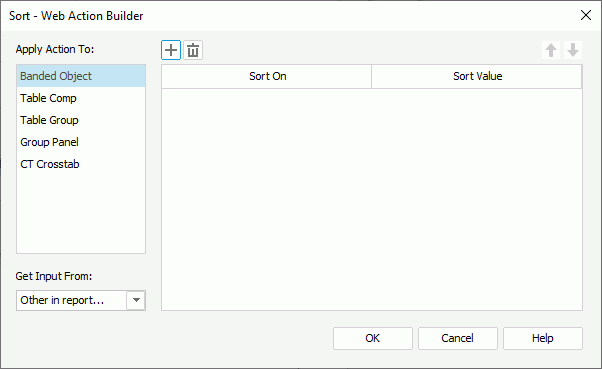
- In the Apply Action To box, select a data component in the web report/library component or a group of a table/banded object in the web report/library component, the data of which you want to sort.
- From the Get Input From drop-down list, specify where to get the input, which can be a parameter form control in the current page report, or "Other in report".
- Select Add
 to add a sort condition.
 - In the Sort On column,
- If you select to sort a data component, you can sort on a field of the data component, or select a web control in the web report/library component to retrieve the field name at runtime.
- If you select to sort a group, leave the cell in the column blank or select a web control to retrieve the field name at runtime.
- In the Sort Value column, specify the order to perform the sort: Ascending, Descending, or select a web control to get the sort order at runtime.
- Add more condition lines and specify the sort conditions. To delete a sort condition, select it and select Remove
 .
. - Adjust the order of the sort conditions using Move Up
 and Move Down
 . The order determines the sort priority of the conditions at runtime.
 - Select other data components and groups in the Apply Action To box and take the preceding steps to specify the sort conditions on them.
- Select OK to accept the sort conditions.
Applying the Property Web Action
You can use the Property web action to change properties of the specified report objects when the designated event occurs on the trigger object at runtime. However, you can apply this web action in web reports and library components only.
To define the Property web action
- In the Web Action List dialog box, select *Property and select OK. Designer displays the Change Property - Web Action Builder dialog box.
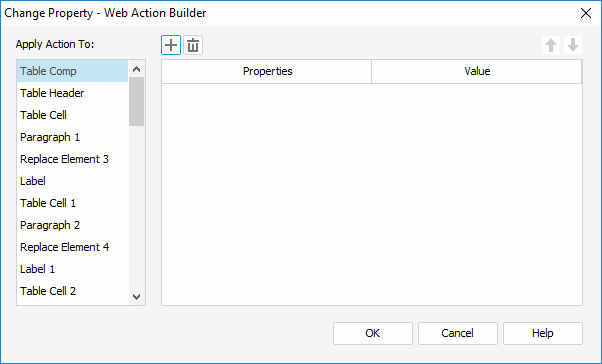
- In the Apply Action To box, select an object in the current web report/library component the properties of which you want to change.
- Select Add
 to add a property condition line.
 - In the Properties column, select the property of the object you want to change.
- In the Value column, type the value of the property. You can also select a web control in the web report/library component to retrieve the value at runtime.
- Add more condition lines and specify the property conditions. To delete a property condition, select it and select Remove
 . You can also use Move Up
 and Move Down
 to adjust the order of the condition lines.
 - Select other objects in the Apply Action To box and take the preceding steps to specify their property values.
- Select OK to accept the property values.
Applying the Go Down Web Action
You can use the Go Down web action to drill data of the specified data components to lower-level groups according to the predefined hierarchies in the business views the data components use when the designated event occurs on the trigger object at runtime. However, you can apply this web action in web reports and library components only.
The Go Down web action works on the groups of tables and banded objects, the column and row fields of crosstabs, the category and series fields of charts, and the current layer of geographic maps.
To define the Go Down web action
- In the Web Action List dialog box, select *Go Down and select OK. Designer displays the Go Down - Web Action Builder dialog box.
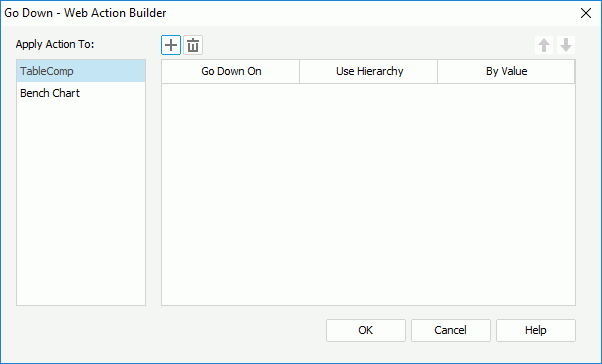
- In the Apply Action To box, select a data component in the current web report/library component whose data you want to drill through.
- Select Add
 to add a condition line. You can add one condition only.
 - In the Go Down On column, select the group in the specified data component, on which to perform the go-down action. For a geographic map, it is "Current Layer" and you cannot change it.
- In the Use Hierarchy column, select the hierarchy based on which to perform the go-down action. You can also select a web control in the web report/library component to retrieve a hierarchy name at runtime. For a geographic map, the "Built-in" hierarchy is used and you cannot change it.
- In the By Value column, type a value of the specified group field to go down to the lower level with the filter condition "SpecifiedGroupField=TheValue". You can also use a web control to retrieve a value at runtime.
- Select other data components in the Apply Action To box and take the preceding steps to define the go-down conditions for them.
- Select OK to accept the conditions.
Applying the Go Up Web Action
You can use the Go Up web action to drill data of the specified data components to upper-level groups according to the predefined hierarchies in the business views the data components use when the designated event occurs on the trigger object at runtime. However, you can apply this web action in web reports and library components only.
The Go Up web action works on the groups of tables and banded objects, the column and row fields of crosstabs, the category and series fields of charts, and the current layer of geographic maps.
To define the Go Up web action
- In the Web Action List dialog box, select *Go Up and select OK. Designer displays the Go Up - Web Action Builder dialog box.
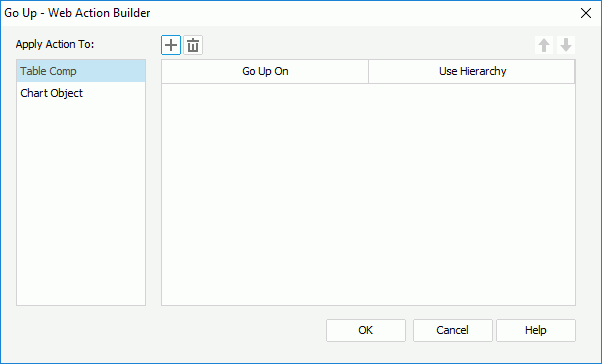
- In the Apply Action To box, select a data component in the current web report/library component whose data you want to drill through.
- Select Add
 to add a condition line. You can add one condition only.
 - In the Go Up On column, select a group in the specified data component, on which to perform the go-up action. For a geographic map, it is "Current Layer" and you cannot change it.
- In the Use Hierarchy column, select the hierarchy based on which to perform the go-up action, or select a web control in the web report/library component to retrieve a hierarchy name at runtime. For a geographic map, the "Built-in" hierarchy is used and you cannot change it.
- Select other data components in the Apply Action To box and take the preceding steps to define the go-up conditions for them.
- Select OK to accept the conditions.
Applying the Go To Web Action
You can use the Go To web action enables you to change the data fields in the specified data components when the designated event occurs on the trigger object at runtime. However, you can apply this web action in web reports and library components only.
The Go To web action works on the groups of tables, the column/row fields and aggregations of crosstabs, and the category and series fields of charts.
To define the Go To web action
- In the Web Action List dialog box, select *Go To and select OK. Designer displays the Go To - Web Action Builder dialog box.
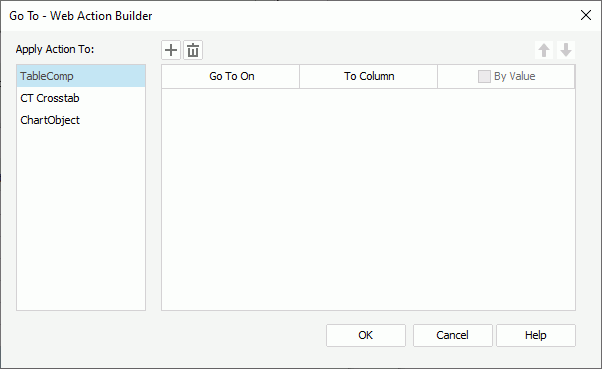
- In the Apply Action To box, select a data component in the current web report/library component whose data field you want to change.
- Select Add
 to add a condition line. You can add one condition only.
 - In the Go To On column, select a group for a table or chart, or a column/row field or aggregation for a crosstab, on which to perform the go-to action.
- In the To Column column, select another group object in the business view the web report/library component uses to change the "Go To On" field to, or select a web control in the web report/library component to retrieve a group name at runtime.
- To apply the go-to action by filtering the "Go To On" field at the same time, select By Value, then select <Input...> from the drop-down list and type the value by which to filter the field in the text box or select a web control to retrieve the value at runtime. Skip this step if you select to perform the action on a crosstab aggregation.
- Select other data components in the Apply Action To box and take the preceding steps to define the go-to conditions for them.
- Select OK to accept the conditions.
Applying the Send Message Web Action
You can use the Send Message web action to send out a message when the designated event occurs on the trigger object at runtime, to ask the message receivers to perform the specified operation in the message. However, you can apply this web action in library components only. See Delivering Messages Between Library Components for more information about the message mechanism of Logi Report.
To define the Send Message web action
- In the Web Action List dialog box, select *SendMessage and select OK. Designer displays the Send Message - Web Action Builder dialog box.
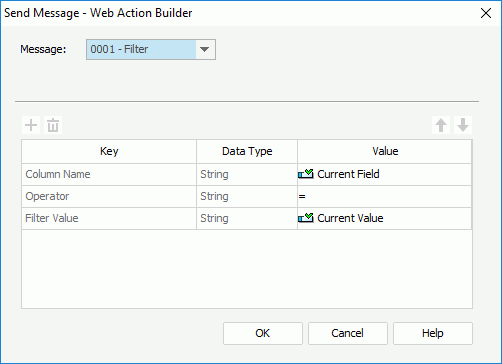
- Define the message you want to send out from the object.
- Select OK to accept the settings.
![]() When you select a web control in a condition to define a web action, Server should be able to retrieve a valid value from the web control at runtime in order to compose a valid condition; otherwise, nothing happens when the designated event occurs on the trigger object.
When you select a web control in a condition to define a web action, Server should be able to retrieve a valid value from the web control at runtime in order to compose a valid condition; otherwise, nothing happens when the designated event occurs on the trigger object.
Specifying Web Behaviors of a Chart
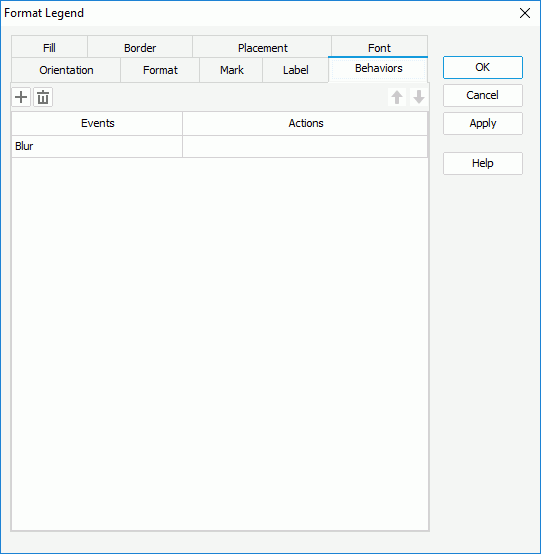
When you format some elements of a chart in a library component, including the data markers, legend, and category (X) axis, Designer displays an additional Behaviors tab in the chart format dialog box for you to add web behaviors to the elements. For example, when formatting the chart legend, you see the Format Legend dialog box like this:
To add web behaviors to a chart element
- In the Behaviors tab of the chart format dialog box, select a trigger event from the drop-down list in the Events column.
- Select in the Actions column and select the ellipsis
 .
. - In the Web Action List dialog box, bind a web action that you want to trigger at runtime when the specified event occurs on the element. The web actions you can bind include Filter, Sort, Parameter, Property, and Send Message.
- Select Add
 to add and define more web behaviors on the element. To delete a web behavior, select it and select Remove
 .
. - You can select a web behavior and select Move Up
 or Move Down
 to adjust the order of the behaviors. At runtime, when an event that is bound with more than one web action happens, Server triggers the upper action first.
Specifying Web Behaviors of a Geographic Map
When creating geographic map in a library component, you can bind web behaviors to the markers and areas of each group in the geographic map.
- In the Display screen of the Create Geographic Map dialog box, select a group in the Drill Path box, then select Web Behaviors. Designer displays the Web Behaviors dialog box.
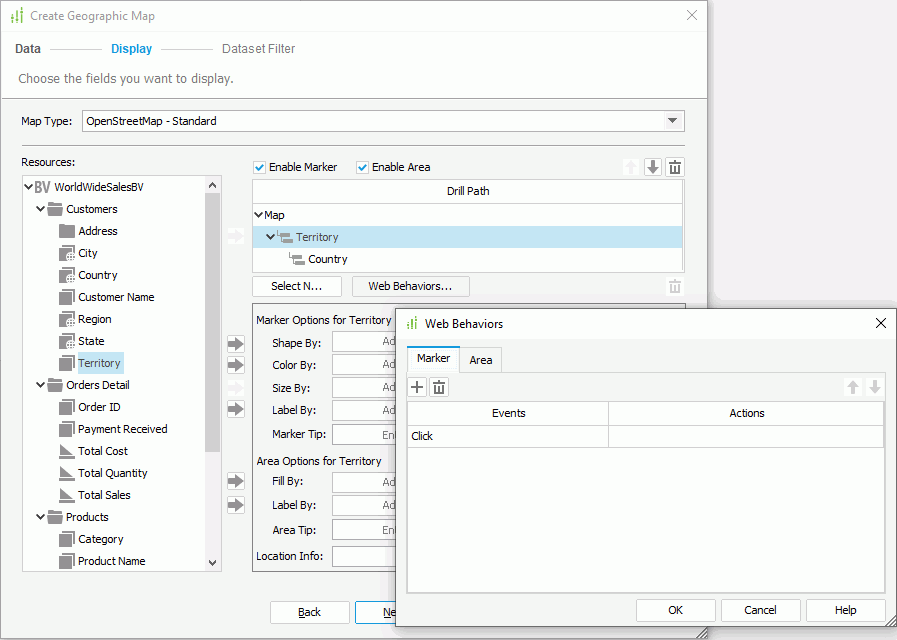
- In the Marker tab, select a trigger event from the drop-down list in the Events column.
- Select in the Actions column and select the ellipsis
 .
.
- In the Web Action List dialog box, bind a web action that you want to trigger at runtime when the specified event occurs on the markers. The web actions you can bind include Parameter, Filter, Sort, Change Property, and Send Message.
- Select Add
 to add and define more web behaviors on the markers. To delete a web behavior, select it and select Remove
 .
. - You can select a web behavior and select Move Up
 and Move Down
 to adjust the order of the behaviors. At runtime, when an event that is bound with more than one web action happens, Server triggers the upper action first.
 - Switch to the Area tab to bind web behaviors to the areas of the group in the same way, if you enable areas for the geographic map.
- Select OK to finish defining web behaviors of the markers and areas for the specified group and return to the map wizard.
- Select other groups of the geographic map in the Drill Path box to specify web behaviors of their markers and areas.
 Previous Topic