Customizing Text Cloud Appearance
We can introduce additional visual differentiations, such as color, font style, etc., to make the weightings stand out more and to make the text cloud more visually interesting. The following example shows you have to use Conditional Classes to give the text cloud fonts different colors based on weighting.


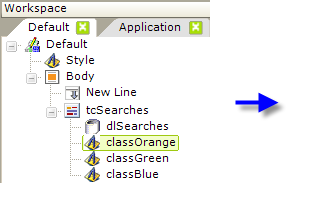
- Beneath the Text Cloud element ("tcSearches") add three Conditional Class elements, as shown above.
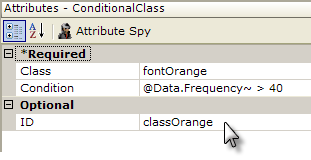
- Set the first Conditional Class element's attributes as shown above. The Condition attribute value allows you to apply the class based on the value of the weighting. If the expression in the value evaluates to True, the class will be applied. In this case, all words or phrases with a frequency greater than 40 will be shown in orange.
- Set the attributes for the other two Conditional Class elements similarly. Their attribute values should be:
| Class | Condition | ID |
|---|---|---|
| fontGreen | (@Data.Frequency~ > 30) AND (@Data.Frequency~ <= 40) | classGreen |
| fontBlue | (@Data.Frequency~ > 14) AND (@Data.Frequency~ <= 30) | classBlue |
The classes assigned in the Class attributes for these elements are all defined in the style sheet you created in Step #4 in Creating a Text Cloud.
![]() Conditional Class elements are evaluated in sequence and that the first class to evaluate to True will be applied and remaining Conditional Class elements will be ignored. This means that the order of your conditional class elements in the report definition may be significant, depending on your evaluation formulae.
Conditional Class elements are evaluated in sequence and that the first class to evaluate to True will be applied and remaining Conditional Class elements will be ignored. This means that the order of your conditional class elements in the report definition may be significant, depending on your evaluation formulae.

Preview your report and you should see the text cloud shown above. (Any reddish quality you may see here is an artifact from the image reduction process used to fit the image to this page - only four colors: orange, green, blue, and black should be visible in your Preview Panel).