Using the Data Table Wizard
The fastest and easiest way to create a data table is to use the Data Table Wizard in Logi Studio. Here's how:
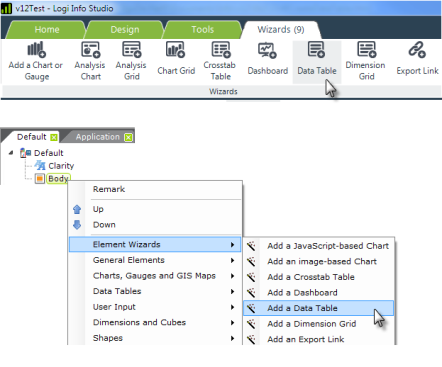
- As shown above, in a definition in Logi Studio, select an element and either click the Data Table item in the main menu's Wizards tab, or right-click the element and select Element Wizards, and then select Add a Data Table from the secondary menu.
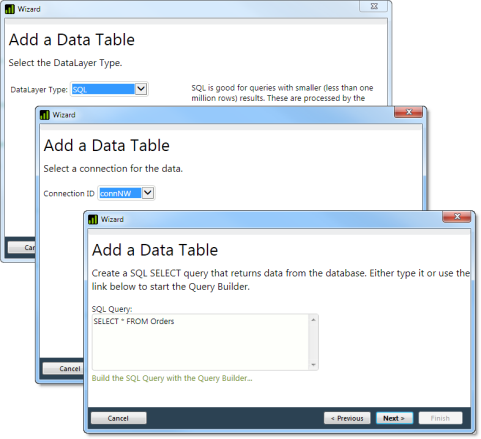
- A series of dialog boxes, shown above, will be displayed. These all relate to the retrieval of the data. Make appropriate selections for your application and click Next to move to the next dialog box.
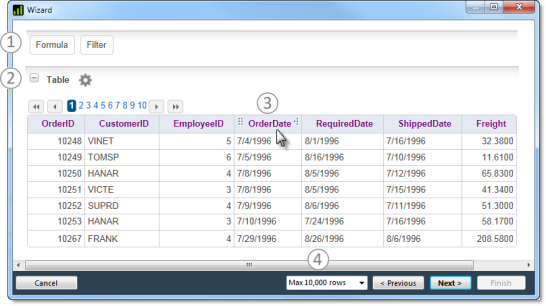
- The wizard will display a model data table in a dialog box, where you can adjust it, if desired. If the table is just as you want it, click Next to exit the wizard. If not, you can continue the customization, using the features identified above:
1- Click these buttons to add calculated or "Formula" columns, and to Filter the data based on column values;
2- Click the gear icon to display the table's Configuration Panel (discussed below);
3- Hover your cursor over a table column header and use the drag handles that appear to change the column width or rearrange column order. Click the header text to see a configuration menu for that column (discussed below);
4- Select the maximum number of rows to be retrieved.
Table Configuration Panel
If you click the gear icon, the table's Configuration Panel will be displayed:
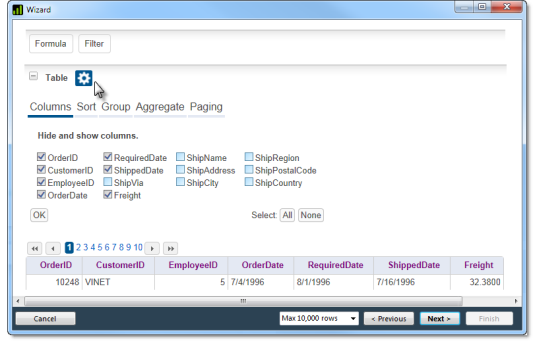
As shown above, the Configuration Panel includes these controls:
- Columns - Select the columns that will be displayed (displayed vs. retrieved in the data).
- Sort - Specify the sort order of the data after it's been retrieved.
- Group - Specify the grouping of the data after it's been retrieved.
- Aggregate - Add new columns foraggregations including Sum, Average, Standard Deviation, Count, Distinct Count, Minimum, and Maximum.
- Paging - Specify whether the table will use paging and, if so,how many rows will be shown per page.
Click the gear icon again to hide the Configuration Panel.
Column Configuration Menu
If you click a column's header text, a pop-up Configuration Menu for that column will be displayed:
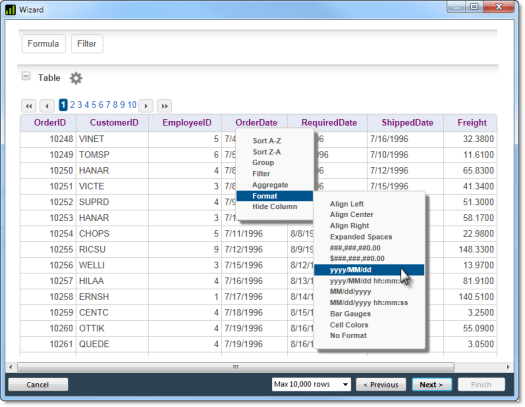
Options on that menu allow you to do some of the same thing you can do in the Configuration Panel but other options, like Format, work specifically on the selected column. Changes in the displayed table will take affect immediately.
When you're done, the Wizard will add all of the elements for the table to your definition. The wizard automatically gives each column interactive sorting capabilities.
![]() Only the elements for the table itself will be added, not any of the wizard's configuration controls you've just worked with.
Only the elements for the table itself will be added, not any of the wizard's configuration controls you've just worked with.
If you already have your data table and datalayer elements added and configured, another wizard - "Add Data Columns" - is available when you select the Data Table element and is really useful if you don't have a list of table columns handy.