Position Elements
Logi Studio provides two methods for positioning elements on the report page: Flow positioning and Absolute positioning. This topic introduces developers to the use of these positioning schemes.
- About Flow and Layout Positioning
- Select the Positioning Schemethe Layout Editor
- Switch Back from Absolute to Flow
- Use the Layout Editor
![]() Do not switch layout modes, even just as an experiment, without reading the section Switching Back from Absolute to Flow first. Absolute positioning is retained in Logi Analytics products primarily for backward compatibility with earlier versions and we highly recommend that you do not use it for any new development work.
Do not switch layout modes, even just as an experiment, without reading the section Switching Back from Absolute to Flow first. Absolute positioning is retained in Logi Analytics products primarily for backward compatibility with earlier versions and we highly recommend that you do not use it for any new development work.
About Flow and Absolute Positioning
Logi application report definitions are developed in Studio using the Element Tree, which is a hierarchical arrangement of elements. Flow positioning determines the layout of the elements on the report page by order of appearance and each element's position is based on the previous element's position.
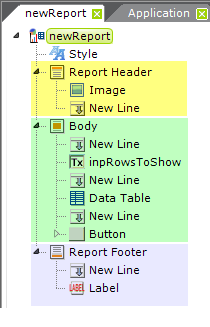
For example, as shown above, most report definitions contain elements in the element tree grouped beneath Report Header, Body and Report Footer elements, which are arranged from top to bottom. On the actual report page, elements in the Report Header will appear above elements in the Body and elements in the Body will appear above elements in Report Footer.
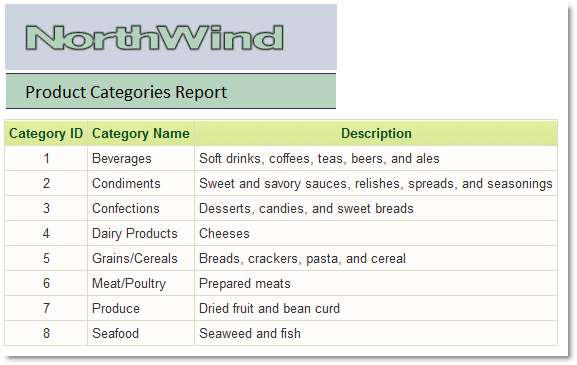
Flow positioning is the default layout for report definitions in Studio and works well with multiple browser types and mobile devices. The use of HTML tables (Row, Rows, and Column Cell elements in Logi definitions) and the careful application of style classes can achieve very accurate alignment of elements on the report page under Flow positioning and, for most situations, it's the best approach.
Absolute positioning, however, determines the location of the elements on the report page by assigning groups of elements exact pixel offsets from the top and left side of the browser window.
When Absolute positioning is in use, Studio's Layout editor enables developers to place elements in absolute positions on the screen by dragging and dropping them (it's not completely WYSIWYG but it's close).

The example above shows the previous report after Absolute positioning has been enabled and elements have been positioned as desired.
Select the Positioning Scheme
While Flow positioning is the default, the positioning scheme can be selected on a report-by-report basis.
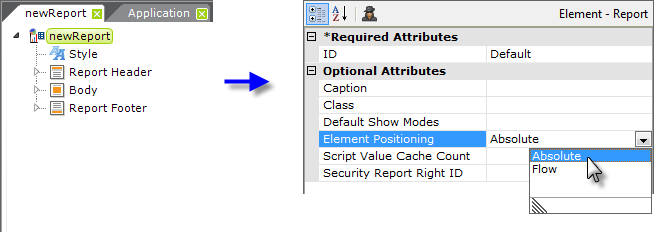
The positioning scheme is controlled, as shown above, by selecting the Report (top) element in a definition and selecting the desired scheme in its Element Positioning attribute value. A blank entry selects the default scheme, Flow positioning.
Two things happen when Absolute positioning is selected. First, all elements that can contain other elements (Division, Body, Row, etc.) are given two "hidden" attributes: absoluteTop, and absoluteLeft. These attributes do not appear in the Attribute panel but are managed behind-the-scenes by Studio. The element will also have Height and Width attributes which may or may not be visible depending on the nature of the element. These attributes allow the Logi Server engine to accurately place elements on the page when a report is being generated.
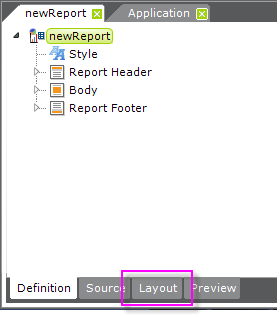
The second thing that happens is that the bottom of the Workspace panel acquires a new tab, the Layout tab, as shown above. Clicking this tab opens the Layout editor.
Switch Back from Absolute to Flow
Developers should use caution when converting to Absolute positioning. Switching back to Flow positioning later may not completely return your report to its former state. When you switch back to Flow positioning from Absolute positioning, Studio will remove most of the attributes mentioned above. However, blanket removal is not possible, as developers may have added desired attributes, such as Height and Width, manually. So, don't switch to Absolute positioning unless you really, absolutely, have a need to do so.
Use the Layout Editor
To begin using the Layout editor, click the Layout tab at the bottom of the Workspace panel. The Layout editor displays the report definition as it appears in a browser window.
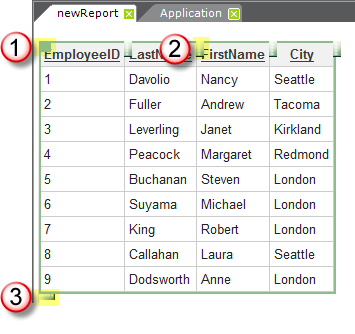
Selecting certain types of objects in the layout encloses that object in a green outline, as shown above, with one or more "grab points". The table object shown above provides three types of grab points:
- Click and drag here to reposition the entire table.
- Click and drag here to resize the object horizontally (in this case, each table column can be resized).
- Click and drag here to resize the object vertically.
The Layout editor also provides additional functionality beyond absolute positioning and resizing:
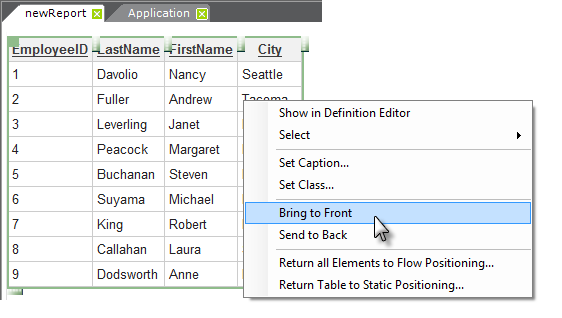
A selected object can be right-clicked to view its context menu, as shown above. Options here allow the following operations:
- Move the selected element in front of or behind other elements
- Set the text for Caption attributes
- Apply style sheet classes
- Locate hard-to-find elements by name
- Return the report to Flow Positioning
Overlay Elements
Absolute positioning provides a method of allowing one object to overlay another. Overlay gives developers the ability, for example, to create a foreground and a background for report definitions.
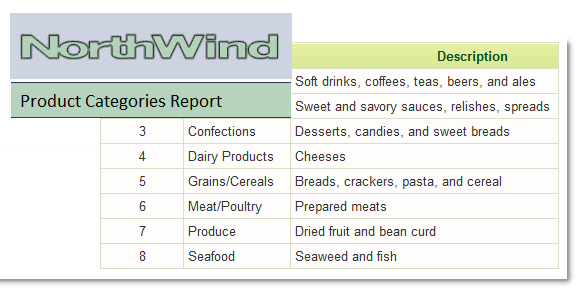
To overlay objects:
- Position two objects such that one overlaps the other.
- Select the overlaying (top) object, right-click it, and select Bring to Front from the popup menu.
The same results can be achieved with Flow positioning by using the CSS position: absolute property and value combination.