Export to CSV File
The Comma-Separated Values (CSV) format is a well-established data file format standard and a widely-accepted method of transferring data. This topic discusses how to export Logi report data to CSV files.
- About Exporting Data to CSV
- Export Data Manually
- Export Data Automatically
- Adjust the Encoding
About Exporting Data to CSV
The CSV data format is useful because of its relative simplicity and universal cross-platform accessibility. CSV files are simple text files that are generally used to represent tabular data: each row of text in the file represents one data record and, in the typical format, each column of data is enclosed in double-quotes and delimited by a comma. The first row may represent the column names.
Logi Studio provides Export CSV elements that make it easy to export Logi report data into CSV
files.
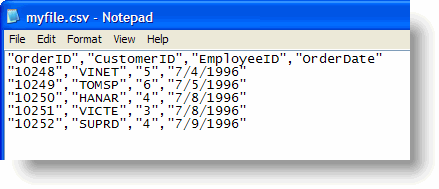
Note that the data exported to CSV files is only the data in the report's datalayers. Summary Rows, for example, are not included in the export.
Logi developers can give users the ability to export a data manually via user interaction at runtime; Logi Info developers can also export data automatically, based on an event or schedule. Manual exports are configured within Report definitions and automated exports are configured within Process definitions.
Export Data Manually
Here's an example of how to create a report with a link that allows data to be exported manually:
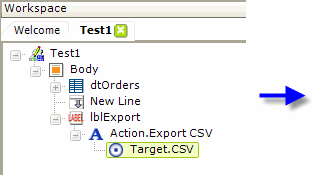
- In your report definition, add an Action.Export CSV element as the child of a Label, Image, Button or Chart element, as shown above.
- Below it, add the required Target.CSV child element.
- If the data to be exported is part of the current report, you need do nothing more. Just save your definition and browse your report. It's that simple. Notice that the example above shows that no attribute values need be set. The default settings will export the current reports' data.
What happens when the link is clicked: the data in the report's datalayer is exported to a temporary .csv file which is created in your project folder's rdDownload folder on the web server. The temp file is then opened automatically in your browser, usually in the Microsoft Excel plugin if it's installed (the .csv file extension gets associated with it when Excel is installed).
With the exception of column header text, only data is exported; headers, footers, paging, images, summary rows, etc. from the source report are not exported. If the source data table has column header labels, these will be exported as the first row of the CSV file.
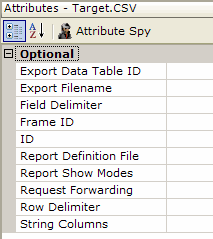
The following table provides explanations for the Target.CSV element's attributes, which are all optional:
| Identifier | Description |
|---|---|
| Export Data Table ID | Specifies the Data Table from which data will be exported. This is useful if a report contains multiple data tables; if there is only one table in the report, this attribute can be left blank. To export the data in an Analysis Grid element, set this value to "dtAnalysisGrid", the ID of the Analysis Grid's internal data table. |
| Export Filename | Specifies an explicit file name for the CSV file that receives the exported data. This value should be a file name only, without a path, and may or may not include the .csv file extension. If left blank, a random GUID file name will be generated and used. |
| Field Delimiter | Specifies the CSV file datadelimiter, typically a comma. Enter the desired character. To delimit using the Tab character, set this value to =CHR(9). You can also use tokens in this attribute to set the delimiter dynamically. If left blank, the delimiter is determined first by inspecting the browser's language setting, and then by using the web server's List Separator character from its Regional Settings. This allows international users to get the appropriate field separator. |
| Frame ID | Specifies the frame for the target page. Leave blank for the current browser window, or select NewWindow to open a new browser window. You can also specify an existing frame identifier to re-use the same window for each request. |
| ID | Specifies a unique identifier for this element. |
Report Definition File | Specifies the name of the report definition file that contains the data to be exported. |
Report Show Modes | Specifies the Show Modes to be used when rendering the data for export, making it possible to hide some of the data. When this attribute is blank, all of the elements and, therefore, all of the data is exported. To set Show Modes in the exported report, enter a comma-delimited list of Show Mode values in this attribute; the data from any elements in the report definition that have a Show Mode that matches on in this list will appear in the exported data. |
| Request Forwarding | Specifies whether request variables will be passed to the report definition file that contains the data to be exported. Has no effect if the current report is being exported. |
| Row Delimiter | Specifies the CSV file row delimiter character(s). Default: standard CRLF characters |
| String Columns | Specifies the columns of the exported data that should be interpreted as string values. The CSV format is frequently used to export data into Microsoft Excel. When Excel encounters a value that looks like a number, it removes any leading zeros. This is a problem for some values that should not be treated as numbers and should not have leading zeros removed. For example, "000123" might be an account number wherein the leading zeros are relevant. The removal of leading zeroes in Excel can be suppressed by supplying the appropriate Data Table Column element IDs, in a comma-separated list, in this attribute. |
The temporary files generated during the export are cleaned up automatically over time.
Export Data Automatically
The following example, for Logi Info only, shows how to create a process task that exports data automatically:
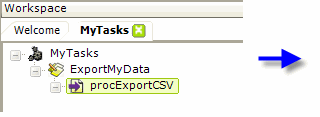

- As shown above, in your Process definition, add a Procedure.Export CSV element beneath your Task element.
- In the element's Filename attribute, specify the output path and filename, on the web server, for the exported report. The filename should include the ".csv" file extension. The example shown above uses the @Function token to provide the path to the Logi application's application folder on the web server.
- Ensure that Write permission has been granted to the local ASPNET (IIS 5.0) or NETWORK SERVICE (IIS 6.0) account on the web server for the target folder.
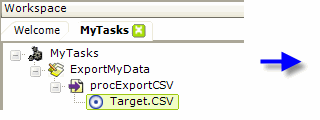
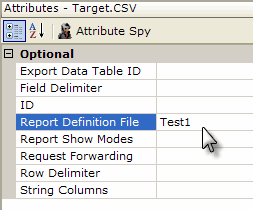
- Next, add the required Target.CSV element, as shown above.
- In the element's Report Definition File attribute, specify the report that contains the data to be exported. Do not select the "CurrentReport" choice in the list of suggestions as it will notwork in this case.
- Your task will need to be completed, of course, with a Response element to run properly.
What happens when your task runs: the data from the specified report's datalayer will be exported to a temporary file in your project folder's rdDownload folder on the web server; then the temp file will be copied to the output file you specified.
If you try to run this task more than once, you'll receive an error. This is due to the fact that Procedure.Export CSV will not overwrite an existing file. Adding a Procedure.Delete File element at the beginning of the task will solve this.
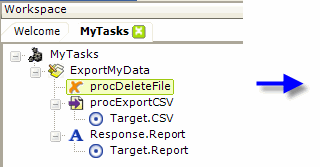

An example of a complete task is shown above. Note the use of the @Function again in the Procedure.Delete File element's Filename attribute.
Delimit with the Tab Character
A common alternate CSV format uses the Tab character as the delimiter and does not enclose the field data in double-quotes. However, you can't type a Tab character in the Field Delimiter attribute, so to get this format, enter a small formula, =CHR(9), in the attribute value instead.

As shown above, when you run the report and export the data, it will be Tab delimited and have no double-quotes.
Adjust the Encoding
By default, data exported by Export CSV is output using UTF-8 encoding. Logi software releases prior to v9.2 used ISO-8859-1 encoding.
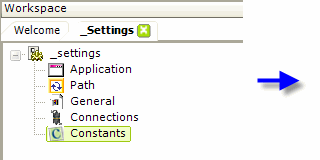
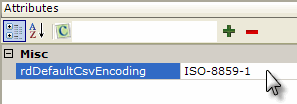
Developers using software later than v9.2 who wish to use the old encoding can do so by including a constant (rdDefaultCsvEncoding) in their _settings definition, as shown above.
