Create Printable Reports
Report consumers often want to print hard copies of their web-based reports or export them in specific page layouts. Logi reporting products provide several ways to do this. This topic discusses various report printing techniques.
- About Printing
- Use the Printable Paging Element
- Format Report and Display as PDF
- Format Report and Display as Word Document
About Printing
Logi reports are designed to be viewed in a web browser and are XHTML-based; this means that users must temper their expectations a bit when those same reports are output to hard copy. Fonts, styles, layouts, etc. may not translate as exactly from one medium to the other as they might desire.
A report that's going to be printed needs to be formatted for printing and then loaded into a browser window, after which it can be printed. The process needs to automatically hide any Interactive Paging elements, to ensure that the navigation controls do not appear on the printout, and to increase the number of records in tables so they fill the page. Typically, the Printable Paging element is used to accomplish this.
The Printable Paging element allows you to set page margins and page orientation, i.e. portrait or landscape, which affects both printed and exported pages.
![]() Note that the Printable Paging element is designed to work with data visualizations that provide "paged" output: data tables, cross-tab tables, etc. It will not work when these visualizations are not part of a report. In cases where there is no paged output, developers should depend on the browser's print function or export the report to PDF and make use of Show
Modes to hide elements that should not be printed. For more information, see Show Modes.
Note that the Printable Paging element is designed to work with data visualizations that provide "paged" output: data tables, cross-tab tables, etc. It will not work when these visualizations are not part of a report. In cases where there is no paged output, developers should depend on the browser's print function or export the report to PDF and make use of Show
Modes to hide elements that should not be printed. For more information, see Show Modes.
Use the Printable Paging Element
There are two things that must be done to make a report "printable": the addition of a Printable Paging element, which governs page margins, size, and headers, and the addition of a link that's clicked to begin the formatting/printing process. The formatting/printing process formats the report for printing, after which the browser window can be printed, or the report can be exported to other formats, such as Adobe PDF or MS Word, from which it can be printed to paper.
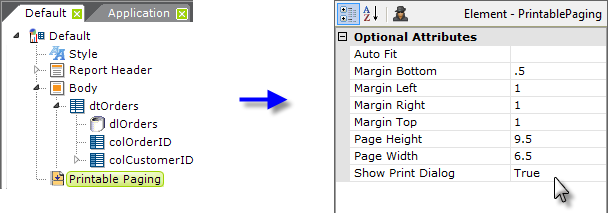
Begin, as shown above, by adding a Printable Paging element beneath the root Report element (its location in the element tree does not matter).
The Margin attributes are optional but have default values, in inches, that are used to calculate page dimensions if they're not set. The proper Page Height and Page Width attribute values are calculated by starting with the physical paper size in inches and subtracting the related margin values. So, in the example above, subtract from the physical paper height (11") the bottom margin (- .5") and the top margin (- 1") to arrive at the Page Height value ( = 9.5"). The pull-down list of potential values for these two attributes does the math for you and provides valid options:
For "portrait" page orientation, set Page Height = 9.5 and Page Width = 6.5
For "landscape" page orientation, set Page Height = 6.5 and Page Width = 9.5
The Show Print Dialog attribute controls whether the operating system's standard printer selection dialog box appears once the report has been loaded into the browser. For formats other than HTML, such as PDF or Word, this is set to False.
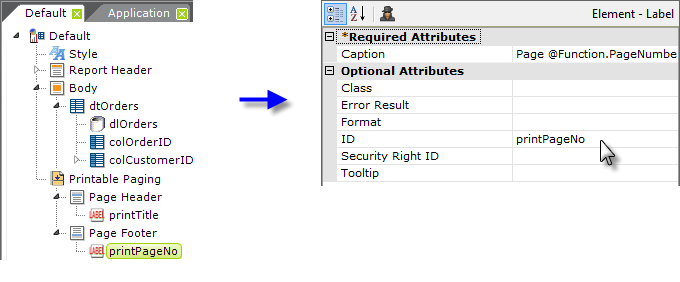
If desired, a page header and footer that will only appear in the printed output can be included by adding Page Header and Page Footer elements as child elements beneath the Printable Paging element, as shown above. They, in turn, can contain other elements including labels and images. In the example, the footer makes use of some @Function tokens to present the current page number and total page number. The complete Caption attribute value for this is:
Page @Function.PageNumber~ of @Function.PageCount~
Note that the PageNumber token is only valid when Interactive Paging or Printable Paging elements are in use and the PageCount token is only valid when Printable Paging is in use.
Developers who want to use the PageNumber and PageCount tokens to control display of elements beneath Page Header and Page Footer elements using Conditions should note that these two tokens are only valid when used in the Condition attribute of Division elements beneath Page Header and Page Footer elements. They are not valid if used in Condition attributes of other elements, such as Rows, beneath Page Header and Page Footer elements.
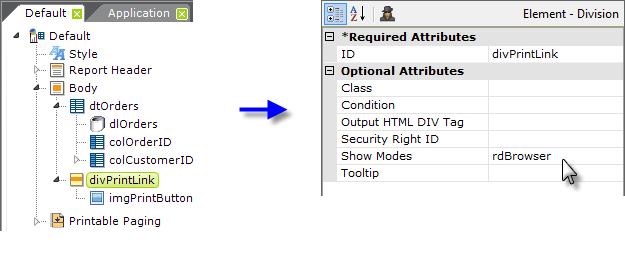
Next, add the element that users will click to print the report:
- Add a Division element to your report and set its Show Modes attribute to the built-in rdBrowser value, as shown above.
- Add an Image, Label, or Button element which will become the "print link" in the report.
By placing the print link beneath a Division element, you can ensure that it will not appear on the printed report. Next, select the appropriate actions depending on the type of output required.
While it's possible to use the Action.Report & Target.Report elements, with the latter's Report Paging attribute set to Printable, with the Printable Paging element, the best output will result from using one of the the following two methods for printing reports.
Format Report and Display as PDF
Continuing with the earlier steps: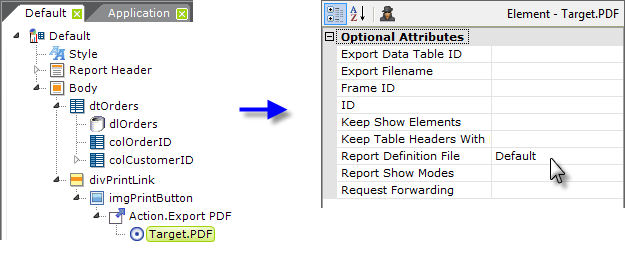
- As shown above, add Action.ExportPDF and Target.PDF elements beneath the print link element. Set the Target.PDF element's attributes as shown.
When the print link is clicked, the report will be reformatted, saved as a temporary .PDF file, and displayed using the Adobe PDF Reader browser extension (which must be installed on the client machine). From there, the report can be saved as another PDF file or printed.
To export a page to PDF in landscape orientation, be sure to use the Printable Paging element as described in the previous section.
Page headers and footers are rendered separately when exporting to PDF format. Since space is limited on printable pages, it's advisable to keep the size of page headers and footers small to allow room for the body of the report.
Note that the web server's local ASPNET or NETWORK SERVICES account must have Full Control access permissions to the rdDownload folder in your Logi application folder in order to create temporary PDF files.
Format Report and Display as Word Document
Continuing with the earlier steps:
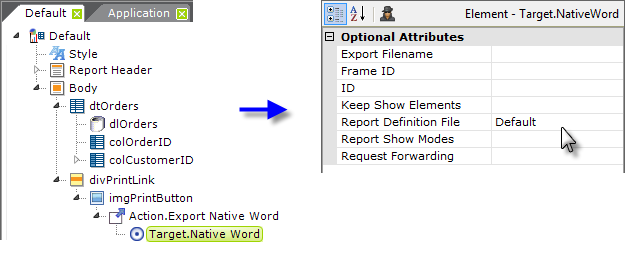
- As shown above, add Action.Export Native Word and Target.Native Word elements beneath the print link element. Set the Target.Native Word element's attributes as shown above.
When the print link is clicked, the report will be reformatted, saved as a temporary Word file, and opened using Word. From there, the report can be saved to another Word file or printed. Microsoft Office or the Word browser viewer must, of course, be installed on the client machine.
Note that the web server's local ASPNET or NETWORK SERVICES account must have Full Control access permissions to the rdDownload folder in your Logi application folder in order to create temporary Word files.
