Export to XML
Data stored in the Extensible Markup Language (XML) format allows information systems to share structured data and is a widely-accepted method of storing and transferring data. Logi products use XML files as temporary caches for a variety of purposes and can export Logi report data to be saved as XML files.
- About Exporting Data to XML
- Export Data Manually
- Export Data Automatically
- Save SQL Data as XML Data
- Export to XML Considerations
About Exporting Data to XML
The XML data format is useful because of its relative simplicity and general cross-platform accessibility. XML files are simple text files that can be used to store a variety of data. In the schema used by Logi Analytics, for tabular data, an XML element set represents one data record, each column is identified by an XML attribute name, and its data is the attribute value.
Logi Studio provides Export XML elements that make it easy to export Logi report data into XML
files.
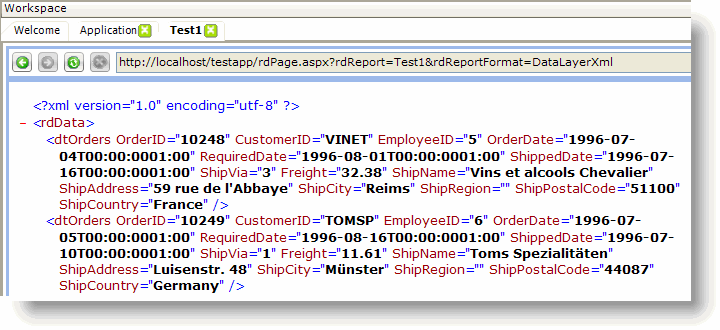
The example above shows report data that has been exported into an XML data file. Note the formatting of date-time type data; it's in the ISO 8601 format. Record 1 of the dataset is everything between <dtOrders and /> .
Logi developers can give users the ability to export a data manually via user interaction at runtime; Logi Info developers can also export data automatically, based on an event or schedule. Manual exports are configured within Report definitions and automated exports are configured within Process definitions.
Export Data Manually
Here's an example of how to create a report with a link that allows data to be exported manually:
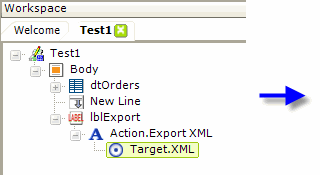
- In your report definition, add an Action.Export XML element as the child of a Label, Image, Button or Chart element, as shown above.
- Below it, add the required Target.XML child element.
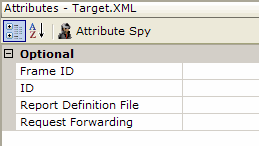
- If the data to be exported is part of the current report, you need do nothing more. Just save your definition and browse your report. It's that simple. Notice that the example above shows that no attribute values need be set. The default settings will export the current reports' data.
What happens when the link is clicked: the report's data is exported to a temporary .XML file which is created in your project folder's rdDownload folder on the web server. The temp file is then opened automatically in your browser (or in whatever tool the .xml file extension has been registered with). From there, you can save it to a file if desired.
Only the data from the datalayer is exported; headers, footers, paging, images, etc. from the source report are not exported. Any conditions, filters, aggregations, etc. that have been applied to the datalayer will be reflected in the exported data.
The following table provides explanations for the Target.XML element's attributes, which are all optional:
| Identifier | Description |
|---|---|
| Frame ID | Specifies the frame for the target page. Leave blank for the current browser window, or select NewWindow to open a new browser window. You can also specify an existing frame identifier to re-use the same window for each request. |
| ID | Specifies a unique identifier for this element. |
Report Definition File | Specifies the name of the report definition file that contains the data to be exported. |
| Request Forwarding | Specifies whether request variables will be passed to the report definition file that contains the data to be exported. Has no effect if the current report is being exported. |
The temporary files generated during the export are cleaned up automatically over time.
Export Data Automatically
The following example, for Logi Info only, shows how to create a process task that exports data automatically:
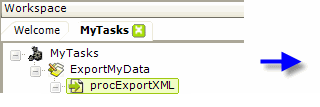

- As shown above, in your Process definition, add a Procedure.Export XML element beneath your Task element.
- In the element's Filename attribute, specify the output path and filename, on the web server, for the exported report. The filename should include the ".XML" file extension. The example shown above uses the @Function token to provide the path to the Logi application's application folder on the web server.
- Ensure that Write permission has been granted to the local ASPNET (IIS 5.0) or NETWORK SERVICE (IIS 6.0) account on the web server for the target folder.
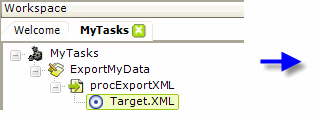
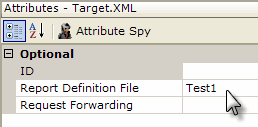
- Next, add the required Target.XML element, as shown above.
- In the element's Report Definition File attribute, specify the report that contains the data to be exported. Do not select the "CurrentReport" choice in the list of suggestions as it will notwork in this case.
- Your task will need to be completed, of course, with a Response element to run properly.
What happens when your task runs: the specified report data will be exported to a temporary file in your project folder's rdDownload folder on the web server; then the temp file will be copied to the output file you specified.
If you try to run this task more than once, you'll receive an error. This is due to the fact that Procedure.Export XML will not overwrite an existing file. Adding a Procedure.Delete File element at the beginning of the task will solve this.
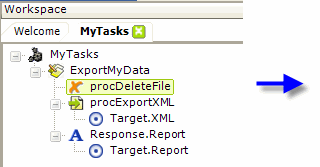

An example of a complete task is shown above. Note the use of the @Function again in the Procedure.Delete File element's Filename attribute.
Logi products also include an XSL Transform element, which allows developers to apply transformations to change the XML output format before the data is exported.
Save SQL Data as XML Data
There are situations in which developers may, during development, want to capture data from a SQL database or other source and save it as XML data.
For example, it may be desirable to create an XML data file of country names, postal codes, or other static data to be used in an application. Or, it may be useful to work with XML data, without the need for a live database connection.
Logi reporting products make it very easy to do this, following these steps:
- Turn on debugging, using the Debug icon in Studio's toolbar (v10.0.259 or later) or by configuring your application's _Settings definition, General element's Debugger Style attribute to DebuggingLinks and saving the definition.
- Run the Logi report that retrieves the desired SQL data or data from another datasource.
- Click the debug link or icon at the bottom of the report page.
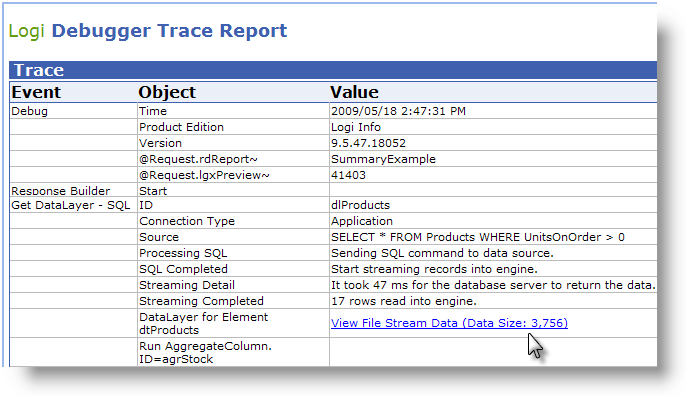
- As shown above, find the link in the Debugger Trace Report page that connects to the retrieved data and click it. This should open the XML in the datalayer in your browser.
- Right-click in the browser and select View Source. This should open the data in Notepad or some other text editor.
- Save the data in the text editor to a file with an .xml extension.
The data is now ready to be used with Logi applications and can be retrieved using DataLayer.XML.
Export to XML Considerations
The following considerations apply to exports to XML file:
- This is a data only export. Only the row-column data in the datalayer is exported. Report headers, footers, and titles, table summary rows and totals, images, etc. are not exported.
- Your computer may associate .xml files with Microsoft Excel, which means that Excel will be launched any time you double-click an .xml file. To view these files outside of Excel, try opening them with Notepad or some other text editor.
- The data exported is the data from the datalayer and the XML attributes will be the column names from the datalayer, not the data table column header text.
