Export to Native Word
Exporting reports into Microsoft Word documents is a popular and useful method of formatting and presenting data. This topic discusses techniques for doing this from Logi reporting products.
- About Exporting Reports to Native Word
- Export a Report Manually
- Export a Report Automatically
- Add Exported Headers and Footers
- Force Page Breaks in Exports
- Hide Elements When Exporting
- Export MoreInfo Rows
- Cascading Style Sheet Support
- Debug Exports
- Export Considerations
About Exporting Reports to Native Word
Exporting tabular data into a document allows for additional formatting to be performed or for the data's inclusion in narrative text. Microsoft's widely-used Word word-processing program is ideal for this practice and Logi Studio provides appropriate elements so that exports can easily be accomplished.
"Export" or "Export Native"?
Earlier versions of Logi managed reporting products included an Action.Export Word Or Excel element and it has been retained for flexibility. However, beginning with version 8, a new element named Action.Export Native Word was introduced and you should use it for all new work.
What's the difference? The Action.Export Word Or Excel element causes the Logi server to render the report data into HTML with a MIME type of ".doc"; the client browser handles conversion and display. This has proven to produce uneven results in some browsers. The new Action.Export Native Word element causes the server to produce true .doc files which are returned to the client for display, producing more consistent and accurate results.
Manual and Automatic Export
Developers can give users the ability to export a report in two ways: manually (the report is made available for download and can be opened using the Word browser plug-in) or automatically (the report is written, as a Word .doc file, to the web server) based on an event or schedule. Manual exports are configured within report definitions and automated exports are configured within process definitions.
Export a Report Manually
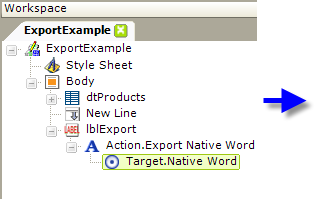
Here's an example of how to create a report, with a link,
that exports itself manually:
- In your Report definition, add an Action.Export Native Word element to a Label, Image, Button or Chart element, as shown above.
- Add the required Target.Native Word element.
- If the report to export is the current report, you need do nothing more. Just save your definition and browse your report. It's that simple.
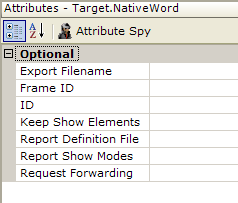
- If the report to export is not the current report, specify that report by setting the Target.Native Word element's Report Definition File attribute.
- All Target.Native Word element attributes are optional. The default settings will export the current report in its entirety.
What Happens: The report is exported to a temporary file which is created in your project folder's rdDownload folder on the web server. The temp file is then returned to the client and opened automatically in the Word plug-in within your browser (you may be prompted to Open or Save the .doc file). Temporary files on the server are cleaned up automatically over time.
Export a Report Automatically
The following example, for Logi Info only, shows how to create a process task that exports data automatically:
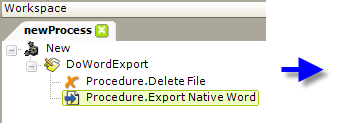
- In your Process definition, add a Procedure.Export Native Word element to your Task element.
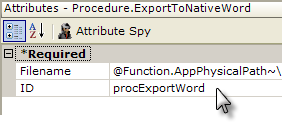
- In the element's Filename attribute, specify the output path and filename, on the web server, for the exported report. The filename should include the ".doc" file extension. For example, this value uses a token to export the report to a folder called myExports within your project folder: @Function.AppPhysicalPath~\myExports\myfile.doc
- Ensure that Write permission has been granted for the folder you are exporting to for the local ASPNET (IIS 5.0) or NETWORK SERVICE (IIS 6.0+) account on the web server.
- Note the Procedure.Delete File element before the Procedure.Export Native Word element. The export will not overwrite an existing file so this element is used to delete an older version before the export occurs; no error will occur if there's no existing file to delete. Set its Filename attribute to match that of the Export Native Word element.
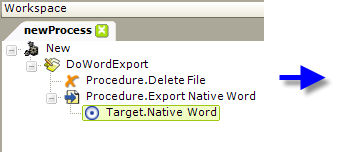
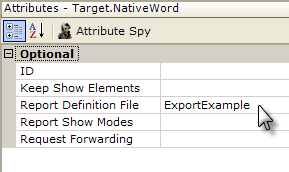
- Add the required Target.Native Word element.
- In the element's Report Definition File attribute, specify the report to be exported. Note that, in a Process definition, the "CurrentReport" option that appears in the suggested values for this attribute cannot be used. You must specify the actual name of the report.
What Happens: When your task runs, the specified report will be exported to a temporary file in your project folder's rdDownload folder on the web server; the temp file is then copied to your output file.
Add Exported Headers and Footers
Exported reports are paginated and you may want to have a report header and/or footer appear on each exported page. This can be done, without affecting the normal appearance of the HTML report output in a browser, using the Printable Paging element.
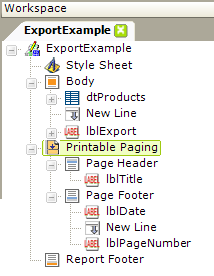
As shown above, the Printable Paging element is added beneath the report's top-level Report element. It has its own Page Header and Page Footer child elements which are containers for Label and other elements. In the example above, the captions of the footer labels could use the @Date.Today~ and @Function.PageNumber~ tokens to get their values.
When the report is run, the header and footer under the Printable Paging element will not be visible. When the report is exported, the header and footer will be visible on each exported page.
Force Page Breaks in Exports
When a report is paginated during an export, it may be useful to be able to force a page break, for example, to ensure that sections of the report start on new pages. This can be done using the Printer Page Break element.
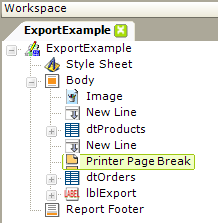
You can add one or more Printer PageBreak elements beneath the Body element to break the exported pages where desired. In the example above, these elements ensure that the "dtProducts" table and the "dtOrders" table start on new pages. When the report is viewed in the browser, however, like the Printable Paging element, the Printer Page Break element has no effect.
Force a Data Table Row Break
When working with data tables with multi-line rows, developers may want to ensure that rows break cleanly across pages of their Word exports. In other words, they want to prevent different lines of the same data table row from appearing on different Word document pages. This can be accomplished through CSS:
|
Assigning the above class to a Data Table Column element will create the desired effect.
Hide Elements When Exporting
When exporting to Word, developers commonly want to hide some of the elements in the report page, like the Export button or link. This can be done very easily using Show Modes.
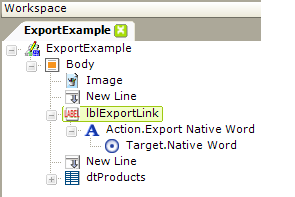
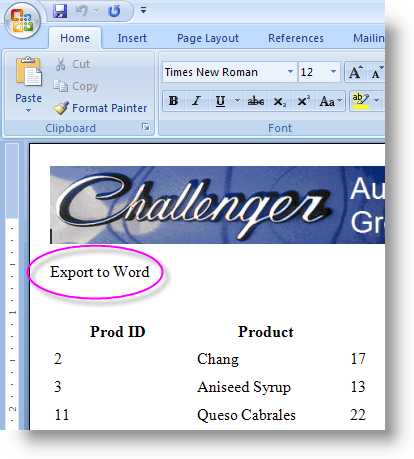
Consider the example shown above. The definition, on the left, includes a Label that can be clicked to export the report to Word. However, when it's exported, shown on the right, the link text "Export to Word" appears in the Word document. We don't want that text to appear in the document.
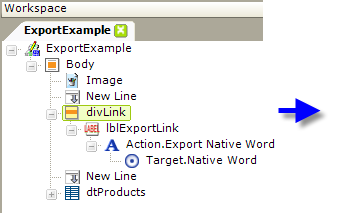
To "hide" the link in the export, simply place it beneath a Division element. This element supports Show Modes, which the link, by itself, does not.
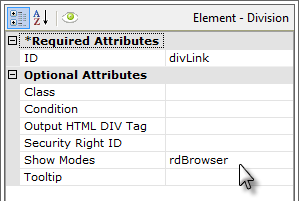
Then set the Division element's Show Modes attribute value to the built-in ShowMode value rdBrowser, as shown above. Elements with this ShowMode value will only be visible in the browser.
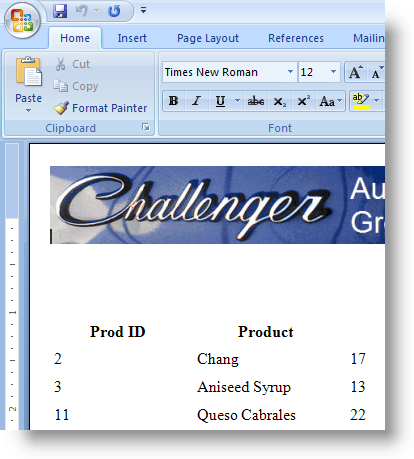
When the report is run and exported, as shown above, the document no longer includes the "Export to Word" text.
Export MoreInfo Rows
If your report contains a data table and you're using the More Info Row element to show/hide additional detail data within the table, you may want the detail rows (when visible) to be exported along with the main table data.

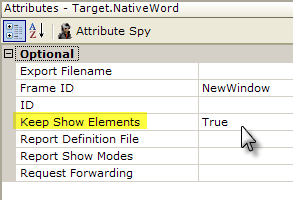
To enable this, as shown above, set your Target.Native Word element's Keep Show Elements attribute to True.
Keep Show Elements works with Action.Show Elements (used to show/hide the More Info Row) so that items that have been
shown or hidden by the user remain that way when the report is re-displayed or
exported.
Cascading Style Sheet Support
When a Word export is being generated, the export engine processes any style sheet information along with the report data. The style sheet assigned to the report is used; you do not need to do anything additional to specify the style sheet.
If desired, you can use two different style sheets in your report definition, one for the report and one for the Word export:
- Select the root element of your report definition and set its Default Show Modes attribute value to an arbitrary string, such as "Normal."
- Add two Style Sheet elements to your report definition.
- Assign one Style Sheet element's Show Modes attribute a value that matches the string used in Step 1, "Normal." This style sheet will be used for the regular HTML report.
- Assign the other Style Sheet element's Show Modes attribute a value that matches the Target.Native Word element's Report Show Modes attribute value (both should be an arbitrary string that does not match the string from Step 1, such as "Export."
Now when the report runs in a browser, the first style sheet will be applied; when it's exported to Word, the second style sheet will be applied.
What if you want to combine the effects from this section and the previous section, i.e., hide some elements and use different spreadsheets? Just remember that the Show Modes attribute can accept several values, separated by a comma. To combine the examples from these two sections, ensure that the root element's Default Show Modes attribute includes both Show Modes values: "Normal,NoExport" (do not enter the double quotes).
![]() The following
considerations should be noted when working with style sheets for Word exports. Failure to
follow these guidelines will result in style sheet information being ignored by
the Word exporter, or, in some cases, failure of the export process.
The following
considerations should be noted when working with style sheets for Word exports. Failure to
follow these guidelines will result in style sheet information being ignored by
the Word exporter, or, in some cases, failure of the export process.
- When defining CSS classes in their style sheet(s), developers must include a space or line feed between the name of a class and the opening curly-brace. These are valid classes:
.class{
color: Blue;
}
.class
{
color: Blue;
}
but this is in invalid class:
.class{
color: Blue;
}
- Developers may combine classes using the CLASS attribute of elements in a report definition file:
CLASS="class1 class2"
- Developers must use the Width and Width Scale attributes when setting table and cell widths. The CSS "width" property is not supported.
- If duplicate class definitions exist, only the first definition is used.
- If duplicate properties appear inside a class, only the last occurrence is used.
- The following CSS Selectors are supported by the Word exporter:
Selector | Example |
Type | TABLE |
Class | .<classname> (begins with a period) |
ID |
#second_table |
Type-prefixed Class | TABLE.<classname> |
- The following CSS Level 1 Properties are supported by the Word exporter. Please note that the order of the values for properties with multiple values is significant. Multiple values must be listed in the order defined in this table or the Word exporter will ignore the property altogether:
| Property | Value/Examples |
|---|---|
| background | <background-color> |
| background-color | Web colors (examples: #00FF00 or Green) |
| border | <border-width> <border-style> <border-color> |
| border-bottom | <border-width> <border-style> <border-color> |
| border-color | Web colors (examples: #00FF00 or Green) |
| border-style | Example: solid |
| border-top | <border-width> <border-style> <border-color> |
| border-width | Pixels (example: 25px) |
| color | Web colors (examples: #00FF00 or Green) |
| filter | Examples: flipv, fliph |
| font | <font-style> <font-weight> <font-size> <font-family>; |
| font-family | Base-14 & TrueType fonts (example: Arial) |
| font-size | Points (example: 12pt) |
| font-style | Example: italic |
| font-weight | Example: bold |
| padding | <padding-top> <padding-right> <padding-bottom> <padding-left> |
| height | Pixels (example: 25px) |
| padding-top | Pixels (example: 25px) |
| padding-right | Pixels (example: 25px) |
| padding-bottom | Pixels (example: 25px) |
| padding-left | Pixels (example: 25px) |
| text-align (see Note 1 below) | Examples: left, right, center, justify |
| text-decoration | Examples: underline, overline |
| vertical-align | Examples: top, middle, bottom |
| writing-mode | Examples: lr-tb, tb-rl |
Style Tips:
- With a limited list of CSS properties, if Native Word exporting is going to be used in an application, it's a good idea to design the CSS classes used for elements to be exported with these limitations in mind. That way a single style sheet could be used for all exports and the HTML display of a report. Many of these property limitations stem from the fact that there isn't a good way to translate certain CSS properties into a formatting setting in a native Word document; the formatting options available
in a native Word document are much more limited than those available with CSS.
- When it comes to specifying font-size, Word can't handle pixel values. All pixel values specified in CSS classes for font-size will be converted to point values. Therefore, it's highly recommended that points be used to specify the font-size.
- Word builds tables sequentially, cell-by-cell, left-to-right, top-to-bottom. Word will attempt to apply all the properties of the previous cell to the cell currently being created unless the properties are explicitly defined differently for the current cell using a different CSS class which overwrites all the properties of the previous cell. For instance, if the first cell has a "border-bottom: 1px solid black;" class applied and you want the next cell to appear without a bottom border,
you would have to apply a class with the following property: "border-bottom: 1px solid white;".
- Use text-align to set the alignment of tables. This is not generally allowed by the rules of CSS, however, an exception is made because the align attribute is not supported.
Exports
In v10.0.259 a new feature was added that allows developers to debug their exports. When the debugger has been set to Debugger Links and the report is run, and then exported, a debug link will be included at the bottom of the exported report:
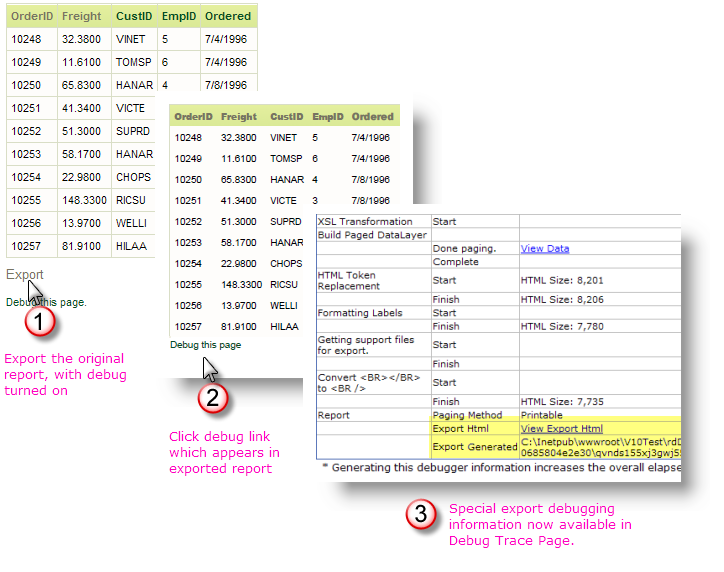
This mechanism allows you to review the export process in more detail and can help to diagnose any problems that may arise.
Export Considerations
The following apply when exporting to Word:
- Chart color transparency is not available in exports to Word. Non-animated charts displayed in Logi HTML reports are rendered as .png images and support transparency, however, when exported to Word, these charts are rendered as .jpg images, which do not support transparency.
- Embedded HTML files in a Logi report may not be exported correctly; success is dependent on the nature of the external HTML file, its adherence to proper XHTML syntax, and other factors.
- Background colors are only applied within tables
- Bulleted lists are not supported (using the Bullet element)
- Rectangle element is not supported
- Layout Positioning is not supported
- HideDuplicates element is not supported
