Create a .NET Plug-in
"Plug-ins" give Logi developers the ability to programmatically extend the functionality of their Logi applications. This topic discusses the development of Logi plug-ins using the .NET framework.
- Write Your Plug-in
- Example: Change the Application Caption
- Example: Modify an SQL Query with a Request Variable
- Example: Change Data in a Datalayer
- Implement Your Plug-in
- Debug in Visual Studio 2012
- Debug in Visual Studio 2008/2005
- Plug-in Class Properties and Methods
![]() If you haven't done so already, you should read Logi Plug-ins for important supporting information before proceeding.
If you haven't done so already, you should read Logi Plug-ins for important supporting information before proceeding.
![]() If you're developing a Java plug-in, see Create a Java Plug-in instead.
If you're developing a Java plug-in, see Create a Java Plug-in instead.
Write Your Plug-in
Plug-ins written for Logi .NET applications are compiled into Dynamic Link Library (.DLL) files. In the code, the System.Web and System.XML.Linq .NET namespaces are referenced for interactions with Logi applications and report definitions. Namespaces are collections of classes with methods for doing things with specific kinds of data or objects. You import or include them in your plug-in project.
For example, System.Web is needed to access HTTP Request and Session objects, which are often useful in a plug-in.
Logi definitions and data are handled as XML streams during processing by the web server and therefore by your plug-in, too. Much of your code will be concerned with searching, parsing, and modifying this XML. The System.XML.Linq namespace provides useful methods for doing this. If you're familiar with XPath notation, you'll find that to be very helpful as well.
Create your plug-in project in Visual Studio:
- Create a new Class Library project, using C#, Visual Basic, or other language of your choice.
- Configure the project to build the .DLL output in the _Plugins folder of the Logi application (which you may need to create). The folder's name must be "_Plugins", beginning with an underscore.
- Add a reference to the System.Web and System.XML.Linq .NET namespaces. Both may not be needed, depending on what you do in the plug-in, but you can refine that later.
- Logi Info & Report: Add a reference to the file yourLogiApp/bin/rdPlugin.dll distributed with your Logi product.
 Be sure to use the file found in the bin folder of the Logi application that will use this plug-in. It's version-specific so don't refer to it in the bin folder of some other Logi application.
Logi ETL: Add a reference to the EtlWebService\bin\LogiEtlWebService.dll file. Always copy this DLL locally to the build folder when compiling so that, if you upgrade ETL and the engine version of the DLL changes, your code will still function.
- Write your plug-in code, starting with this prototype:
Public Class Plugin
|
Add the methods and code you need to get the plug-in to do whatever it's supposed to do.
Example: Change the Application Caption
The following are code examples for a plug-in that alters the caption of the Logi application at runtime:
[C#]
|
Example: Modify a SQL Query with Request Variable
The following are code examples for a plug-in that customizes a SQL query based on a request variable:
[C#}
|
Example: Change Data in a Datalayer
The following are code examples for a plug-in that converts RTF text in a datalayer to plain text. It creates an in-memory RichTextBox control, then iterates through all records in the datalayer, processing and replacing the contents of a data column.
' load the XML from the datalayer ' loop thru each node, processing the "colText" attribute value, ' clean up End Sub
[C#} // create RichTextBox // load the XML from the datalayer // get a nodelist for all nodes (records) in XML doc // loop thru each node, processing the "colText" attribute value,
|
Implement Your Plug-in
When your plug-in has been written and compiled, add the element(s) you need to call it in your Logi application. The elements used to do this are described in Logi Plug-ins.
![]() The first time you run your Logi application, IIS will load the plug-in into memory and it will remain cached there. If you make coding changes to the plug-in and want to rebuild it, you'll need to run stop and restartIIS (run iisreset.exe) first, in order to be able to replace the previous build.
The first time you run your Logi application, IIS will load the plug-in into memory and it will remain cached there. If you make coding changes to the plug-in and want to rebuild it, you'll need to run stop and restartIIS (run iisreset.exe) first, in order to be able to replace the previous build.
Debug in Visual Studio 2012
You can debug your plug-in as it runs in your Logi application, using Visual Studio (VS). The examples in this section show you how it's done in VS 2012. Ensure that you're running VS with a user account that has Administrator privileges.
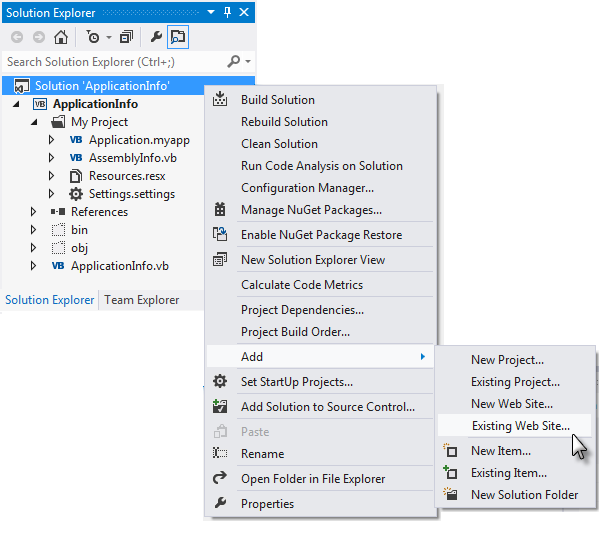
Open your plug-in solution in VS and, in the Solution Explorer, select and right-click the root node, then select Add![]() Existing Web Site... Click the Local IIS category and select your Logi application web site's virtual directory from the list, adding it to your solution.
Existing Web Site... Click the Local IIS category and select your Logi application web site's virtual directory from the list, adding it to your solution.
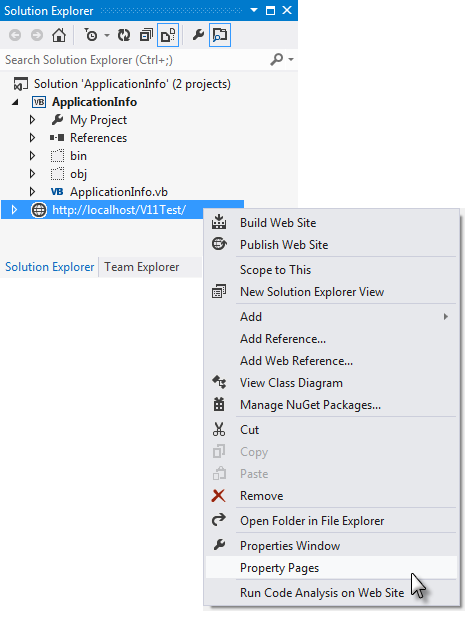
Right-click the Logi application web site in the Solution Explorer and select its Property Pages from the pop-up menu, as shown above.
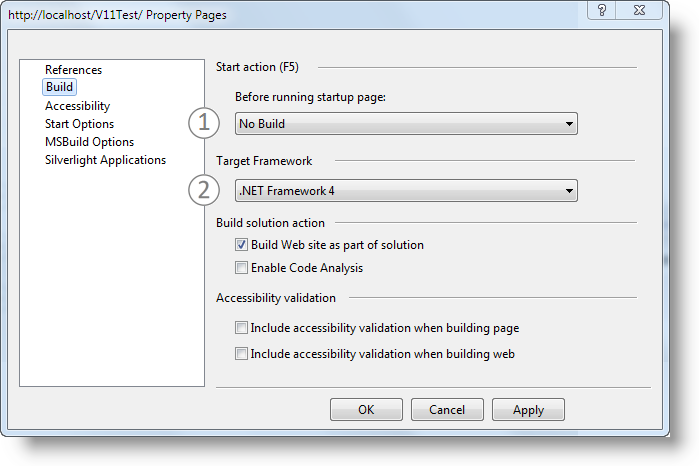
In the Property Pages window, shown above, select the Build page in the left menu, and then:
- Select No Build in the list of Start actions.
- Ensure that the appropriate .NET Framework version for your Logi application is selected.
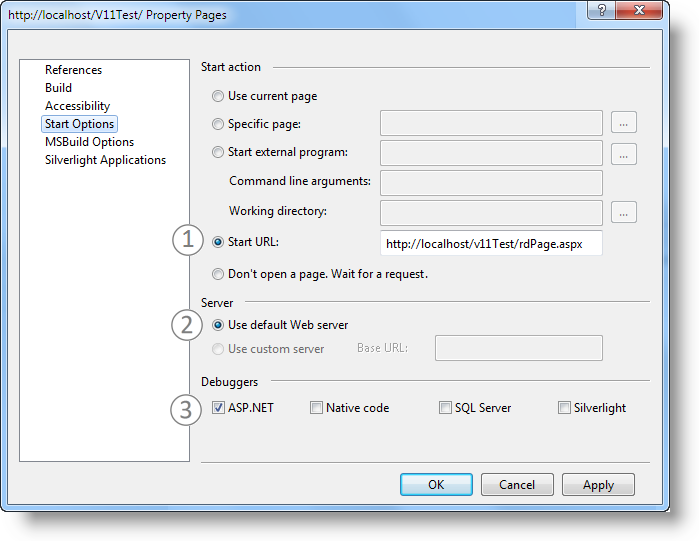
Next, select the Start Options page in the left menu, as shown above, and then:
- Select the Start URL radiobutton, and enter your Logi application's URL.
- Ensure that the Use default Web server option is selected.
- Ensure that the ASP.NET debugger option is checked. Click OK to save all your settings
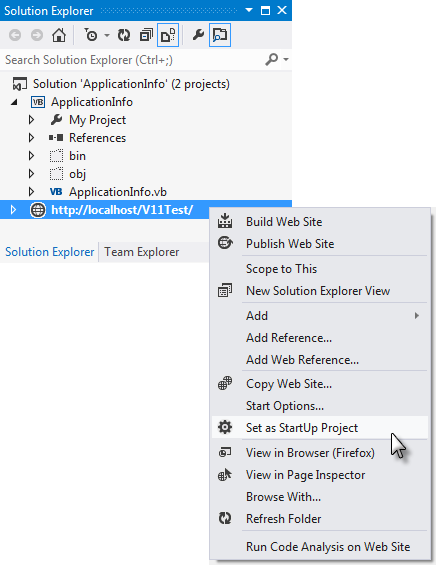
Finally, in the Solution Explorer, right-click your Logi application web site, and select the Set as Startup Project option.
You're now ready to press F5 (or use the Debug menu) to run your solution and start debugging. The details of setting Watches, Breakpoints and other debugging-related activities are beyond the scope of this topic; refer to your Visual Studio documentation.
If you start debugging and receive the error "...Debugging failed because integrated Windows authentication is not enabled", read this MSDN article for information about configuring the authentication for your Logi app virtual directory.
These settings are for a simple debugging example. Depending on the implementation of your Logi application, such as use of a remote web server, you may need to adjust some of the settings shown above.
Debug in Visual Studio 2008/2005
You can debug your plug-in as it runs in your Logi app, using Visual Studio (VS). The technique is the same regardless of VS version, with minor differences as noted below. Ensure that you're running VS with a user account that has Administrator privileges.
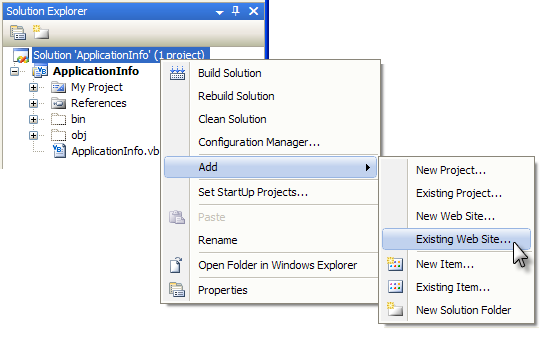
Open your plug-in solution in VS and, in the Solution Explorer, select and right-click the root node, then select Add ![]() Existing Web Site... Browse to and select your Logi application web site (its virtual directory), adding it to your solution.
Existing Web Site... Browse to and select your Logi application web site (its virtual directory), adding it to your solution.
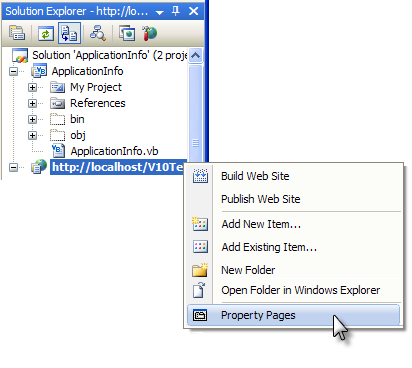
Right-click the Logi application site in the Solution Explorer and select its Property Pages from the pop-up menu, as shown above.
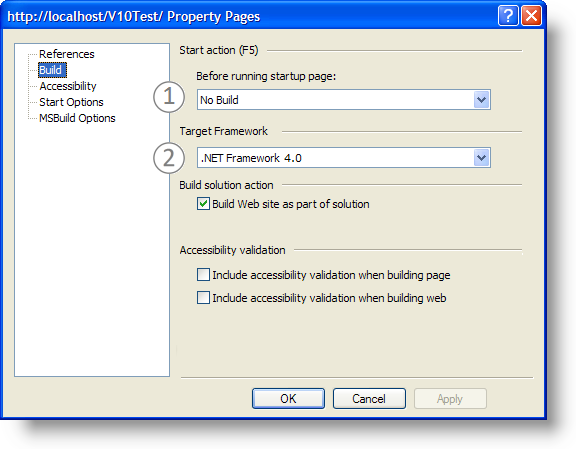
In the Property Pages window, shown above, select the Build page in the left menu, and then:
- Select No Build in the list of Start actions.
- Ensure that the appropriate .NET Framework version for your Logi application is selected.
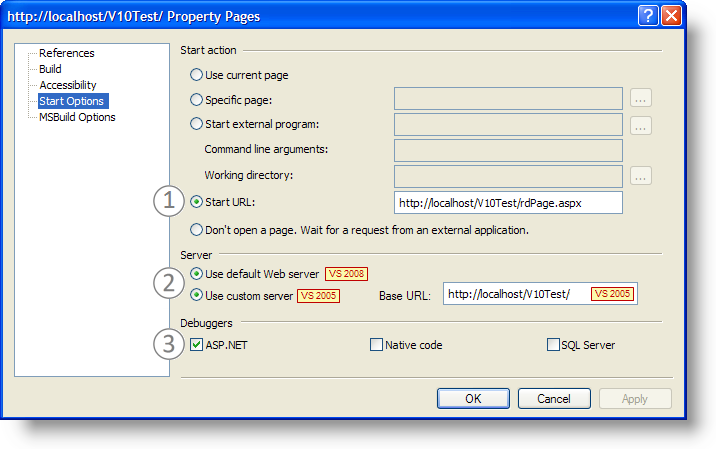
Next, select the Start Options page in the left menu, as shown above, and then:
- Select the Start URL radiobutton, and enter your Logi application's URL.
- To run your Logi app using the local IIS server:
VS 2008: Select the Use default Web server radiobutton.
VS 2005: Select the Use custom server radiobutton and enter the Base URL, as shown above. - Check the ASP.NET debugger checkbox; click OK to save all your settings
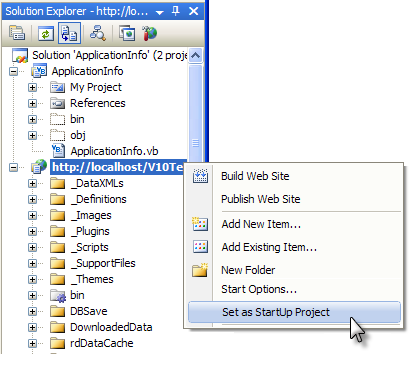
Finally, in the Solution Explorer, right-click your Logi application web site, and select the Set as Startup Project option.
You're now ready to press F5 (or use the Debug menu) to run your solution and start debugging. The details of setting Watches, Breakpoints and other debugging-related activities are beyond the scope of this topic; refer to your Visual Studio documentation.
If you start debugging and receive the error "...Debugging failed because integrated Windows authentication is not enabled", read this MSDN article for information about configuring the authentication for your Logi app virtual directory.
These settings are for a simple debugging example. Depending on the implementation of your Logi application, such as use of a remote web server, you may need to adjust some of the settings shown above.
Plug-in Class Methods and Properties
Logi plug-ins for .NET are written in Visual Studio or a similar development tool, using the rdServerObjects class, which resides in the rdPlugin.dll assembly and is a member of the rdPlugin namespace. You instantiate this class in your code and it provides access to the Logi application and its data. The class object is defined in your code as:
[Visual Basic]
public Class rdServerObjects
[C#]
public class rdServerObjects
Once instantiated, the object provides the following properties and methods for use with your custom code:
Here are the object's methods and parameters:
AddDebugMessage() |
This method inserts an entry into the Debugger Trace Report. (v10.0.337+) [Visual Basic] [C#] Parameters: The time value for the entry inserted into the Debugger is provided automatically. |
CurrentData |
Returns an XmlDocument object containing the data in all of the datalayers. [Visual Basic] [C#] |
| CurrentDataFile |
Returns a string object containing of the fully-qualified path and filename for the cache file containing the XML data retrieved by the datalayer. [Visual Basic] [C#] |
| CurrentDefinition |
Returns a string object containing the XML source code of the current report definition. [Visual Basic] [C#] |
CurrentElement |
Returns an XmlElement object containing the XML source code of the current element. Only available when using Data Layer Plugin Call and Procedure.Plugin Call elements. [Visual Basic] [C#] |
CurrentHttpContext |
Returns an XmlDocument object containing all HTTP-specific information, including Application, Session, Server, Request, and Response objects. [Visual Basic] [C#] |
| PluginParameters |
Returns a Hashtable object containing the parameters, if any, passed to the plug-in. [Visual Basic] [C#] |
ReplaceTokens() |
Returns a string object containing the sTokens parameter with some or all of its tokens replaced with their current values, and with other optional effects applied. Added in v10.0.337. [Visual Basic] [C#] Parameters: |
Request |
Returns an HttpRequest object, which can be used to access HTTP Request values sent by the client to a Logi application. [Visual Basic] [C#] |
ResponseHtml |
Returns a String object containing the HTML for the rendered response page; available when the FinishHtml event completes. [Visual Basic] [C#] |
ReturnedDataFile |
Returns a String object containing the fully-qualified path and filename for the cache file which contains the manipulated XML data after processing. [Visual Basic] [C#] |
| Session |
Returns an HttpSessionState object, which can be used to access Session variable values related to the current Logi application session. [Visual Basic] [C#] |
SettingsDefinition |
Returns a read-only XmlDocument object containing the XML of the _Settings definition. [Visual Basic] [C#] |
Keywords: plugin, plugins