Scheduling Data Refreshes
Logi DataHub allows you to create Dataviews using data from databases, applications, and files. As a "snapshot" of this data, the DataHub repository will likely require periodic updating in order to "refresh" the data. This topic discusses that operation.
About Refreshing Data
DataHub makes it easy to refresh the data in your repository on a scheduled basis or manually. Essentially you will need to schedule a "data reload" for each data object. From the Dataview Status page, you also have the option of manually triggering an immediate reload.
During a refresh operation, DataHub will compare the schema from the data source with the column information previously loaded. If they match the scheduled reload will continue. If the schema no longer matches, however, the reload will stop and warning will be displayed.
Immediate Refresh
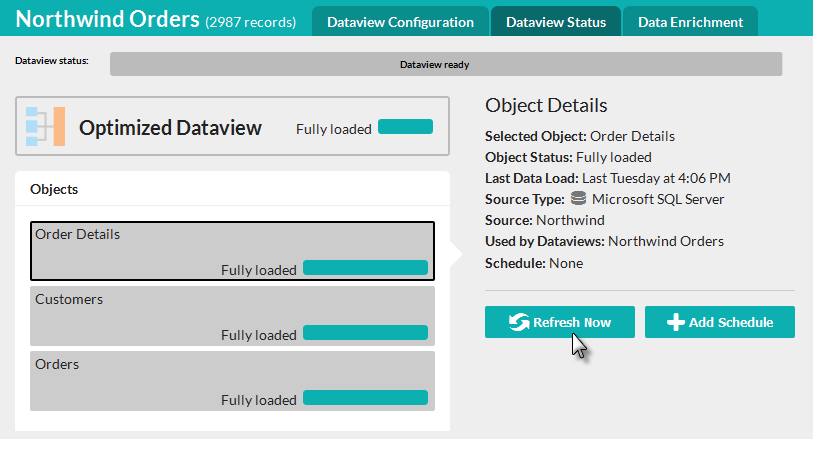
To immediately refresh data, navigate to the page for the desired Dataview and click its Dataview Status tab:

If there are multiple objects, select the desired one, then click Refresh Now, as shown above.

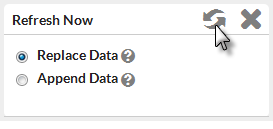
A prompt will appear requesting that you select the type of refresh to execute. If you select:
- Replace Data - All data in the cache will be replaced by new data retrieved from the data source.
- Append Data - New data retrieved from the data source will be appended to the existing data. Existing data will not be updated.
Click the Refresh Now icon ![]() to start the data loading operation immediately.
to start the data loading operation immediately.
Schedule a Refresh
The most convenient way to refresh data is to schedule it to occur at regular intervals.
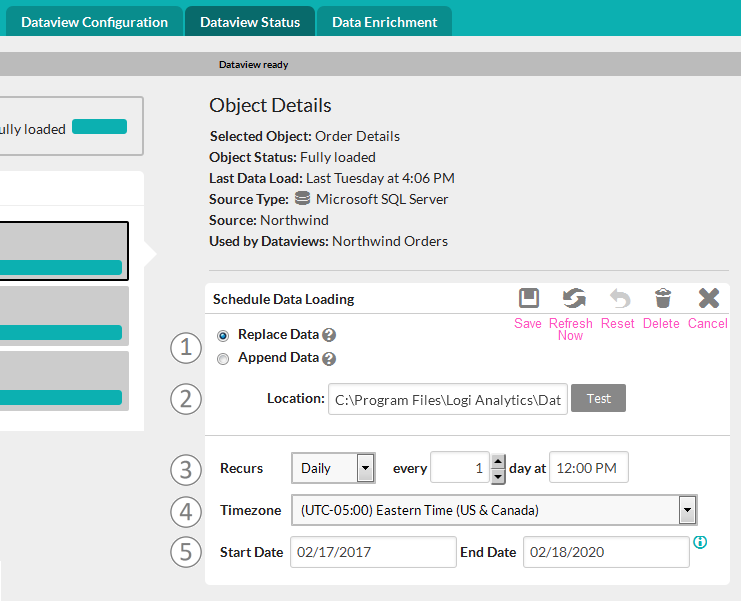
If there are multiple objects, select the desired one, then click Add Schedule, and these controls will be displayed:

Use these steps to create a scheduled refresh:
- Refresh Type - Select Replace Data to replace all data with new data retrieved from the data source. Select Append Data to have new data retrieved from the data source appended to the existing data - existing data will not be updated.
- Location - (File-type data sources only) Enter a fully-qualified file name with path. Click Test to ensure that server and scheduler can access the file.
- Recurs - Select the frequency (Daily, Weekly, Monthly), interval, and start time for the backup.
- Timezone - Select the appropriate time zone.
- Start and End Date - Enter the Start Date (required) and End Date (optional) for the backup. Leaving the End Date blank will cause to backup to continue to occur at the specified frequency and interval until the schedule is modified or deleted.
![]() Remember that, when the refresh occurs, the Dataview will be unavailable to other users until the operation completes.
Remember that, when the refresh occurs, the Dataview will be unavailable to other users until the operation completes.
Click the Save icon ![]() to save the schedule.
to save the schedule.
Click the Refresh Now icon ![]() to refresh the data immediately.
to refresh the data immediately.
Click the Reset icon ![]() to clear any changes in the controls during this sequence.
to clear any changes in the controls during this sequence.
Click the Delete icon ![]() to delete this schedule.
to delete this schedule.
Click the Cancel icon ![]() to cancel this operation and hide the controls.
to cancel this operation and hide the controls.
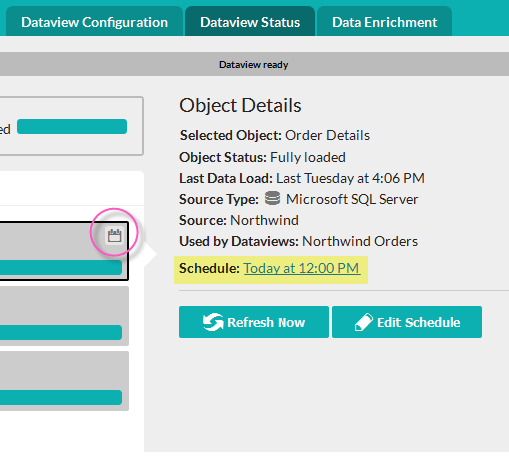
Once the schedule has been saved, you'll notice some changes in the Dataview Status tab:

As shown above, a special "scheduled" icon (circled above) appears in the selected object graphic, the scheduled time appears with a link (highlighted above, click to edit) in the object details, and an Edit Schedule button is now visible.