Data Repository Management
DataHub's data repository is self-tuning and self-optimizing, resulting in excellent performance. This topic discusses the data repository and how administrators can manage it.
- About the Data Repository
- Managing Usage
- Deleting Data Objects
- Changing the Repository Password
- Backing Up the Repository
- Restoring a Repository Backup
About the Data Repository
The DataHub data repository is a self-tuning columnar data store that offers high-performance, even for very large (250M+ records) data sets. Generally, it requires very little attention and works autonomously.
However, there are some administrative tasks associated with it and they're discussed in the following sections.
Managing Usage
It's easy for Administrators to see the amount of repository storage space being used - the usage icon is part of the main menu:

It provides both a percentage value and a visual indicator for the amount of storage being used. The standard DataHub installation has a 1 TB data storage ceiling.
Click Manage Objects to display the Manage Repository Objects page:
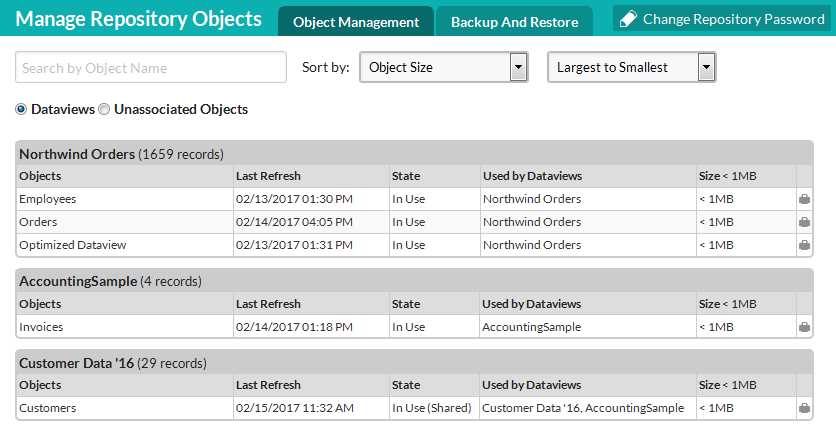
The purely informational page, shown above, shows the details of the dataviews and data objects currently loaded into the repository. The information displayed includes:
- The number of records loaded for each data Source
- The data object name and number of records
- The last time the data was refreshed
- The current state (whether it's in use or shared)
- The Dataviews currently using the object
- The amount of storage being used
The display can be searched and sorted using the controls provided.
Deleting Data Objects
Data objects that are not in use can be deleted. Click the Unassociated Objects option to filter the list of objects down to those that
have not been used. Click the red Delete icon ![]() in the right-most column of the table to delete an object.
in the right-most column of the table to delete an object.
![]() If a Padlock icon is displayed in the right-most column, you'll need to remove the object from its associated dataviews before you can delete it.
If a Padlock icon is displayed in the right-most column, you'll need to remove the object from its associated dataviews before you can delete it.
Changing the Repository Password
You may need to change the repository password at some time.

To do so, click Change Repository Password, highlighted in the image above. A dialog box will appear with appropriate input fields. The repository Admin user name appears at the top of this dialog box.
Backing Up the Repository
There are two primary components of the DataHub repository: the metadata and the data cache.
The metadata is the schema structure of the repository. It identifies the connections, data sources, data objects and columns, relationships, and other non-data constructs that allow DataHub to function.
The data cache is all of the data that has been loaded into the repository.
While you may refresh the data cache regularly and consider a backup of it unnecessary, the metadata is possibly the result of a lot of work and should be backed up, especially after any changes to Source and Dataviews have been made.
![]() Backup is not automatic - so it should be scheduled or become a regular maintenance task for an admin user.
Backup is not automatic - so it should be scheduled or become a regular maintenance task for an admin user.
Backup
DataHub's Backup tool lets you to make a full backup of the repository metadata and/or data cache. Select the Manage Repository Objects page's Backup and Restore tab to display the tool's controls:
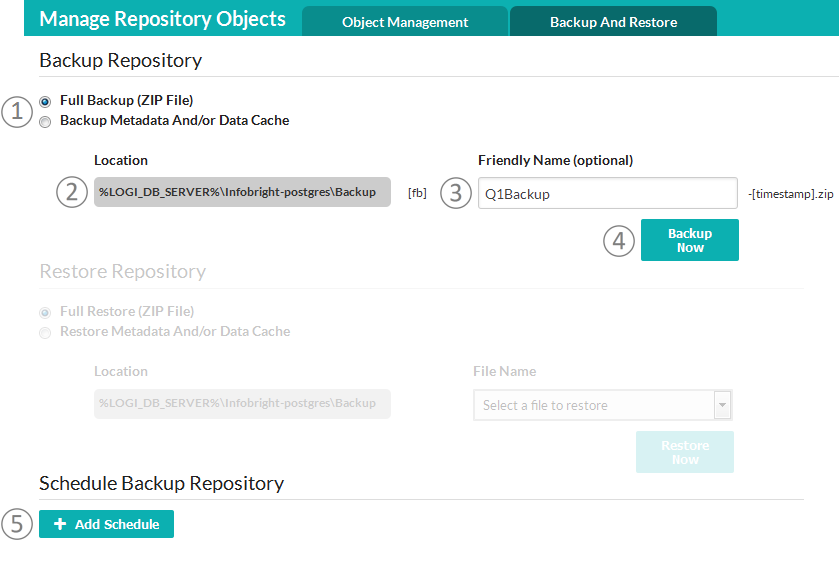
Take the following steps to make a backup:
- Backup Type - Select the Full Backup or Metadata And/Or Data Cache Backup option. If you select the latter, additional controls will appear for selecting and identifying which items to backup.
- Location - The read-only location of the backup folder, based on the repository installation location is displayed here. This location can be changed in C:\Program Files\Logi Analytics\DataHub\web.config if desired; search for "backup location" and restart DataHub after making a change to the value.
- Friendly Name - (Optional) Enter an arbitrary identifying name if it will help you distinguish backups, but keep in mind that the date and time are automatically appended (see below).
- Backup Now - Click to start the backup.
- Add Schedule - Click to create a scheduled backup - see the section below for more details.
The information form #2 and #3 above provide you with the format of the resulting backup file path and name. In the case of the example above, it would be:
%LOGI_DB_SERVER%\Infobright-postgres\Backup\fb-Q1Backup-2017-02-17-0848.zip
The "fb" highlighted in the name indicates a full backup; if you decided to backup the metadata or data cache separately, the name would include "md" or "dc" instead, respectively.
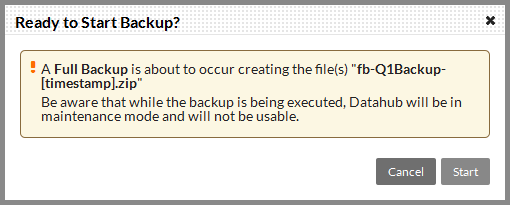
You'll be asked to confirm starting the backup, in the dialog box shown above.
Since a backup is intended to take a snapshot in time, the process will check to see if there are other pending updates to the repository and will queue the backup if necessary. When the backup runs, it will put the repository in Maintenance Mode, making it unavailable to other users until it completes.
Click Start to begin the backup.
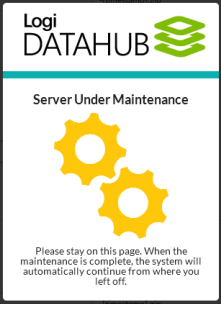
During the backup users will see the warning shown above.
Scheduling a Backup
The most convenient way to make backups is to schedule them to occur at regular intervals. If you click Add Schedule in the page, these controls will be displayed:
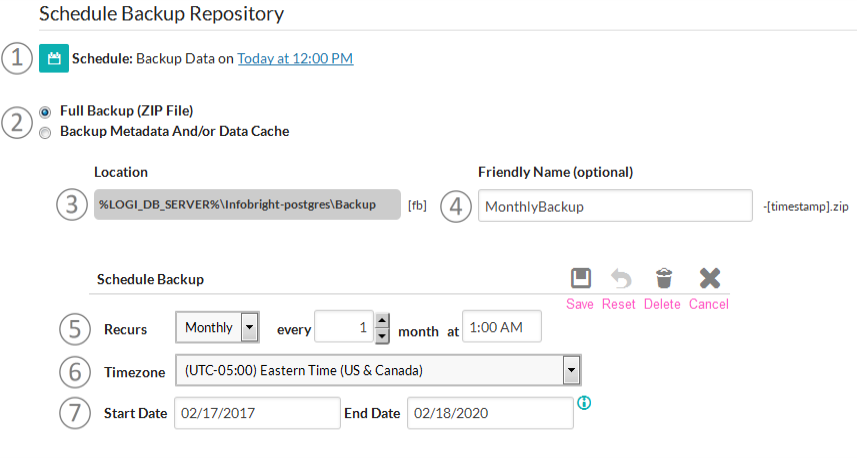
Use these steps to create a scheduled backup:
- Existing Backup - This indicates that a scheduled backup has already been created. Click the link to modify or delete it.
- Backup Type - Select the Full Backup or Metadata And/Or Data Cache Backup option. If you select the latter, additional controls will appear for selecting and identifying which items to backup.
- Location - The read-only location of the backup folder, based on the repository installation location is displayed here. This location can be changed in C:\Program Files\Logi Analytics\DataHub\web.config if desired; search for "backup location" and restart DataHub after making a change to the value.
- Friendly Name - (Optional) Enter an arbitrary identifying name if it will help you distinguish backups, but keep in mind that the date and time are automatically appended (see below).
- Recurs - Select the frequency (Daily, Weekly, Monthly), interval, and start time for the backup.
- Timezone - Select the appropriate time zone.
- Start and End Date - Enter the Start Date (required) and End Date (optional) for the backup. Leaving the End Date blank will cause to backup to continue to occur at the specified frequency and interval until the schedule is modified or deleted.
![]() Remember that, when the scheduled backup occurs, the repository in be put into Maintenance Mode, making it unavailable to other users until the operation completes.
Remember that, when the scheduled backup occurs, the repository in be put into Maintenance Mode, making it unavailable to other users until the operation completes.
Click the Save icon ![]() to save the schedule.
to save the schedule.
Click the Reset icon ![]() to clear any changes in the controls during this sequence.
to clear any changes in the controls during this sequence.
Click the Delete icon ![]() to delete this schedule.
to delete this schedule.
Click the Cancel icon ![]() to cancel this operation and hide the controls.
to cancel this operation and hide the controls.
Restoring a Repository Backup
If necessary, you can restore the repository from an existing backup file, overwriting its contents.
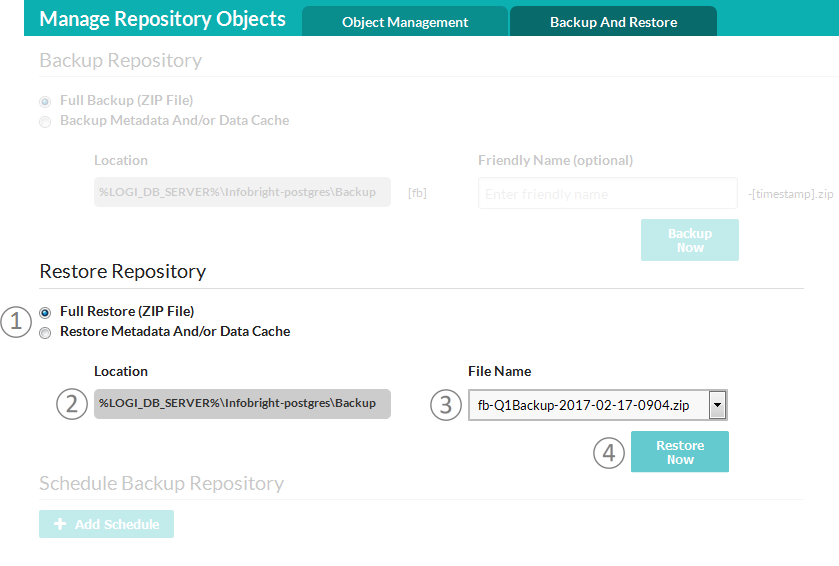
Follow these steps to restore a backup file:
- Backup Type - Select the Full Restore or Metadata And/Or Data Cache Restore option, depending on the nature of the backup file. If you select the latter, additional controls will appear for selecting and identifying which items to restore.
You can determine the nature of the backup file by looking for the code embedded in its file name:
fb-Q1Backup-2017-02-17-0848.zip
where "fb" = full backup, "md" = metadata only, "dc" = data cache only
- Location - The read-only location of the backup folder, based on the repository installation location is displayed here. This location can be changed in C:\Program Files\Logi Analytics\DataHub\web.config if desired; search for "backup location" and restart DataHub after making a change to the value.
- File Name - Select an existing backup file.
- Restore Now - Click to start the restore operation.
You'll be asked to confirm starting the restore:
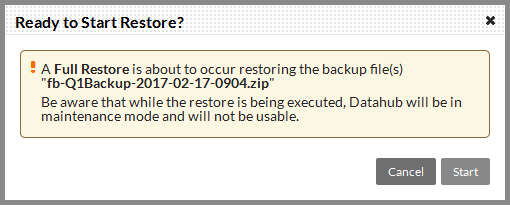
When the restore runs, it will put the repository in Maintenance Mode, making it unavailable to other users until it completes.
Click Start to begin the restore.

During the restore users will see the warning shown above.