Publishing Resources
You need to publish and organize your resources in the server resource tree before performing tasks on them. This topic describes how you can publish resources using Logi Report Designer, from the server computer, from a local directory, or from another Logi Report Server.
This topic contains the following sections:
- Basic Publishing Rules
- Publishing Resources from Designer
- Publishing Resources from Server Machine
- Publishing Resources from Local Directory
- Publishing Resources to Another Server
Tip: After you have delivered resources to Server, you may find that the publishing time shown on the server UI is different from the client time. That is because the publishing time takes the server time instead of the client time.
Basic Publishing Rules
You can publish the following resources to folders in the server resource tree: catalogs, reports, library components, dashboards, and folders. However, you are not able to publish resources to or from folders that come from real paths.
The built-in folders and the sub folders within them in the server resource tree can only store resources of specific types:
- My Reports, Public Reports, and Organization Reports store reports, dashboards, and analysis templates with catalogs.
- My Components, Public Components, and Organization Components store library components with catalogs. In folders where you can publish library components, Server allows only one catalog file.
In Logi Report, you can save catalogs and page reports in either binary or XML format if your license permits. For performance concern, when you publish catalog and page report files of the XML format, Server parses the XML files, converts them to binary files, and then saves the converted binary files in the server resource tree instead of the XML files. In this way, Server does not have to go through parsing of the XML files each time the catalogs and page reports are executed and therefore it can greatly improve the server performance. In the meantime, you can download catalogs and page reports from the server resource tree to Logi Report Designer in the XML format if you prefer this format for checking into source code control systems.
Publishing Resources from Designer
After creating catalogs, reports, and library components in Logi Report Designer, you can publish them from Logi Report Designer to Logi Report Server directly. For more information, see Publishing Resources Remotely in the Logi Report Designer Guide.
Publishing Resources from Server Machine
You can easily publish resources, including reports, library components, catalogs, and folders, in the computer where Logi Report Server runs, to the server resource tree. However, if you are not a Server administrator, you will be able to perform the task only when you have the Publish privilege and have the Write permission on the folder where you want to publish the resources.
- On the Server Console, open the Resources page and navigate to the folder in which to publish the resources.
- Select Publish > From Server Machine on the task bar.
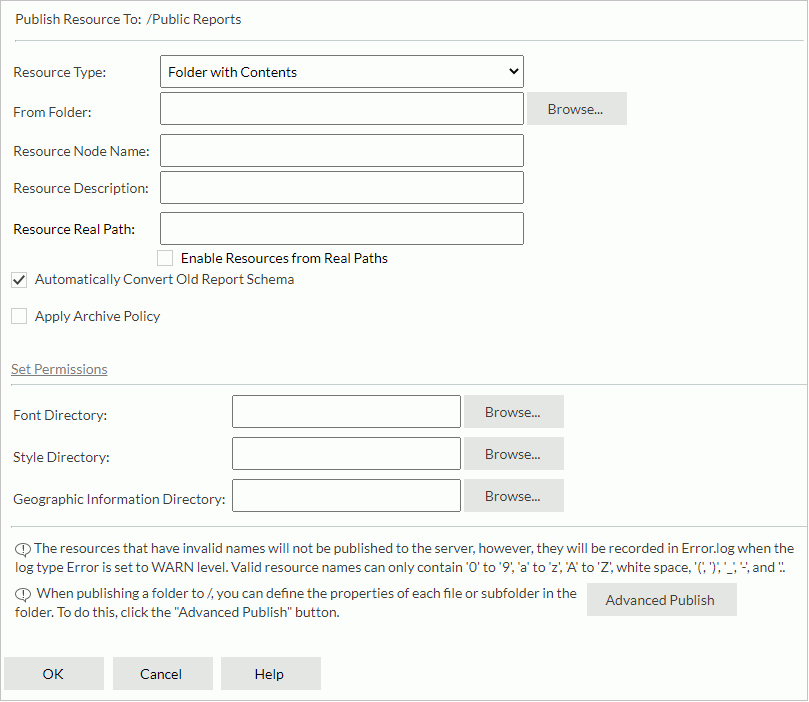
Server displays the Publish from Server Machine dialog box.

- Select a type from the Resource Type list.
- Specify properties for the resources you are to publish.
- If you selected the Page Report or Web Report resource type,
- In the From File text box, type the path of the report you want to publish. System administrators can select Browse to specify the file.
- In the Resource Node Name text box, you need to provide the display name of the report in the server resource tree.
- Type a brief description to describe the report in the Resource Description text box.
- From the Status list, select the status of the report.
- Active
You can run, advanced run, and schedule to run the report on the server. - Inactive
You cannot run, advanced run, or schedule to run the report on the server. - Incomplete
You haven't finished designing the report. You cannot run, advanced run, or schedule to run it on the server. - Specify the values of the custom fields for the report if you see them.
- Specify the font/style/geographic information directory for the report if it uses special font, applies style group, or contains geographic information.
- If you selected the Catalog resource type,
- In the From File text box, type the path of the catalog you want to publish. System administrators can select Browse to specify the file.
- In the Resource Node Name text box, you need to provide the display name of the catalog in the server resource tree.
- Type a brief description to describe the catalog in the Resource Description text box.
- Specify the values of the custom fields for the catalog if you see them.
- If you selected the Component resource type,
- In the From File text box, type the path of the library component you want to publish. System administrators can select Browse to specify the file.
- In the Resource Node Name text box, you need to provide the display name of the library component in the server resource tree.
- Type a brief description to describe the library component in the Resource Description text box.
- Specify the values of the custom fields for the library component if you see them.
- Specify the font/style/geographic information directory for the library component if it uses special font, applies style group, or contains geographic information.
- If you selected the Folder resource type,
- In the Resource Node Name text box, you need to provide the display name of the folder in the server resource tree.
- Type a brief description to describe the folder in the Resource Description text box.
- In the Resource Real Path text box, type a path in the hard drive as the real path of the folder. If you see Enable Resources from Real Paths, you can select it to enable getting resources from this real path. Server maps the hard drive path to the resource node of the folder in the server resource tree and can always get resources and updates from the real path.
If you skip this step, Server will just create a new blank directory node in the server resource tree.
- Specify the values of the custom fields for the folder if you see them.
- If you selected the Folder with Contents resource type,
- In the From Folder text box, specify the path of a folder containing the resources you want to publish. System administrators can select Browse to specify the folder.
- In the Resource Node Name text box, you need to provide the display name of the folder in the server resource tree.
- Type a brief description to describe the folder in the Resource Description text box.
- In the Resource Real Path text box, type a hard drive path as the real path of the folder. If you see Enable Resources from Real Paths, you can select it to enable getting resources from this real path. Server maps the hard drive path to the resource node of the folder in the server resource tree and can always get resources and updates from the real path.
- Specify the values of the custom fields for the folder if you see them.
- Specify the font/style/geographic information directory for the resources in the folder if they use special font, apply style group, or contain geographic information.
- To publish the resources in an advanced way, select Advanced Publish. Server lists the resources that the specified folder contains. Select the resources you want to publish and specify the properties for them.
- If you selected the Catalogs Reports and Folders in Folder or Catalogs and Reports in Folder resource type,
- In the From Folder text box, specify the path of a folder containing the resources you want to publish. System administrators can select Browse to specify the folder.
- Specify the font/style/geographic information directory for the resources if they use special font, apply style group, or contain geographic information.
- To publish the resources in an advanced way, select Advanced Publish. Server lists the resources that the specified folder contains. Select the resources you want to publish and specify the properties for them.
- If you selected the Page Report or Web Report resource type,
- When the resources you select to publish contain reports that you created in earlier versions, select Automatically Convert Old Report Schema. Server automatically converts the reports to the current version when it finishes publishing the resources.
- To apply an archive policy to the resources that you are publishing,
- For resources that you publish to the My Reports or Public Reports folder, select Apply Archive Policy, then specify the archive policy: Archive as New Version or Replace Old Version.
- For resources that you publish to the My Components or Public Components folder, specify the maximum number of versions that the resources can have.
 A folder itself does not have versions. The archive policy for a folder applies to the resources in the folder.
 - If you have located a public folder in step 1 to publish the resources to and you have the Grant permission on the folder, you can select Set Permissions to specify user permissions on the resources.
- Select OK to start publishing the resources.
Publishing Resources from Local Directory
In the case when you are accessing Server from a remote computer, you can also publish resources including reports, library components, catalogs, and folders from your local directories to the server resource tree, that is you can publish resources from your local computer using a web browser to the computer where the server runs. However, if you are not an administrator, you will be able to perform the task only when you have the Publish privilege and have the Write permission on the folder where you want to publish the resources.
The resource type when publishing from a local directory can ONLY be a compressed file. You should compress the resources in advance. If the reports or library components use special fonts, add the corresponding font files into the compressed file as well. You have two approaches to building a compressed file.
- You can compress the resources manually using a third-party tool, such as Winzip and gzip.
- You can use jar.exe that the JSDK provides to build a compressed jar file directly. Use the commands:
Parameter Description %JAVAHOME% The Java SDK install root. %DEST_JAR_FILE% The destination file path and file name. Server generates the .jar file to the path you specify here, using the file name you provide. %SOURCE_RESOURCES% The source file path and file name.  Specifying a path for this parameter will cause the generated jar file to contain the same path information. For example, when you extract a jar file compressed using
 myReports\*.*for this parameter, Server extracts the files to a folder called myReports. Server cannot import a compressed file that contains the path information, so do not specify a path for this parameter.%JAVAHOME%\bin\jar.exe -cvfM %DEST_JAR_FILE% %SOURCE_RESOURCES%To generate a jar file containing no path information, switch to the source folder, and then carry out the compression. For example,
C:\myReports>C:\jdk1.8.0\bin\jar -cvfM C:\temp\aa.jar.Server compresses all the files in
C:\myReportsand generates the jar file toC:\temp, as aa.jar which contains no path information.Always use this method if the folder you are compressing contains reports or library components with Chinese, Korean, or Japanese names.
To publish resources from a local directory to the server resource tree:
- On the Server Console, open the Resources page and navigate to the folder that you want to publish the resources to.
- Select Publish > From Local Directory on the task bar.
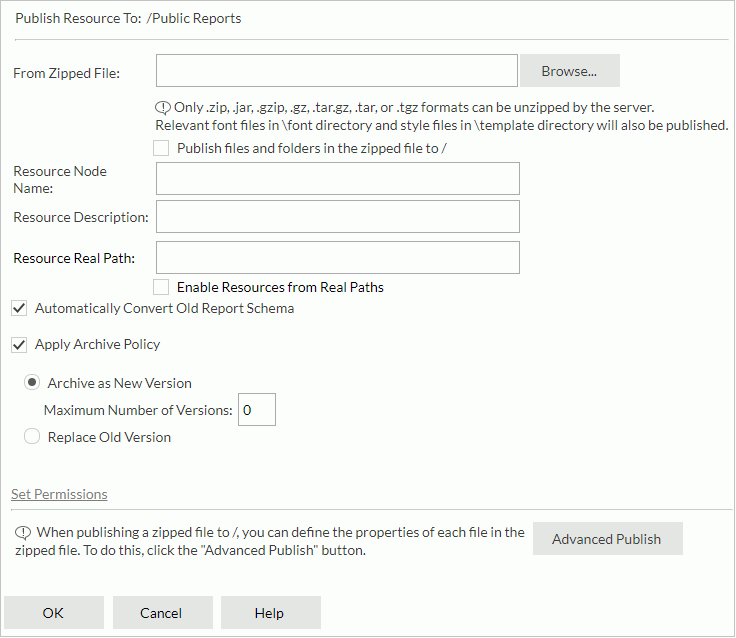
Server displays the Publish from Local Directory dialog box.

- Select Browse to specify the zipped file in the local directory which contains the resources you want to publish.
- Specify where you want to publish the resources.
- If you want to publish the resources directly to the current open folder, select Publish files and folders in the zipped file to /XXX.
- If you want to create a new folder in the current open folder to hold the resources,
- Do not select Publish files and folders in the zipped file to /XXX.
- In the Resource Node Name text box, provide the display name of the folder in the server resource tree.
- Type a brief description to describe the folder in the Resource Description text box.
- Specify the values of the custom fields for the folder if you see them.
- In the Resource Real Path text box, type a hard drive path as the real path of the folder. If you see Enable Resources from Real Paths, you can select it to enable getting resources from this real path. Server maps the hard drive path to the folder in the server resource tree and can get resources and updates from the real path.
- When the resources you specify to publish contain reports that you created in earlier versions, select Automatically Convert Old Report Schemas. Server automatically converts the reports to current version when it finishes publishing.
- To apply an archive policy to the resources that you are publishing,
- For resources that you want to publish to the My Reports or Public Reports folder, select Apply Archive Policy, then specify the archive policy: Archive as New Version or Replace Old Version.
- For resources that you want to publish to the My Components or Public Components folder, specify the maximum number of versions that the resources can have.
- If you have located a public folder in step 1 to publish the resources to and you have the Grant permission on the folder, you can select Set Permissions to specify user permissions on the resources.
- To publish the resources in an advanced way, select Advanced Publish. Server lists the resources that the zip file contains. Select the resources you want to publish and specify their properties.
- Select OK to start publishing the resources.
Publishing Resources to Another Server
You can publish the resources including catalogs, reports, library components, dashboards, and folders in the resource tree of a Logi Report Server to another Logi Report Server, provided that you are a user of both servers and have the Publish privilege on both servers. Developer users can also publish resources from one server to another using API methods.
For easy explanation, in the following contents, we publish resources from the source server to the target server.
When you publish resources from one server to another, Logi Report tries to replicate the resources on the target server as precisely as possible, but there are still some rules and limitations you should be aware of:
- You cannot publish reports whose status are Inactive or Incomplete or shared reports.
- To publish library components and dashboards, you should make sure the target server has JDashboard license.
- Server does not copy the custom field values that you defined on resources on the source server to the target server.
- You cannot publish plug-ins and customized controls to the target server.
- When a resource that you are to publish references other resources, for example you linked a report to other reports, Server automatically publishes the referenced resources to the same location on the target server as in the source server. However, if you do not have the Write permission on the target location or the target location enables getting resources from path, Server publishes neither the resource nor the referenced resources. When the target location already contains resources that are of the same names as the referenced resources, Server replaces them with the referenced resources directly.
- In the case when a source server resource is to replace the same target server resource, the source server resource follows the archive policy of the target server resource.
- By default, Server publishes the latest version of the resources (including referenced resources) on the source server. When the latest version of a resource enables NLS on the source server, Server also copies its NLS setting to the target server and replaces the NLS on the target server directly if conflict occurs.
- When a catalog on the source server contains dynamic connection, dynamic security, or dynamic display name setting, Server also copies these dynamic settings to the target server while you publish the catalog and replaces those on the target server directly if conflict occurs.
To publish resources from one server to another:
- Open the Console of the source server and access its Resources page.
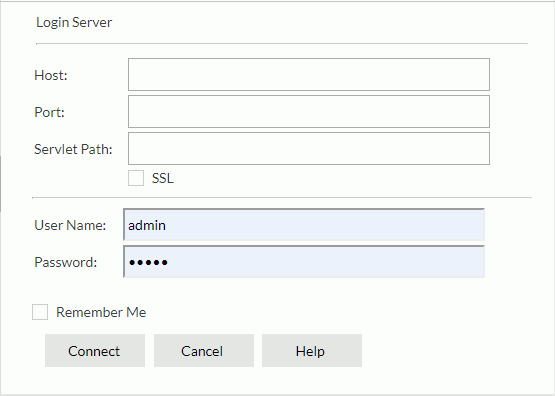
- Select Publish > To Server on the task bar. If it remembers your signing in information, the source server displays the Publish to Server dialog box; otherwise it displays the Login Server dialog box, prompting you to sign in.
To sign in to the target server:
- In the Host text box of the Login Server dialog box, type the host of the target server. You can use the host name or IP address of the target server.

- In the Post text box, type the port that the target server listens to.
- In the Servlet Path text box, specify the servlet path of the target server for accessing the servlet via URL. The servlet path is /jrserver when the target server is a standalone server. If the target server is an embedded server, for example jreport.jar, the servlet path will be /jreport/jrserver.
- You can select SSL to create an SSL (Security Socket Layer) connection when the target server integrates with another web server which supports SSL.
- In the User Name text box, type the username to access the target server. If you sign in to the source server as an organization user, Server uses the same organization name to sign you in to the target server by default. Therefore, if the target server does not have the same organization, server denies your signing in.
- Select Remember Me to have the source server remember your information, so that you can sign in to the target server automatically when you want to publish resources to it. Server remembers your information till the source server restarts.
- Select Connect to set up the connection with the target server and sign in.
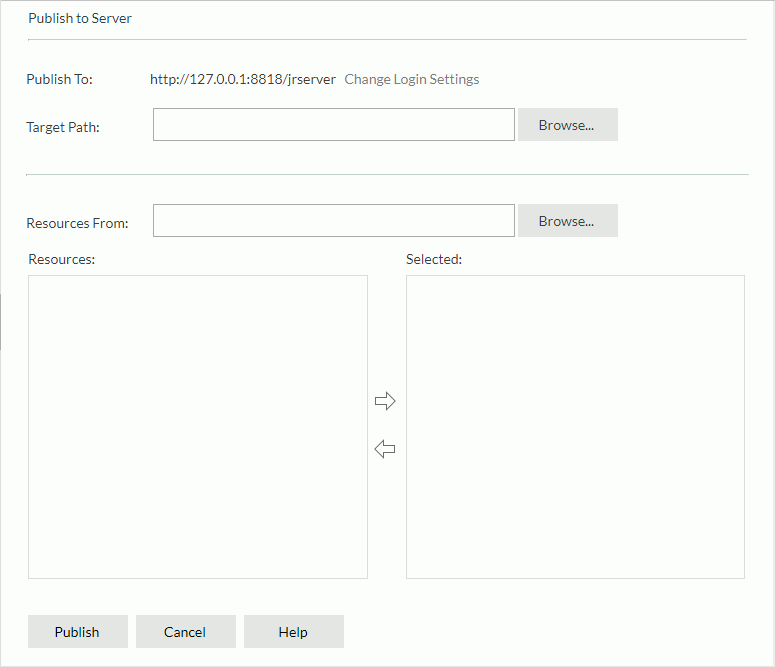
After you sign in, Server displays the Publish to Server dialog box.
- In the Host text box of the Login Server dialog box, type the host of the target server. You can use the host name or IP address of the target server.
- The Publish To
option in the Publish to Server dialog box shows the URL using which you have signed in to the target server. You can select Change Login Settings
to edit the signing in information.

- Select Browse next to the Target Path text box. Server displays the Select Folder dialog box.
- Select the folder in the target server that you want to publish the resources to. You can select from the folders on which you have the Visible and Write permissions (an organization user can select from folders in his organization that match the same prerequisites). The target folder you select determines which kind of resources you can publish from the source server. For example, if you select the built-in folder My Components as the target folder, you will only be able to publish library component and catalog resources from the source server.
- Select Browse next to the Resources From text box to select the folder in the source server where you get the resources. Based on your selection for the target folder, you can only select the folders that function the same as the target folder and on which you have the Visible permission as the source folder.
- Server displays the available resources on which you have the Visible permission in the specified source folder, in the Resources box. Select the resources you want to publish and select the Add button
 to add them to the Selected box. If you selected a folder, Server adds the folder with all its resources. To remove a resource from the Selected box, select it and select the Remove button
  .
. - Select Publish to publish the selected resources to the target server.
When resources with the same names already exist in the target server, Server prompts you to deal with the conflicts. Make the choice accordingly.
 Previous Topic