Designing the Report Pages
A report page is a medium which contains the layout result for a single page of a report. This topic introduces the features of report pages and how you can apply them to design the pages for your reports.
A report page has the following features:
Page Panel
A page panel is a template where you design a page. You can define information for it and define information for pages designed with this page panel accordingly at the same time. Here, information covers all factors of a page, including page size, margin, and orientation.
In a page report tab, you can insert multiple page panels in its report body, and specify page settings for each page panel separately.
To insert a page panel into a page report tab
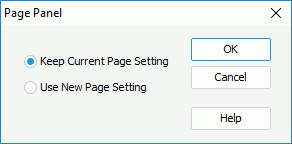
- Navigate to Insert > Page Panel. Designer displays the Page Panel dialog box.

- Choose whether the new page panel keeps the original page settings or it applies new settings.
- Select OK. If you specify to insert a page panel where the new page has new page settings, Designer displays the Page Setup dialog box for you to adjust the settings for the new page panel.
To remove a page panel from a page report tab, place the mouse pointer to the beginning of the page panel and select Backspace on the keyboard. You cannot remove the page panels containing objects.
 TOC Page Panel
When you insert the TOC Page object into your page report or web report, Designer automatically creates the TOC page panel to position the Table of Contents generated by the object. You cannot insert TOC page panel directly, while you can customize its page settings in the same way as you do for a general page panel. A report can have only one TOC page panel.
To remove a TOC page panel, delete the Table of Contents in it and Designer deletes the TOC page panel at the same time.
Page Header and Footer
Each page in a page report or web report has its own page header and page footer. They are the areas in the top and bottom page margins, where you can add almost any components. You can insert fields, such as page numbers and topic headings, in the page header and footer.
When you create a page report tab or a web report or when you add a new page panel in a page report tab, Designer generates a page header and page footer at the same time. By default, Designer does not display the header or footer of the page panels. You can show or hide them for each page panel by selecting in the page panel and then selecting or clearing Page Header and Page Footer on the View menu tab.
 TOC Page Header and Footer
The TOC page panel also has its own page header and footer and you can show or hide them and insert objects in them. However, different from the header and footer of a general page, the TOC page header and footer can only contain labels and the special field TOC Page Number.
Page Settings
All pages designed with the same page panel apply the same page settings, so you just need to set the settings for one page panel to apply them to all these pages.
To customize the page settings, you can use either of the following two methods:
- Customizing via the Page Setup dialog box
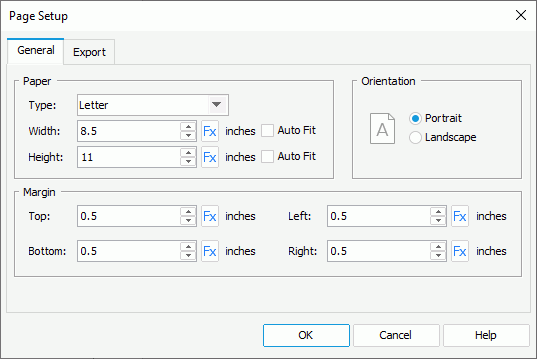
- Navigate to File > Page Setup. Designer displays the Page Setup dialog box.

 For a page report tab containing multiple page panels, you first need to place the mouse pointer inside the page panel.
 - In the General tab, specify the size, orientation, and margin of the page. You can select Auto Fit to calculate the page width/height according to the width/height of the contents within the page dynamically, which is useful when the width/height of the contents in the page is unpredictable and when the report is not huge. For a page report tab, you can also use constant level formulas to control some page properties, if you have bound a data resource to its report body.
- Use the Export tab to define the page settings for the output of each export format. For more information, see Exporting Reports.
- Select OK to apply your settings.
- Navigate to File > Page Setup. Designer displays the Page Setup dialog box.
- Customizing via the Report Inspector
- In the Report Inspector, select the Page Panel node in the report structure tree (for a page report tab containing multiple page panels, select the node representing the page panel).
- Set the property values according to your requirements.
Page Break
When laying out a report, Logi Report Engine generates a new page when the space in a page has been fully occupied, or when for a page report tab there exists a break control in this page, for example, you insert a page break in the page.
You can insert page breaks in the report body of a page report tab only. To insert a page break, navigate to Insert > Page Break.
Page Mode
In Designer, you can set the page mode of a page report tab or a web report to be either pagination mode or continuous mode (to switch between the two page modes, select or clear Page Layout on the View menu tab).
Pagination Mode
Pagination mode displays the page margins and enables multiple pages. In this mode, you can specify the page shape and size in the page panel settings. Once defined, Logi Report Engine lays out the contents of the page report tab or web report according to these specifications. If the contents exceed the specified size, the page break control starts a new page with the same size.
In addition, the total page size is determined both by the contents' size and by the page breaking control, such as Fill Whole Page, On New Page, and Page Break.
Continuous Mode
In continuous mode (Page Layout cleared), the report becomes a single continuous page, which is useful for dashboard style reports where multiple pages are not wanted. However, if the report is very large, it may run out of memory and be very unresponsive in continuous mode.
In continuous page mode, only the component breaking control works. Logi Report Engine lays out the whole page report tab or web report in a single page, and it has no specific shape and size. If you do not set any component breaking control, Logi Report Engine lays out all of the components in the same page, and the size of the page depends on the size of the contents.
In continuous page mode, Logi Report Engine skips all of the properties that you specify in pagination mode, including the page breaks in page panel. In this way, if there is more than one page panel in a page report tab, Logi Report Engine lays out all contents contained in different page panels in the same page, and it only lays out the first page panel's page header and footer.
Component breaking rule
In Designer, you can specify properties to add page breaks to a component in continuous page mode. This kind of page break is not based on space, but on logic. For example, you can set a group break to occur every 20 detail panels, no matter how big these 20 detail panels are.
You can apply logic break to the following components:
- Banded object
The logic break acts only on its child objects - detail panel and group panel. You can use the Current Block Index and Items per Block properties of the child objects to control the component logic break. - Table
The logic break acts only on its child objects - detail row (available to query-based table only) and group row. You can use the Current Block Index and Items per Block properties of the child objects to control the component logic break. - Query-based crosstab
The logic break acts on the whole crosstab. You can use the four crosstab properties to control component logic break: Current Row Block Index, Current Column Block Index, Items per Row Block, and Items per Column Block.
 Previous Topic