Upload Files
In the course of creating applications, developers may find it useful to upload and save files to their web server. Logi Info provides elements specifically for this purpose and this topic provides guidance in using them.
- Upload Considerations
- Identifying Files to Upload
- Save Uploaded Files
- Adjust the Maximum Upload Size Limit
Upload Considerations
You should know at the outset that file uploading under ASP.NET is an imprecise and imperfect activity. The process of uploading a file to your web server consists of two steps: first, at the browser, the user has to identify a file on his file system to be uploaded, and then, second, at the web server, the uploaded file has to be named and saved. Logi Info provides elements that make this all fairly easy to implement. However, developers first need to consider these issues:
- What file types will you allow to be uploaded? For security or virus protection reasons, you may want to limit uploads to non-executable file types, prohibiting those such as .EXE, .COM, .BAT, and perhaps even macro-capable Microsoft Office types such as .DOC and .XLS. It's a good idea to identify the smallest set of acceptable file types and refuse all others.
- Should you restrict the size of uploaded files? For most developers, this is a question of available storage space. The default maximum file size that can be uploaded under ASP.NET is 4MB (although this can be increased if necessary - see below). You may also want to consider a limit on the number of files each user can upload.
Another critical issue is that the actual upload transfer is not very efficient and large uploads can take a considerable amount of time. The transfer doesn't provide any feedback that would allow you to display a progress bar, either, so your users will have no way of knowing what's going on. Finally, if the upload is too large or the session times out, your application will throw an exception that's hard to handle gracefully.
- How will the uploaded files be stored and identified? Uploaded files are first stored as temporary files in your application's rdDownload folder and are subsequently renamed and relocated. Developers need to plan for storage locations on the web server and for a method of providing unique names to the files (the Logi @Function.GUID~ token can be very helpful for this purpose). You could, for example, use a database table to hold information about the uploaded files such as their original names, sizes, and GUID-based names.
- How will the uploaded file be managed? Assuming you're not going to just accept uploaded files forever, you'll probably need to develop a way of managing them. Here again, a database table can be useful for identifying uploaded files for deletion.
- What About Virus Protection? If your web server's anti-virus software conducts "on access" scans of all files, any uploaded files stored on the web server should be examined automatically. If not, you'll want to consider how you can screen uploaded files for viruses.
Identify Files to Upload
The upload process begins with the user identifying the file to upload. This can be done very easily using the Input File Upload element in a report definition. This element displays both an input text box and a "Browse" button that allows users to browse their local file system.
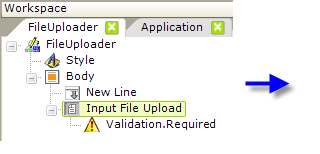
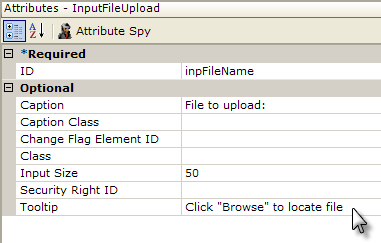
- As shown above, add an Input File Upload element to a report and set its attributes as desired.
- Add a Validation.Required element beneath it to ensure that the filename value is not empty.
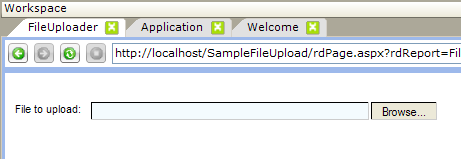
The example above shows what the Input File Upload element looks when displayed. Clicking the Browse... button opens a file system browser window that allows a file on a user's computer to be selected and inserts the fully-qualified file name (drive letter, complete path, and full file name) into the text box.
Only one file at a time can be uploaded per Input File Upload element.
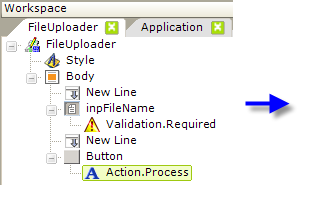
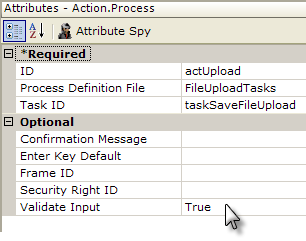
- Add New Line and Button elements, as shown above, and beneath the Button, add an Action.Process child element which calls the appropriate process task. Note that its Validate Input attribute is set to True to cause the Validation.Required element to check to see if a file name was entered.
When the user clicks the button and submits the page, the upload will take place immediately, using the RFC 1867 HTML Form Upload Protocol. The uploaded data will be stored as a temporary file in your application's rdDownload folder on the web server.
At the same time, the process definition task specified will be called; it's role is discussed in the next section.
Save Uploaded Files
A process definition task is used to determine what has been uploaded and what to do with the temporary file now in the rdDownload folder. Several useful tokens become available to facilitate the process:
Token | Description |
@FileUpload.UploadFileName~ | The file name, with extension but stripped of any path info, of the original file. Only available for use in attributes of the Procedure.Save Uploaded File element. Note that the RFC 1867 protocol used to upload files does not include access to the full file path of the original file, only its file name. |
@FileUpload.UploadFileExtension~ | The file extension of the original file, including the period. This is case-sensitive and only available for use in attributes of the Procedure.Save Uploaded File element. |
@Procedure.<MyProc>.UploadFileName~ | The file name, with extension but stripped of any path info, of the original file. Available throughout the task. |
@Procedure.<MyProc>.UploadFileExtension~ | The file extension of the original file, including the period. This is case-sensitive and available throughout the task. |
@Procedure.<MyProc>.UploadFileContentType~ | The file's MIME or content-type string. Available throughout the task. |
@Procedure.<MyProc>.UploadFileLength~ | The number of bytes (file size) uploaded. Unit is bytes. Available throughout the task. |
where <MyProc> is the ID of the task's Procedure.Save Uploaded File element.
You're ready to create a process definition task to save the uploaded file:
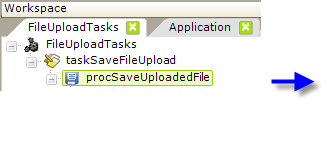
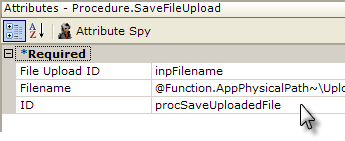
- As shown above, a process definition has been created and a task ("taskSaveFileUpload") added to it. Note that the task ID is the same as the value entered in the Task ID attribute of the Action.Process element in the report definition in the previous section of this topic.
- Add a Procedure.Save File Upload element ("procSaveUploadedFile") to the task.
- Set its File Upload ID attribute to the ID of the Input File Upload element ("inpFilename") in the report definition.
- Set its Filename attribute to the fully-qualified file name you want to use when the uploaded file is saved, beginning with a physical drive letter on the web server. Several tokens can be used together to provide a value for the Filename attribute, for example:
@Function.AppPhysicalPath~\UploadedFiles\@FileUpload.UploadFileName~
The value shown above will move the temporary upload file to a folder called "UploadedFiles" in your application folder and rename it to the file's original name. Note that the target folder ("UploadedFiles") must exist in advance; the element will not create it. In addition, the web server's ASPNET or NETWORK SERVICE account has to be granted Write permission to that folder.
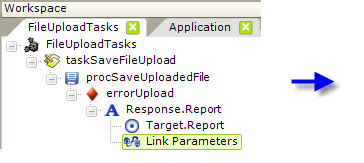
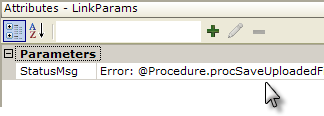
- Add an If Error element ("errorUpload") beneath the Save Uploaded File element to handle any errors.
- Add Response.Report, Target.Report, and Link Params elements, as shown, to redirect to the calling report in case of an error. Any error message will be available using this token:
@Procedure.procSaveUploadedFile.ErrorMessage~
- Back in the report definition, you can use an @Request token to test for and display any error message returned.
If the report is run now, the file will be uploaded and saved to the UploadedFiles folder. Note that there is a default 4MB file size limit, discussed in more detail below.
Qualify Uploaded Files
Once an upload has occurred and the temporary file has been saved, we have an opportunity to qualify the uploaded file and delete it if necessary due to criteria such as size or file type. This "post-upload" filtering isn't the best arrangement but it's all that's available under the RFC 1867 protocol.
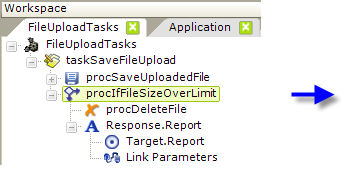
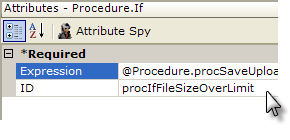
In the example above, we've added additional elements to qualify the uploaded file. A Procedure.If element ("procIfFileSizeOverLimit") is used to test the size of the uploaded file; if it's larger than 1MB it's deleted. The complete Expression attribute value used is:
@Procedure.procSaveUploadedFile.UploadFileLength~ > 1024000
In order to use the Procedure.Delete File element to delete uploaded files, the web server's ASPNET or NETWORK SERVICE account has to be granted Modify permission to the upload destination folder. Set the Procedure.Delete File's Filename attribute to the same value as the Procedure.Save File Upload element's Filename attribute.
As before, you should also include Response, Target, and Link Parameters elements to redirect the browser to the original report and display a meaningful error message.
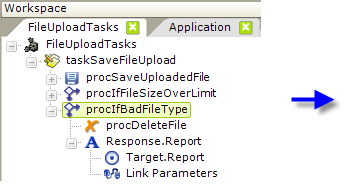
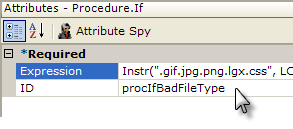
In the example above, elements have been added to delete the file if the uploaded file's extension isn't one of five approved types. The complete Expression attribute value is:
Instr(".gif.jpg.png.lgx.css", LCase("@Procedure.procSaveUploadedFile.UploadFileExtension~")) = 0
In this example, the VBScript Instr function is used to determine if the uploaded file's extension is in the string of concatenated approved file types. Note that the procedure token's file extension value is case-sensitive, which is why the LCase function was used.
As before, you should also include Response, Target, and Link Parameters elements to redirect the browser to the original report and display a meaningful error message.
In conclusion, file uploading is best done under very controlled circumstances and you should be prepared for the likelihood that some uploads will fail.
Adjust the Maximum Upload Size Limit
The default maximum upload size, as determined by ASP.NET, is 4MB. To increase this, to a maximum of 2GB, you need to edit the web.config file in your application folder. In the <system.web> section, add this:
<httpRuntime maxRequestLength="nnnn" executionTimeout = "ssss"/>
where:
maxRequestLength specifies the limit for the input stream buffering threshold, in KB. This limit can be used to prevent denial of service attacks that are caused, for example, by users posting large files to the server. The default value is 4096 (4 MB). To enable large file uploads you need to change the value of this attribute to the largest allowed combined file size for your application. If someone selects and uploads files with total size larger than maxRequestLength, this will result in a "Page not found" error (which is the default error of the Framework), and
executionTimeout specifies the maximum number of seconds that a request is allowed to execute before being automatically shut down by ASP.NET. The value of this setting is ignored in debug mode. The default in .NET Framework 2.0 and later is 110 seconds; in .NET 1.0 and 1.1, the default is 90 seconds. To enable large file uploads, which can take large periods of time, increase the value of this property.