Combine Text and Data
There are several flexible ways to combine and display text and data in a Logi report. This topic provides multiple examples.
- Combine Data in a SQL Query
- Use a Calculated Column
- Display Tokens Adjacent to One Another
- Display Literal Text and Data
- Display Request Tokens
- Sample Definition
Combine Data in a SQL Query
In all of the following examples, the goal will be to retrieve FirstName and LastName text data and combine it into a complete name. One of the easiest ways to this is to let the database server do it for you. This SQL query:
SELECT FirstName + ' ' + LastName AS Name, EmployeeID FROM Employees
will return two columns: Name and EmployeeID. The Name column will contain the FirstName and LastName data, separated by a space. Like any other column in the datalayer, the Name column will be accessible using an @Data token:
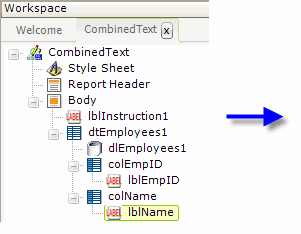
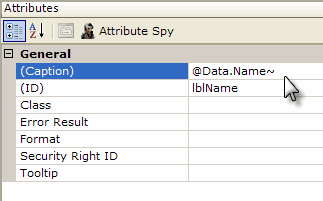
In the example above, the SQL query mentioned before has been used in the datalayer's Source attribute. In order to display it, a Data Table Column element has been added and below it a Label element whose Caption attribute is set to @Data.Name~.
Use a Calculated Column
The Calculated Column element adds a column to a datalayer and is another fine way to synthesize data, i.e. the full name, not found in the database. In this case, the SQL query would be straightforward:
SELECT FirstName, LastName, EmployeeID FROM Employees
so all three columns are returned to the datalayer.
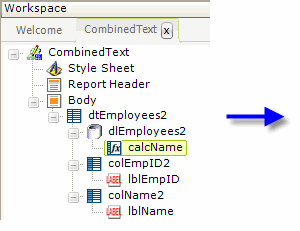
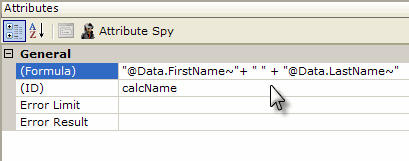
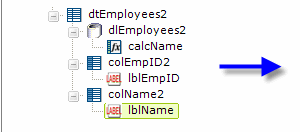
As shown above, a Calculated Column element has been added as a child of the datalayer. It's Formula attribute value is set to concatenate the two name columns, with a space separating them. Its ID attribute becomes the name of the new column added to the datalayer.
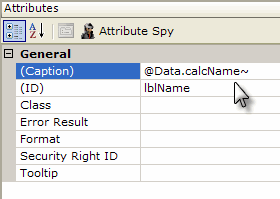
The Label element that will display the full name, shown above, references the Calculated Column's ID in an @Data token to retrieve that data.
DisplayTokens Adjacent to One Another
One of the simplest way to concatenate text is simply to include their @Data tokens adjacent to one another. If we use the SQL query from the previous example, so that three columns are returned,
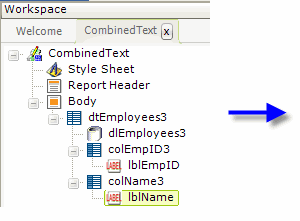
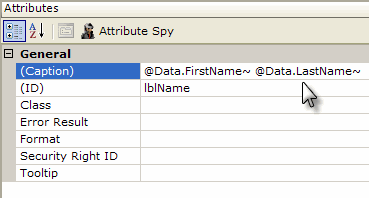
but choose not use a Calculated Column element, we can achieve the same results with this method. As shown above, this time the Caption attribute of the Label element is set to both @Data tokens with a space between them. When the literal evaluation of the tokens occurs, the two names will be displayed along with the separating space.
As you may know, browsers will usually tolerate one space within text, but will ignore any other consecutive spaces. So don't bother inserting multiple spaces in a Caption within text or around tokens; all of them after the first one will be ignored by the browser.
Display Literal Text and Data
In the same way that tokens can be combined, as discussed in the previous section, literal text and data can be shown together:

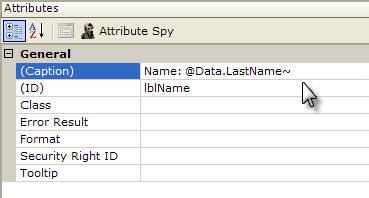
As shown above, the literal text "Name:", and a separating space, can be typed in, followed by an @Data token. In the report output, the token will be replaced by the data value and will be preceded by the literal text in each table row.
Display Request Tokens
Text data, of course, can come from sources other than a database. One frequent source is the Query String used to call the current page. Data is often passed in "request variables" in the Query String and these are available using @Request tokens in your report.
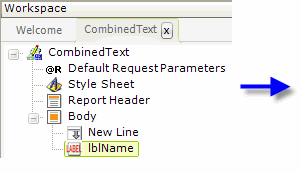
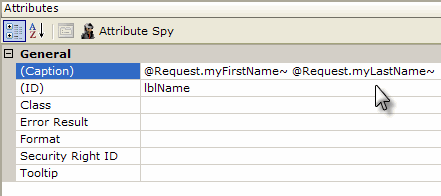
The example shown above includes a Default Request Parameters element, which provides request variables if none are actually passed to the page. It's useful for testing and for situations in which you need a default or must ensure that the request variables are not null. The highlighted Label element is used to display two @Request tokens, once again, entered adjacent to one another and separated by a space.
Sample Definition
The following is a sample definition you can experiment with. Just select all the text, copy and paste it into Notepad, then save it with an .LGX extension in the _Definitions\_Reports folder of a test application. If the application is already open in Studio, right-click the Reports folder in the Application panel and select "Refresh Application" to make the sample definition appear in the list of report definitions.
The sample definition you have a connection to the Northwind database and that it's the first Connection in the application's _Settings definition. The blue.css style sheet, included with your Logi product installation, is also used.