Fill an Excel Template
This topic guides developers in creating template definitions for use with Microsoft Excel templates. A Logi template definition acts as a "blueprint", mapping how the Excel template will be filled with data by the Logi server engine. Filling an Excel template with data starts with the creation of the Excel template; once it has been created, four more steps are required:
- Add the Excel Template to Your Project
- Create a Template Definition
- Configure the Data Ranges
- Work with Hierarchical Data
For information about how to call templates from within Logi applications, see Form-based Reporting.
Template definitions are only available in Logi Report v10 starting with v10.1.59.
Add the Excel Template to Your Project
The term "template" is used frequently in this discussion, and to avoid confusion, let's clarify it:
- created with a Microsoft Excel. It looks like the finished worksheet without any data and has cells reserved for the data. This is the target template.
- A Logi reporting tools template definition is an .LGX file, similar to a report or process definition, created with Logi Studio. It's a set of instructions to the Logi server engine to retrieve data and map it to the cells in the target template.
The rest of this topic assumes that you've already created your Excel template.
Excel template files are managed within your Logi application as support files.
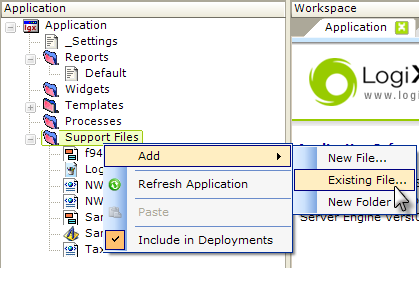
- In Logi Studio's Application Panel, select and right-click the Support Files folder.
- In the popup menus that appear, select the Add and Existing File... items.
- Browse to your Excel template (.XLTX or .XLT) file and select it. Click OK to add it to the project. The file will be copied to the _SupportFiles folder within your Logi application folder.
Creating a Template Definition
The next step is to create a new template definition that maps the data to the Excel template data ranges:
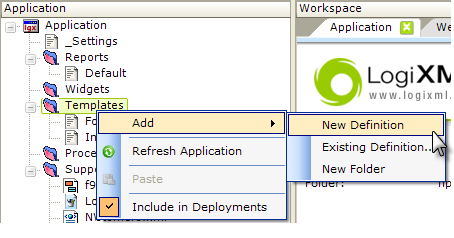
- In the Application Panel, select and right-click the Templates folder.
- In the popup menus that appear, select the Add and New Definition items.
- A new definition named "newTemplate" will appear beneath the Templates folder, ready to be renamed, and will open in the Workspace Panel for editing. The actual file will be created in the _Definitions/_Templates folder in your application project folder.

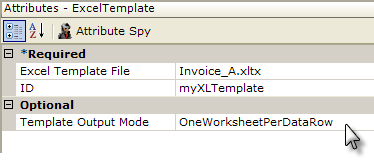
- In the Workspace editor, add an Excel Template element to the definition, as shown above. Template definitions cannot utilize more than one Excel Template element.
- Set the Excel Template File attribute to the name of the .XLTX or ,XLT file you added as a Support File ((it should be available in the attribute's drop-down list of options).
- The Template Output Mode attribute is optional; its default value is OneWorksheet. If this attribute is set to OneWorksheet, all rows returned by the top-most data layers are processed in a single worksheet; each Pattern Block element (discussed below) can specify a different worksheet in the template. If the attribute is set to OneWorksheetPerDataRow, each row from the top-most data layers is treated as a separate worksheet. Developers will find this mode useful for invoice-style reports.
Configure the Data Ranges
The Pattern Block element gives developers the ability to define data ranges within the Excel template. A pattern block must correspond to one or more rows from the worksheet. Developers should keep the following guidelines in mind when creating template definitions:
- Two distinct pattern blocks cannot have overlapping ranges.
- Disposable rows must follow the corresponding pattern block.
- A sub-pattern block cannot extend beyond the boundaries of its parent block.
- A sub-pattern block's range must be less than its parent block range.
Now let's continue building the template definition:
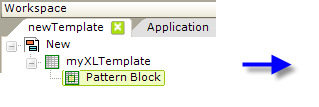
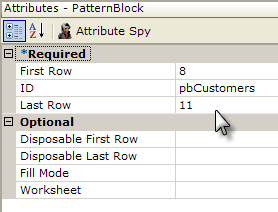
- Add a Pattern Block element to the template definition, beneath the Excel Template element, as shown above.
- Set its First Row and Last Row attributes to values that correspond with row numbers from the Excel template.
Hint: A Pattern Block range is equal to the difference of the last row number minus the first row number. Make the First Row and Last Row attributes equal to specify one row.
The Disposable First Row and Disposable Last Row attributes are optional. If dynamic charts and formulas are present in the Excel template, developers will need to set both attributes to values that correspond with row numbers from the worksheet. A disposable range consists of extra rows added to the template in order to test a formula or chart range.
Test rows with dummy data cannot be part of the data range, because the Logi server engine extends the data range downward in certain scenarios. Without a method for declaring rows as "disposable", the Logi report server has no means of removing such rows from the final report. By specifying values for these attributes, developers can remove the unwanted, dummy rows from the final output.
If the Disposable First Row attribute is set but not the Disposable Last Row attribute, the Logi report server will use the Disposable First Row value for both attributes.
The Worksheet attribute is also optional and the default is the first worksheet. Each pattern block range resides on a single worksheet, however, you may specify any number of pattern block ranges using different worksheets.
The Pattern Block Cell Element
We've now specified the rows associated with the pattern block; next we need to specify the columns and map the data.
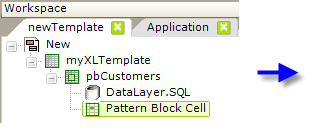
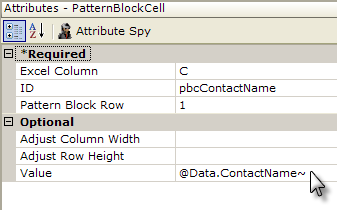
- Beneath the Pattern Block element, add an appropriate datalayer element and configure its attributes appropriately.
- Beneath the Pattern Block element, add a Pattern Block Cell element.
- Set its Excel Column attribute to a letter that corresponds with a column from the Excel template.
- Set the Pattern Block Row attribute to a row number within the pattern block range. This value is relative to the parent Pattern Block element, not to the worksheet row number.
- The Adjust Column Width attribute is optional. Set this attribute to True to automatically adjust the column width to fit the data.
- The Value attribute is optional and either tokens or static values can be used here.
Repeat the previous steps for each data item.
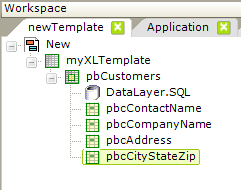
As shown above, we'll have three more Pattern Block Cell elements, one each for Company Name, Address, and City-State-Zip data.
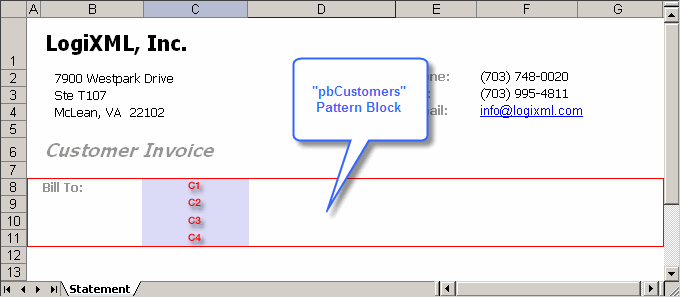
When complete, the Excel template example above shows that the pbCustomers Pattern Block spans four rows. The four Pattern Block Cell elements added in the sample definition above correspond to one cell within the block range. In this example, each cell in column C within the pattern block range will be filled with data.
This is the technique that's used to map data to specific cells in the Excel template. Repeat as necessary to map all the data into the worksheet.
Work with Hierarchical Data
Logi report server also supports hierarchical datasets within Excel templates. Hierarchical data presents parent-child relationships in the data and requires developers to specify sub-data ranges within an existing data range in the template definition.
The Subpattern Block element specifies a repeatable sub-range within a parent Pattern Block or another Subpattern Block element. Developers must add a Subdata Layer element with at least one Subdata Layer Relation Column element to establish
the parent-child relationships with the query
and sub-query.
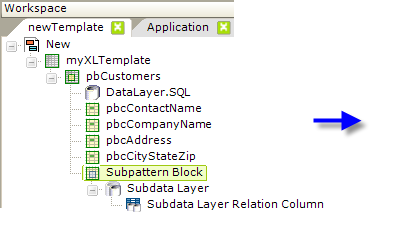
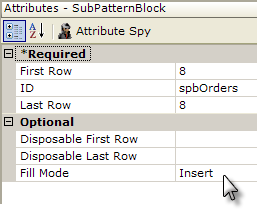
- Beneath the Pattern Block element, add a Subpattern Block element, as shown above.
- Set its First Row and Last Row attributes to row numbers from the parent pattern block range.
- Set its Fill Mode to Insert. The Logi server engine will insert new rows into the Excel template for each row of data
returned by the data layer. The number of rows inserted is equal to the total
number of rows in the pattern block range.
- Beneath it, add a Subdata Layer element and beneath it a Subdata Layer Relation Column element.
- Set the Subdata Layer Relation Column's Child Column and Parent Column attributes to a column that exists in both datasets.
Note: Subpattern Block attribute values are always relative to the parent block and must reside on the same worksheet.
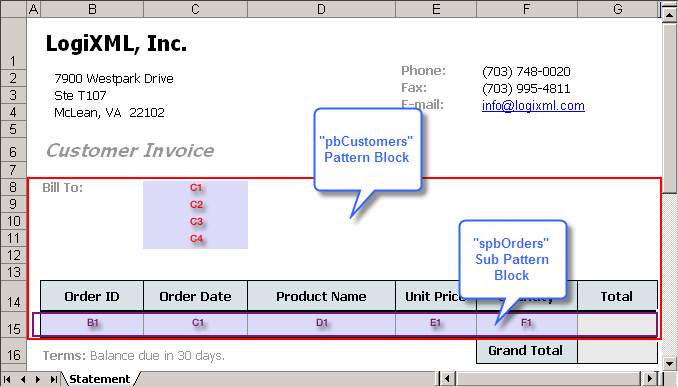
The Excel template shown above specifies the range of the pbCustomers Pattern Block as worksheet rows eight through fifteen. The range of the spbOrders Subpattern Block is the last row of its parent block - in this case, the eighth row. Any Pattern Block Cells that are children of the spbOrders Subpattern Block have row numbers relative to the parent sub-block. Since there is only one row in spbOrders, each Pattern Block Row attribute
for any child Pattern Block Cell elements must have a value of 1.