Track 2: Creating Business Views
Business views are the data sources for creating interactive reports and perform dynamic analysis in Logi Report. They enable report developers and end users to build reports and analyze data based on a set of view elements that they can easily understand. For example, they do not need to worry about where the data source is from (SQL, stored procedure, view, etc.), or what the data source is (Oracle, Sybase, XML, etc.). Business views also enable IT professionals to maintain control of business data and to ensure its integrity, while presenting end users with an intuitive view of the underlying data.
In this track, you have been asked to create a business view as a report developer using the data in the company database of Jinfonet Gourmet Java, which should provide information about customers, orders, orders detail, and products.
This track contains the following tasks:
- Task 1: Create the Business View
- Task 2: Add Elements to the Business View
- Task 3: Define Hierarchies in the Business View
![]() To perform this track, you should have a Live license for Designer. If you need more information, contact Customer Service.
To perform this track, you should have a Live license for Designer. If you need more information, contact Customer Service.
Task 1: Create the Business View
In this task, we create the business view and add the data resources we need for the business view.
- Select Logi Report Designer in the Logi Report folder on the Start menu to open Designer.
- Designer displays the main window and shows the Start Page by default. Close the Start Page.
- Navigate to File > Open Catalog. Designer displays the Open Catalog File dialog box.
- Browse to select the JinfonetGourmetJava.cat catalog file in
<install_root>\Demo\Reports\JinfonetGourmetJava, then select Open. Select Yes in the Warning dialog box. Designer then displays the Catalog Manager. - Expand the Data Source 1 node, then right-click the Business View node and select New Business View on the shortcut menu.
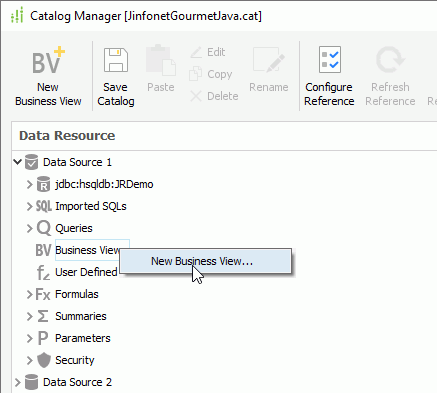
- Type WorldWideSalesBV in the Enter Business View Name dialog box and select OK.
- In the Add Tables/Views/Queries dialog box, expand the JDBC connection node and then the Tables node, select these tables: Customers, Orders, Orders Detail, and Products, then select Add
 to add them to the right box. Select OK to close the dialog box.
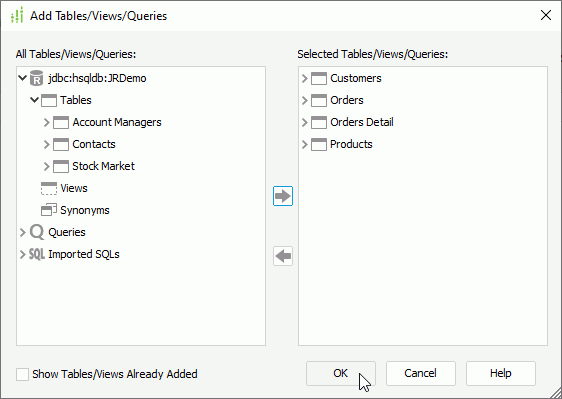
You can also combine tables, views, synonyms, queries, imported SQLs, stored procedures, and user-defined data sources into a business view to mash up multiple data resources in a single business view, and create distributed joins to set up inter-relationships between the data resources. In this example, we only use tables for the business view.
- Designer displays the four tables with their columns and automatically joins them based on the auto join criteria in the Query Editor dialog box (you can view the join criteria on the Query > Auto Join menu).
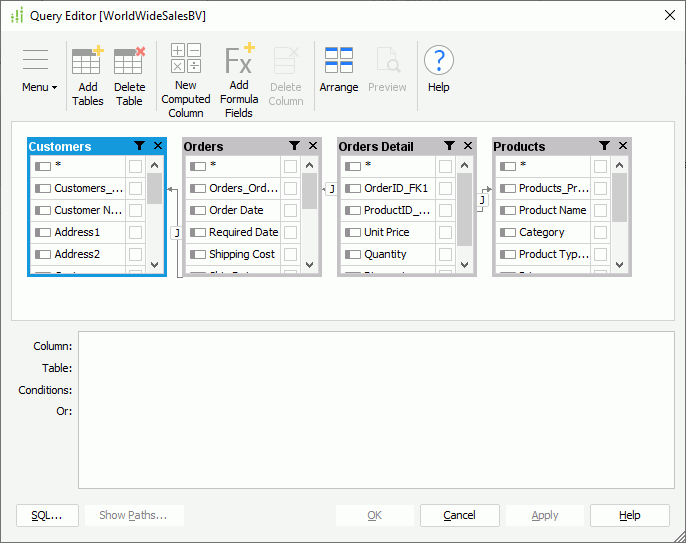
- In the Customers table, select the top checkbox to select all columns in the table, then clear these columns: Address2, Customers_Fax, and Annual Sales; in the Orders table, select Orders_Order ID, Order Date, and Payment Received; in the Orders Detail table, select Unit Price, Quantity, and Discount; in the Products table, select all its columns first, then clear Inventory and Reorder Level.
- Select OK at the bottom of the Query Editor dialog box to finish selecting data resources for the business view.
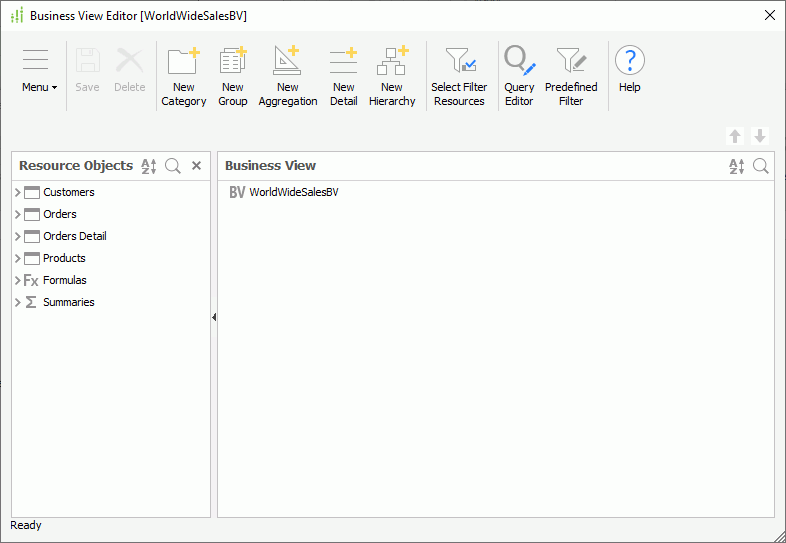
Designer displays the Business View Editor dialog box, showing the selected tables and table columns, and the formulas and summaries that are valid to them, in the Resource Objects panel in the dialog box. We can now create view elements based on these resources.
Task 2: Add Elements to the Business View
In this task, we create three categories in the business view to hold customer, order, and product information respectively.
- Select New Category on the toolbar of the Business View Editor dialog box.
- In the Category Property dialog box, type Customers in the Display Name text box, then select OK.
- Expand the WorldWideSalesBV node in the Business View panel to display the category.
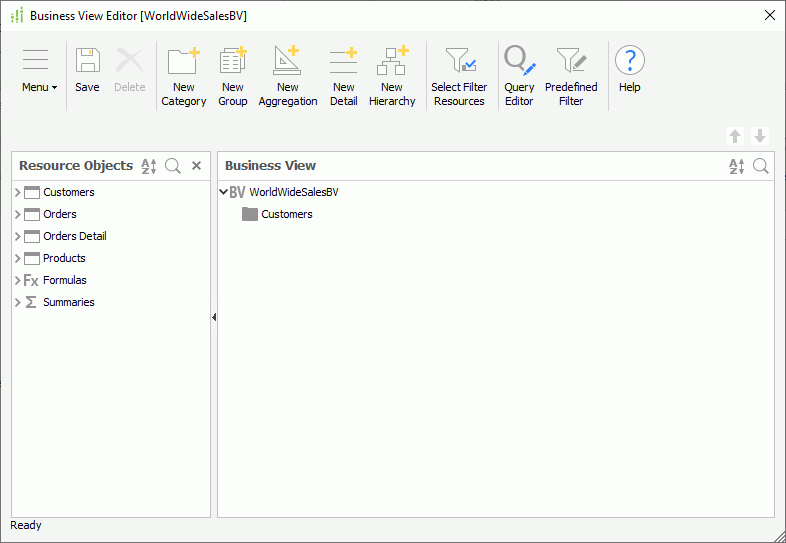
- Expand the Customers table in the Resource Objects panel, select the fields Customer Name, Customers_City, Customers_Country, Customers_Region, Customers_State, and Customers_Territory in the table, then drag them into the Customers category in the Business View panel.
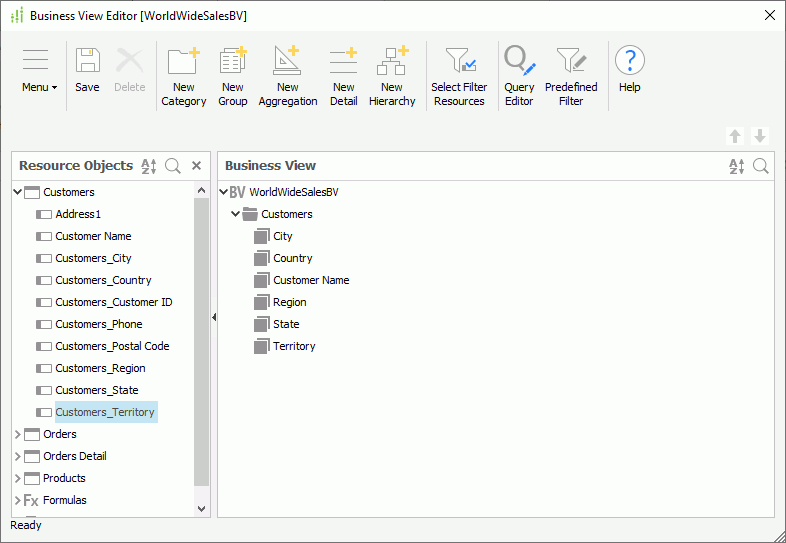
- Right-click the Customers category and select New Category from the shortcut menu to create a subcategory Address in it, which we want to use to hold address information.
- Select Address1, Customers_Country, Customer Name, and Customers_Phone in the Customers table in the Resource Objects panel and drag them into the Address category.
When adding elements to a business view by dragging fields from the Resource Objects panel, Designer uses the elements as Group object by default. Next, we want to edit the type of the elements in the Address category to Detail, so that we can use them to show detail information in reports.
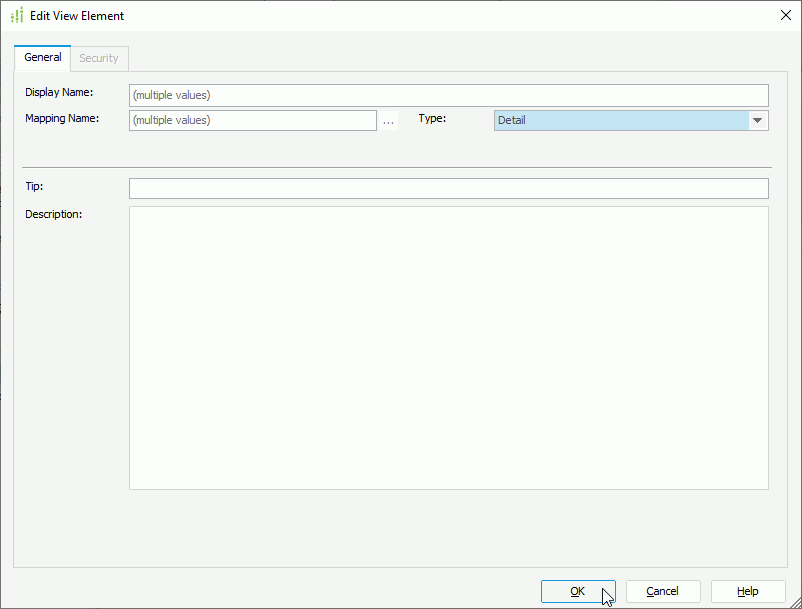
- Select the four elements in the Address category, right-click them and select Edit on the shortcut menu. In the Edit View Element dialog box, select Detail from the Type drop-down list and select OK (using the dialog box, you can edit the Type, Tip, and Description properties of multiple view elements at the same time).
The Address category now contains four detail objects.
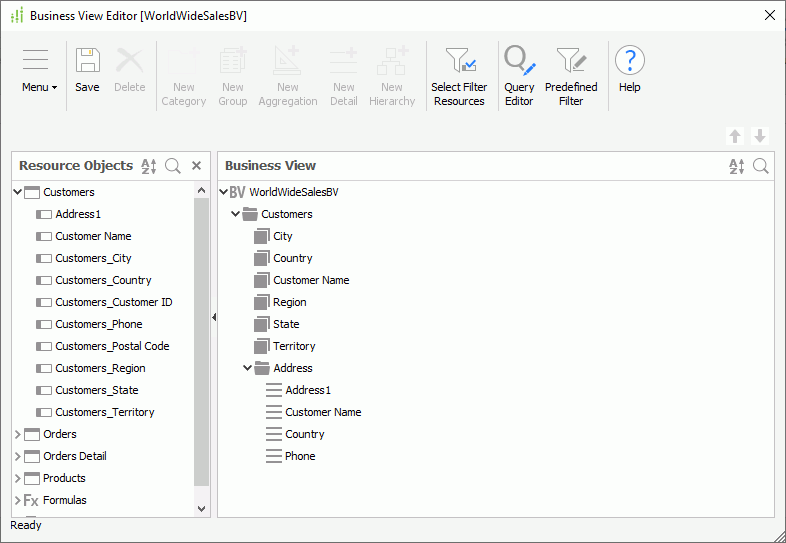
By now, we have finished creating the Customers category with the Address subcategory. Next, let's create the Orders Detail category.
- Select WorldWideSalesBV in the Business View panel.
- Select New Category on the toolbar to create a category Orders Detail.
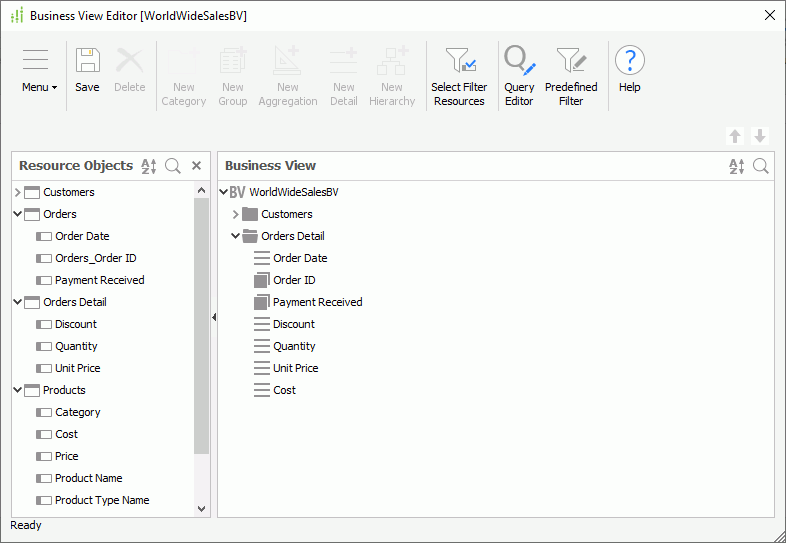
- Add the following fields from the Resource Objects panel into the category: all the fields in the Orders and Orders Detail tables, and Cost in the Products table.
- Right-click Orders_Order ID and select Rename from the shortcut menu to edit its display name to Order ID.
- Edit the type of Cost, Discount, Order Date, Quantity, and Unit Price to Detail using the Edit View Element dialog box as seen earlier in this task.
The Order Detail category shows as follows:
You can also add view elements to a business view by using dialog box. Next, we add more elements to the Orders Detail category via dialog box.
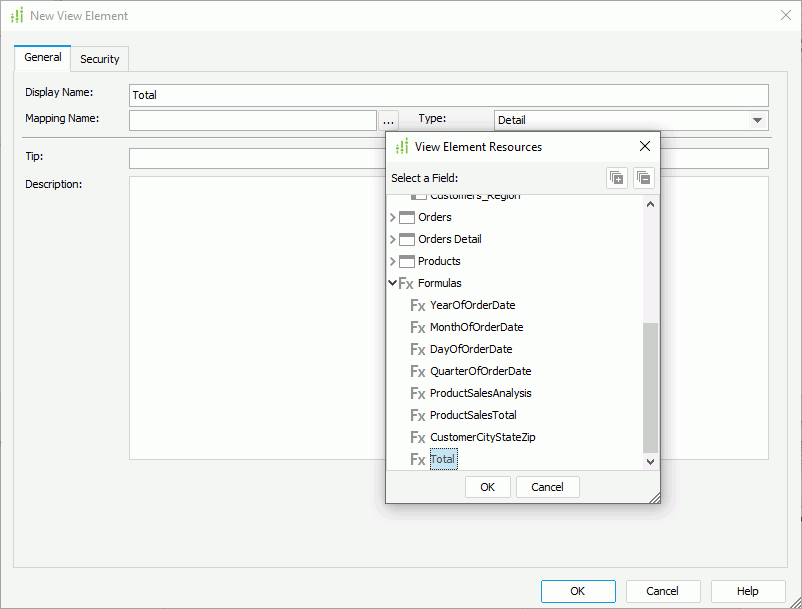
- Select the Orders Detail category and select New Detail on the toolbar.
- In the New View Element dialog box, select the ellipsis
 next to the Mapping Name text box. In the View Element Resources dialog box, expand the Formulas node and double-click Total to add it as the mapping field. Select OK to create the element.
- Select the Orders Detail category again, right-click it and select New View Element from the shortcut menu.
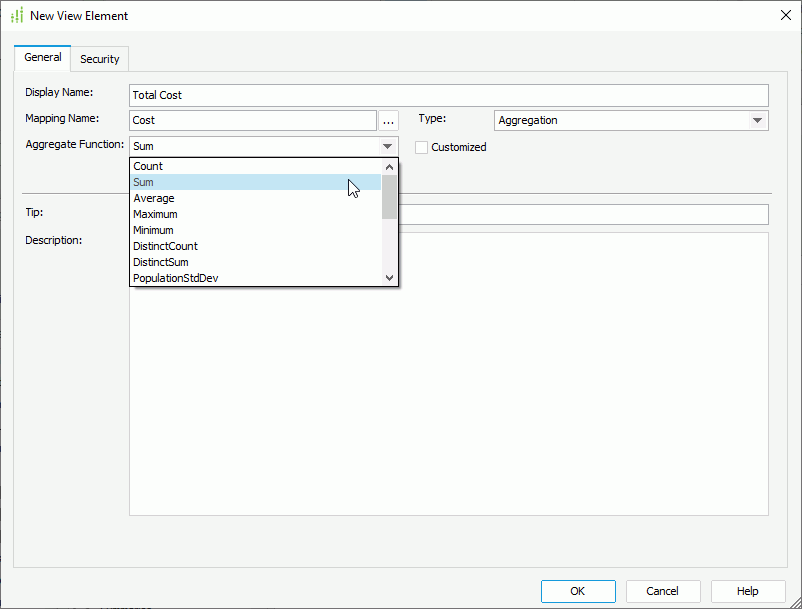
- In the New View Element dialog box, type Total Cost in the Display Name text box, select
 and select Cost in the Products table as the mapping field, select Aggregation from the Type drop-down list, then select Sum from the Aggregate Function drop-down list. Select OK to create the aggregation.
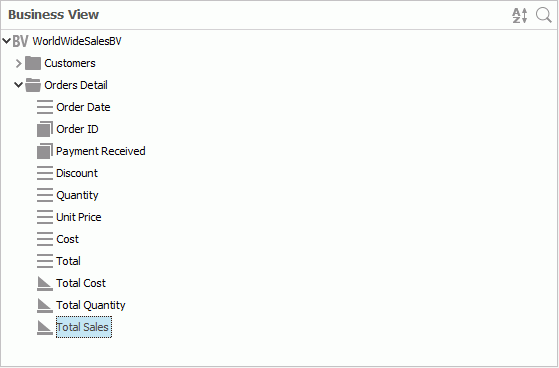
- Create another two aggregations, Total Quantity that sums on Quantity and Total Sales that sums on the formula Total using the same way.
The Orders Detail category now contains the following elements:
Next, we create the Products category to hold product related information.
- Select WorldWideSalesBV in the Business View panel and select New Category on the toolbar to create a category Products.
- Drag Category, Product Name, Product Type Name, and Products_Product ID from the Products table in the Resource Objects panel to the Product category.
- Right-click Product Type Name and select Rename from the shortcut menu to edit its display name to Product Type.
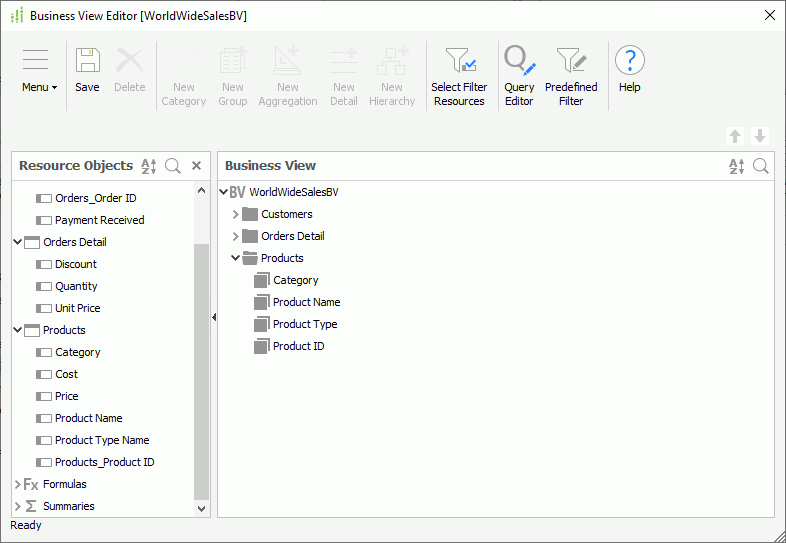
- Select Sort
 at the upper right corner of the Business View panel and select Ascending from the drop-down menu to sort the elements that we have added to the business view in the ascending order.
 - Select Save on the toolbar to save the business view.
Task 3: Define Hierarchies in the Business View
In this task, we define two hierarchies in the business view: one containing customer's geographic information, from region down to city, and the other containing product's hierarchical groups.
- In the Business View Editor dialog box, select WorldWideSalesBV in the Business View panel, then select New Hierarchy on the toolbar.
- In the New Hierarchy dialog box, type Geography and select OK. Designer then adds the Geography hierarchy node at the bottom under the business view root node.
- In the Business View panel, drag the group objects Region, Territory, Country, State, and City from the Customers category one by one following this order to the Geography hierarchy node. Region is the highest level and City the lowest.
- Take the preceding steps to create another hierarchy Product and add Product Type, Category, and Product Name in the Products category to this hierarchy.
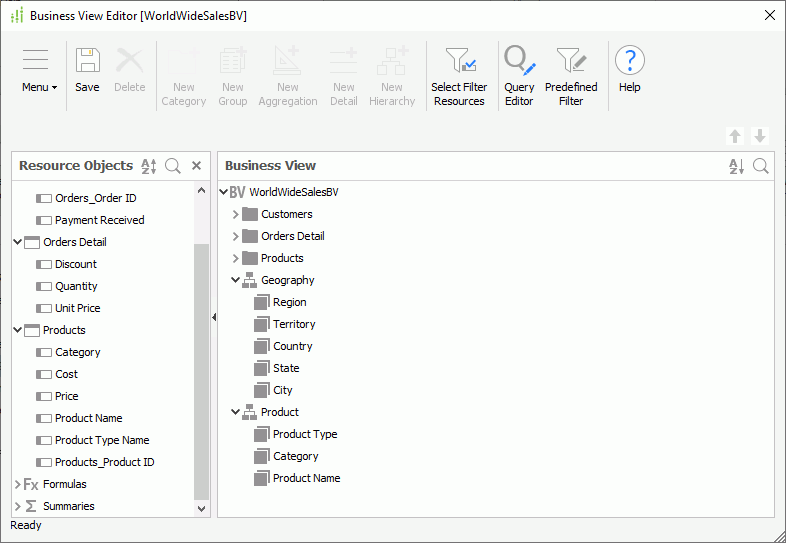
- Save the business view to save the hierarchies, then close the Business View Editor dialog box.
- Select Save Catalog on the Catalog Manager toolbar to save the business view into the catalog.
 Previous Topic