Creating Predefined Filters
You can predefine filters in a business view for users to choose when they design or modify data components that use the business view so as to filter out the unnecessary data in the data components.
If you want to filter data used in a business view, you need to make use of the query filter while defining the data resources to be used for the business view.
To create predefined filters in a business view:
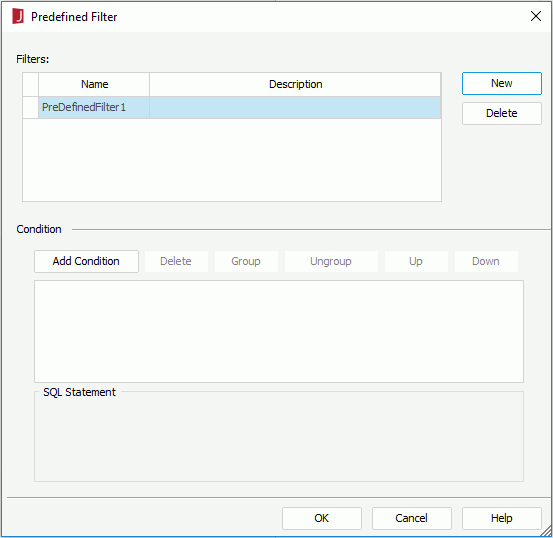
- In the Business View Editor, select Predefined Filter on the toolbar or select Menu > Tools > Predefined Filter. The Predefined Filter dialog appears.
- Select the New button to add a filter.

- In the Filters box, double-click in the Name and Description text boxes to edit the name and description of the filter.
- In the Condition panel, select the Add Condition button to add a condition line.

- Select
 next to the field text box, then in the View Element Resources dialog, expand the corresponding category node and double-click the element you want to filter, or select the elment and select OK. You can also type in the name of the view element manually as @ElementName in the text box.
 - From the operator drop-down list, select the operator with which to compose the filter condition.
- In the value text box, select
 to specify the value of how to filter the element. In the Values dialog, switch to the Value tab. All values of the selected element are listed, double-click the required one then close the dialog. However if you choose to manually enter the element name in step 5, you need to select the element in the Fields tab of the Values dialog once again to get its value list. You can also select the special field User Name or a parameter in the Fields tab as the value to filter the business view dynamically (for the usage of parameters in filter conditions, see the example in Dynamically Filtering Queries).
If you are familiar with the values of the selected view element, you can also input the value manually (when the selected operator requires multiple values, you will have to enter the values manually). When you type in the value, if multiple values are required, they should be separated with ",", and if "," or "\" is contained in the values, input it as "\," or "\\".
- Select Add Condition to add more condition lines, specify the condition in each line, and define the logic (And or Or) between the condition lines.
To make some condition lines grouped, select them and select the Group button, then the selected condition lines will be added in one group and work as one line of filter expression. Conditions and groups together can be further grouped. To take any condition or group in a group out, select it and select Ungroup.
To adjust the priority of the condition lines, select it and select the Up or Down button.
To delete a condition line, select it and select the Delete button.
- Repeat steps 2-8 to add more filters and define the filter conditions. To remove a filter, select it from the Filters box and select the Delete button on the right.
- Select OK to save the filters.
- Save the business view to make the filters saved into it.
You can then apply the filters when creating or editing reports based on the business view in Logi JReport Designer or at server runtime after you publish the corresponding catalog to Logi JReport Server.
Notes:
- When the resources that are used in some predefined filters are removed from the business view, the next time when you open the Predefined Filter dialog, you will be prompted with warning messages showing the details and the filters will be removed automatically from the dialog as well.
- The following SQL type of data cannot be filtered: Db.SQL_BINARY, Db.SQL_BLOB, Db.SQL_CLOB, Db.SQL_LONGVARCHAR, Db.SQL_LONGVARBINARY, Db.SQL_VARBINARY and Db.SQL_OTHER.
 Previous Topic