Creating a Query
This topic introduces how to create a query.
To create a query in a catalog, follow the steps below:
- Open the required catalog, then do either of the following:
- In the Catalog Manager, expand the data source in which you want to create the query, then select the Queries node or any existing query in the data source and select New Query on the Catalog Manager toolbar, or right-click the Queries node in the data source and select New Query from the shortcut menu.
- Select Home > New > Query or File > New > Query, specify the data source in which the query will be created, then select OK.
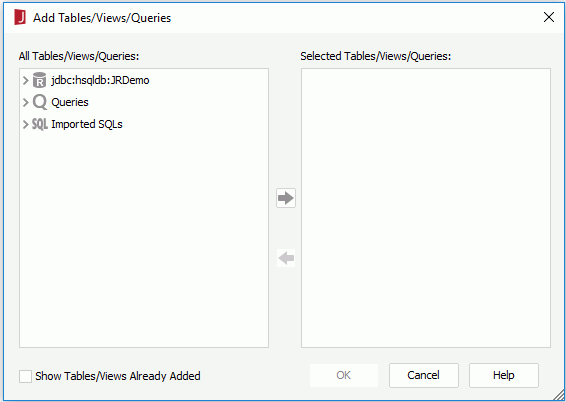
- In the Enter Query Name dialog, give a name for the query and select OK. The Add Tables/Views/Queries dialog appears.

- Add the resources based on which to create the query.
If the catalog data source is connected with multiple connections, you can mash up multiple data resources in the query that come from all these connections, including tables, views, synonyms, queries, imported SQLs, stored procedures and user defined data sources. When a query, imported SQL, stored procedure or user defined data source is added, it will be added as a single table with all of its columns. When two resources (for example, a table and a view) use the same name, they cannot be added to the query at the same time, and when a table is already contained in a query, you cannot add the table and the query at the same time.
If the current catalog data source contains JDBC connections, the Include Added Tables/Views option is available. Check it if you want to show the tables, views and synonyms in the resource tree in the left box, which have already been added to the right box. You can then add the tables, views and synonyms of the JDBC connections to the query as many times as you want by providing different names for the tables, views and synonyms each time you add them.
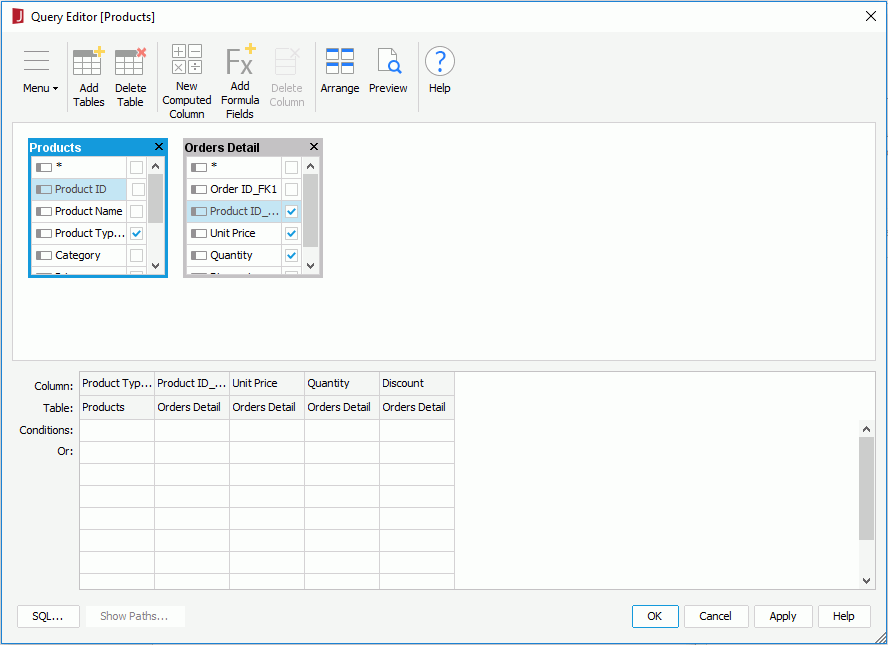
- Select OK. The Query Editor appears, with the selected resources displayed as tables.

- Select Add Tables on the toolbar to add more data to the query if needed.
- Select the required columns in each table. To select all, select *. The columns will be displayed in the criteria panel in the lower part of the Query Editor. However for tables from MongoDB connections, you cannot select all columns by selecting *. The PrimaryKey and ForeignKey columns in such table cannot be selected to a query.
- Join the tables as required.
Based on the Auto Join options that are selected in the Query Editor category of the Options dialog, Logi JReport will join the tables automatically. However, if the Pre-join feature is enabled for the catalog data source where the query is created, the auto join settings will not take effect, instead Logi JReport applies the pre-joins to the added tables. You can also add more joins among these tables manually. When you use the Auto Join feature you often see many joins that are not valid. You can delete unneeded joins by double-clicking the join icon
 and selecting Delete Join in the Join Options dialog.
 - Create filters on the query.
- Add some computed columns and formula fields to the query if required.
- Select Apply to save the query and then select OK to close the editor.
Note: Normally, a query returns all the records that match its search criteria without considering whether there are duplicated ones. You can decide to get only one copy for each record by checking Menu > Query > Select Distinct. When this option is enabled, SQL SELECT statements are treated as SELECT DISTINCT statements. The query will search for identical records and ensures to return them only once instead of returning duplicate records from the database. However, this feature works when the query contains only tables, views, and synonyms from JDBC connections, or only tables from collections of the same MongoDB database of MongoDB 3.2 or higher and all joins between the tables are left-outer equi-joins of one-way link.
 Previous Topic