Creating a Logi Template Definition
After you have added a Word template to your Logi application, the next step is to create a new Logi Template definition that maps the data into the Word template form fields:
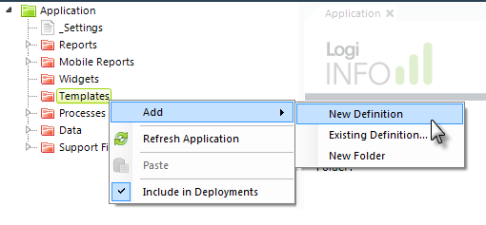
- In the Application Panel, select and right-click the Templates folder, as shown above.
- Select Add and then New Definition from the context menus.
-
The definition will be created with the standard name
"newTemplate". Rename it as you desire. Your new definition
file has been created in the _Definitions/_Templates folder within your
application folder and should open in the Workspace panel.
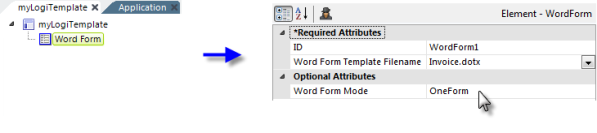
- In the Workspace editor, as shown above, add a Word Form element to the definition.
- Set its Word Form Template Filename attribute to the name of the .dotx or .dot file you added as a Support File (it should be available as an option in the value's drop-down list of suggestions).
- Setting its Word Form Mode attribute is optional; its default value is OneForm. If this attribute is set to OneForm, all rows returned by the top-most data rows are processed in a single document page. If the attribute is set to OneFormPerDataRow, each row from the top-most data rows is treated as a separate document page. Developers will find this mode useful for invoice-style reports.
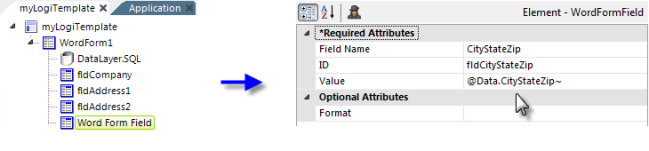
- As shown above, beneath the Word Form element, add an appropriate DataLayer element and configure its attributes as needed.
- Add a Word Form Field element.
- Set its Field Name attribute to the corresponding field name in the Word template where this data should go. Field name spelling and case must match exactly!
- Set its Value attribute to a token for the appropriate data column in the datalayer.
Repeat Steps 8-10 to add and configure additional Word Form Field elements as necessary to fill-in all the data in the template.
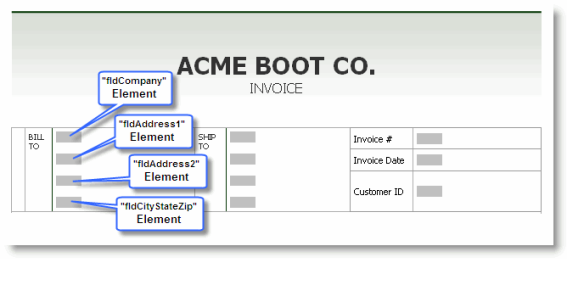
The Word template example above shows how four Word Form Field elements
correspond to four form fields in the template. In this fashion, data is
mapped to specific fields in the Word template.