Converting XML into JSON Data
Many jQuery objects and plug-ins work with data in the JSON format. An easy way to get data into this format in a Logi application is to use the JSON Data element. This element runs a child datalayer and inserts the data it retrieves into a JavaScript array, which enables browser-side components, such as JQuery components, to use and display the data.
There are two options for including the JavaScript array data: Inline and File. If the Inline option is selected, the data is embedded directly into the generated report page HTML, between <SCRIPT> tags. If the File option is chosen, the data is written out to a temporary file in your app's rdDownload folder and included using a <SCRIPT SRC= filename.js> tag in the HTML. In both cases, your jQuery code uses the array variable name to access the data.
In many cases, the array object will match the data format expected by your jQuery code but, in some it may not, in which case you may need to write a little JavaScript code to extract the data you need.
Here's an example, using the jQuery AutoComplete widget.

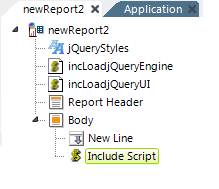
Start by using the same Style and Include Script File elements, and their settings, from the first example in this topic. Then add an Include Script element beneath your report definition's Body element, as shown above. We'll come back to it and write its script later.

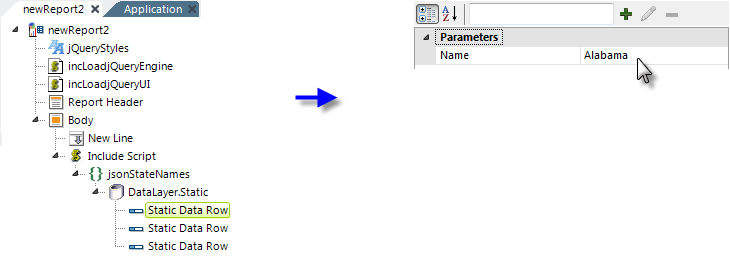
Beneath the Include Script element, next add a JSON Data element and set its attributes as shown above. Its unique attributes are:
- Json Var Name - Specifies the variable name to be used for the data array, which is used in the jQuery code.
- Json Human Readable - Specifies whether spaces and LFs are used to format the output JSON data, for easier debugging.
- Json Output - Specifies whether the data array will be embedded directly in the HTML (Inline) or included as a external file (File). Using an external file might help with performance for larger data volumes or might help by shielding the data from examination using View Source.
- Json Style - Specifies the format of the data output; either as RowsToObjects or as ColumnsToPropertyArrays. See the discussion below with output examples. Default: RowsToObjects

Next, add a datalayer beneath the JSON Data element. This could be any type of datalayer, but for the purposes of this example, we'll use DataLayer.Static which makes it easy to see the data.
Add seven Static Data Row elements beneath it, adding values to a column named "Name". The values should be "Alabama", "Alaska", "Arizona", "Arkansas", "California", "Colorado", and "Connecticut".

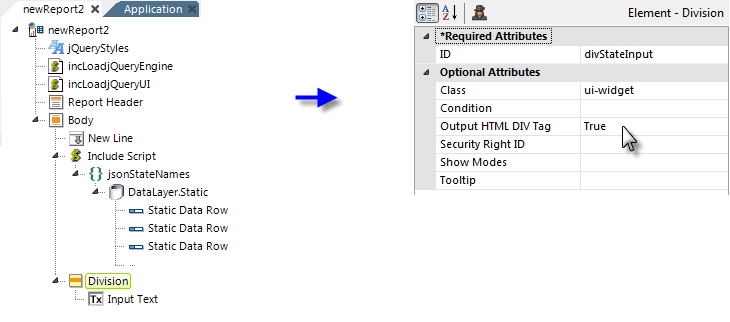
Finally, add a Division element and a child Input Text element beneath the Body, as shown above. Set the Div's attributes as shown (the ui-widget class assigned to the Div is from the Google-hosted jQuery style sheet).
Set the Input Text element's ID to inpState.
var arrStateNames = [ {"Name" : "Alabama"}, {"Name" : "Alaska"}, {"Name" : "Arizona"}, {"Name" : "Arkansas"}, {"Name" : "California"}, {"Name" : "Colorado"}, {"Name" : "Connecticut"} ]; | var arrStateNames = { "Name" : ["Alabama","Alaska","Arizona", "Arkansas","California","Colorado", "Connecticut"] }; | |||
|
|
If you Preview the application right now, then right-click and select View Source to see the underlying HTML, you should see the data embedded in the HTML, as shown above. This is the JavaScript array of data in JSON format, shown using the two different formatting styles available.
| var data= [ {"Year": "2010", "TotalSales": 12540}, {"Year": "2011", "TotalSales": 21450} ]; | var data = { "Year": ["2010","2011"], "TotalSales": [12540,21450] }; | |||
|
|
Here's another example, shown above, which is unrelated to our exercise but which includes multiple columns, to further illustrate the effects of the Json Style attribute. RowsToObjects serializes datalayer rows into an array of
objects, where each object represents a data row and the objects have a property for
each column. ColumnsToPropertyArrays serializes the datalayer into a
single object, where each column is a property with all the row values
contained in an array.
Now go back to the exercise definition and add in the JavaScript code: select the Include Script element and enter the following as its Included Script attribute value:
var len = arrStateNames.length;
var arrTemp = new Array(len);
for(var i = 0; i < len; i++) {
arrTemp[i] = arrStateNames[i].Name;
}
$(document).ready(function() {
$( '#inpState').autocomplete({
source: arrTemp
});
});
You'll recognize the bottom section as jQuery code; note the use of the Input Text element's ID ("inpState") and a temporary array variable name ("arrTemp") in it. The upper section creates the temporary array from the JSON data, because the widget is expecting a one-dimensional array of strings, while the JSON data is, as we've seen, two-dimensional.

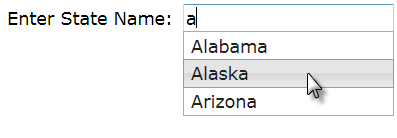
If you Preview the application now, you should see the Input Text control. If you type the letter "a" into it, a list of the choices that begin with that letter will appear. Typing more characters will narrow the list further. You may care to go back and change the JSON Data element's Json Output attribute to File, Preview again, and then examine the temporary file created in rdDownload. It will have a GUID filename with a .js extension.
Managing JSON Data Columns
Normally, the Json Data element will output all of the columns in the datalayer, using the same column names. However, the Json Column element lets you manage the output columns. You include a Json Column element for each datalayer column that you want to output; which means you can output fewer than all of the datalayer columns if you desire. The element's attributes let you specify a different name for the column and its data type in the output as well.