Saving Uploaded Files
After the physical upload completes, a Process task is used to save the temporary file to the final file and determine what has been uploaded. Several useful special tokens become available in the task to facilitate the process:
| Token | Description |
|---|---|
@FileUpload.UploadFileName~ |
Contains the file name, with extension but stripped of any path info, of the original file. Only available for use in attributes of the Procedure.Save Uploaded File element.  The RFC 1867 protocol used to upload files does not include access to the full file path of the original file, only its file name. The RFC 1867 protocol used to upload files does not include access to the full file path of the original file, only its file name.
|
@FileUpload.UploadFileExtension~ |
Contains the file extension of the original file, including the period. This is case-sensitive and only available for use in attributes of the Procedure.Save Uploaded File element.
|
@Procedure.<MyProc>.UploadFileName~ |
Contains the file name, with extension but stripped of any path info, of the original file. Available throughout the task.
|
@Procedure.<MyProc>.UploadFileExtension~ |
Contains the file extension of the original file, including the period. This is case-sensitive and available throughout the task.
|
@Procedure.<MyProc>.UploadFileContentType~ |
Contains the file's MIME or content-type string. Available throughout the task.
|
@Procedure.<MyProc>.UploadFileLength~ |
Contains the number of bytes uploaded (the file size). Available throughout the task.
|
where <MyProc> is the ID of the task's Procedure.Save Uploaded File element.
Now you're ready to create a Process task to save the uploaded file:

- In a process definition, add a Task element. Its ID should be the same as the value entered in the Task ID attribute of the Action.Process element in the report definition in Identifying Files to Upload.
- Add a Procedure.Save File Upload element to the task.
- Set its File Upload ID attribute to the ID of the Input File Upload element in the report definition.
- Set its Filename attribute to the fully-qualified file name you want to save the temporary upload file to, beginning with a physical drive letter on the web server. Several tokens can be used together to provide a value for the this attribute, for example:
- @Function.AppPhysicalPath~\UploadedFiles\@FileUpload.UploadFileName~
-
The value shown above will move the temporary upload file to a folder called "UploadedFiles" in your application folder and rename it to the file's original name.
The target folder ("UploadedFiles") must exist in advance; the element will not create it. If this folder is outside of your application folder, the account the web server uses to run your application (ASPNET, NETWORK SERVICE, or Application Pool) has to be granted Write permission to that folder.
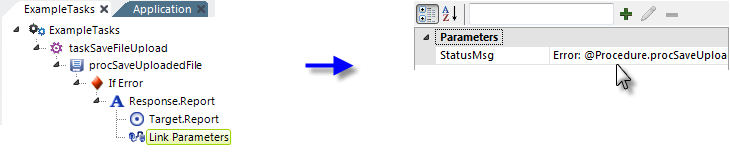
- To handle errors, add an If Error element beneath the Save Uploaded File element.
- Add Response.Report, Target.Report, and Link Params elements, as shown, to redirect to the calling report in case of an error. Any error message will be available using this token:
@Procedure.procSaveUploadedFile.ErrorMessage~ - Back in the report definition, you can use an @Request token to test for and display any error message returned.
If the report is run now, the file will be uploaded and saved to the UploadedFiles folder. There is a default 4MB file size limit, discussed in more detail below.