Creating Bursting Reports
Report bursting is a technique which enables running a page report once and distributing the report result to multiple users who each will receive a subset of the results related only to them. It is useful in handling both large amounts of data as well as a large number of users. Logi Report can distribute any report result to multiple recipients with each receiving a subset, subject to security rules. Report bursting allows you to burst the report to multiple levels of grouping, for example, you may want to give individual salesmen a report of just their sales, the sales manager a report for all salesmen in his division and a complete report with all the data for all salesmen in the company for the VP Sales.
Bursting report result can be distributed to any destination, including e-mail, FTP, disk, Logi Report’s versioning system, and principals in the Logi Report Server security system. Multiple criteria and rules can act simultaneously to perform multiple distributions from a single report run.
This topic includes the following sections:
Bursting Schema
A bursting schema defines how data is split and who receives each subset of the split data. The most important part for a bursting schema is that there should be a recipient query to contain these data fields:
- Data fields that define recipients. They are known as bursting recipients.
- At least one data field that is able to map to the bursting key. So that the report data can be split by the bursting key and then distributed to the recipients in the query according to the mapping relationship.
For example, to send salary report to the employees in the company by e-mails and to make each employee see his own salary information only, you can use Employee ID as the bursting key. Then you need to create a recipient query and add at least these two data fields in it:
- A data field that contains the e-mail addresses of the employees.
- A data field that contains the IDs of the employees which is used to map to the bursting key Employee ID.
Bursting key is one or more distinguishing fields according to which report data is split. For example, sending a credit card bill to every consumer according to the credit card ID. The credit card ID here is the bursting key. When multiple fields are used as bursting key, Logi Report will split the data according to each unique combination of the fields.
Bursting key fields should come from a dataset used in the current page report. If the dataset is based on a business view, the bursting keys can only be group objects and dynamic formulas used as Group.
Bursting recipients are data fields that contain recipient information in a query. The following types of recipients are supported:
- Principals in the Logi Report Server security system (user, role and group): e-mail addresses or private folders of the users.
- E-mail addresses.
- Disk: directories or full paths with file name. If it is a directory, Logi Report will add the bursting result with the default name into the directory. If it is a full path, Logi Report will generate the result with the specified file name and add it into the path.
If Logi Report finds that there is a file with the same name as the generated bursting result file, it will not send the result file into the path and will record a message into the log.
- FTP.
- Versioning system: directories in the resource system of Logi Report Server.
Creating a Bursting Report
A page report that can do bursting should contain one or more bursting schemas and is called a bursting report. A bursting report cannot run in Page Report Studio. It only supports exporting to formats that can be viewed by an external viewer such as PDF and Excel.
To create a bursting report:
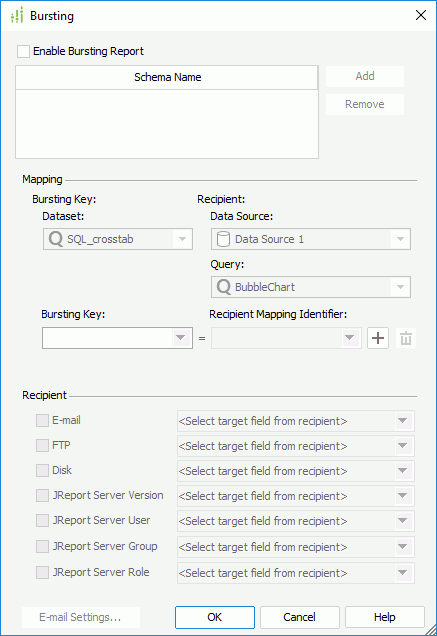
- Design a page report and then select Report > Bursting. The Bursting dialog appears.

- Select the Enable Bursting Report option.
- There is a default schema named BurstingSchema. You can select the schema name and rename it as required.
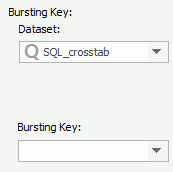
- In the Mapping section, first specify the bursting key to split report data by. The datasets used in the report are listed. Select one from the Dataset drop-down list and then select a bursting key from the dataset.

Make sure the data fields used for the bursting key are sortable in the DBMS, otherwise the bursting results may be unpredictable.
The following data types can be used for a bursting key:
- Integer: INT, SMALLINT, TINYINT, BIGINT
- Float: REAL, FLOAT, DECIMAL, NUMERIC
- Character: CHAR, NCHAR, VARCHAR, NVARCHAR
- Date and Time: DATETIME, SMALLDATETIME
- Currency: MONEY, SMALLMONEY
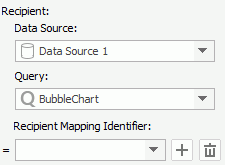
- Specify a data field in a query that contains data fields of recipient information to map to the bursting key. Select the data source, the query, and then the mapping field from the corresponding drop-down list one by one. You can set up more mapping relationships by using the Add button
 . To remove an unwanted mapping row, select
  on the right.

- In the Recipient section, specify the recipient addresses. The data fields that define recipient information in the specified query are available in the drop-down lists. For example, to distribute the report result to e-mail addresses, select the E-mail checkbox and then double-click a data field that defines e-mail addresses from the drop-down list.
- When E-mail or Logi Report Server User/Group/Role > User E-mail is selected in the Recipient section, the E-mail Settings button is activated. You can select it to further define the e-mail settings.
To define more information of the e-mail:
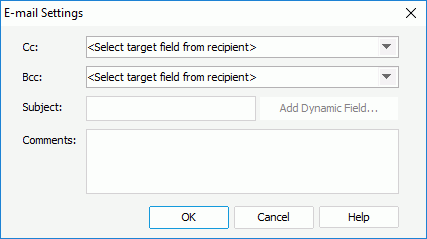
- Select the E-mail Settings button. The E-mail Settings dialog appears.

- From the Cc/Bcc drop-down list, double-click the data field in the specified query which will be used for retrieving the e-mail addresses to send additional copies of the e-mail to. The people in the Bcc list is known to the sender and himself only.
- Specify the subject and comments of the e-mail in the Subject and Comments boxes. If you want the subject/comments to be composed dynamically, select the Add Dynamic Field button, then in the Select Field dialog select the required fields to insert into the text.
- Select OK to accept the e-mail settings.
- Select the E-mail Settings button. The E-mail Settings dialog appears.
- You can select the Add button next to the Schema Name box and repeat the above steps to create more schemas for the report.
To delete an unwanted schema, select it in the Schema Name box and select Remove.
- Select OK to apply the settings.
- Save the report and publish the report to Logi Report Server, where you can submit a schedule task to generate the bursting results (for details, see Scheduling a Task Containing a Bursting Report in the Logi Report Server Guide).
Tip: When you finish designing a bursting report, you may want to check it with data. However, when you preview bursting report in Logi Report Designer, Logi Report runs the bursting report with all of the data, and if a large dataset is involved it may take a long time or run out of memory before completing. To avoid this from happening, you can limit the number of records by setting the Maximum Rows property of the query.
Reference: A sample report containing a bursting report tab named Sales Statistics by Region Report.cls is provided in <install_root>\Demo\Reports\SampleReports.
Built-in Functions for Bursting
Two built-in functions are added in formulas for controlling bursting report result.
- Boolean isRunBursting()
Returns true if the report is running based on bursting schema, else returns false. - String currentBurstingSchema()
Returns the names of the currently applied bursting schemas. When isRunBursting() returns false, the returned value for currentBurstingSchema() is NULL.
The following example shows the usage of the functions. It is supposed that a report is first grouped by VP, and next by Manager as follows:
Group by VP,
Group by Manager,
detail
To distribute relative results to all VPs and managers, you can define two schemas as follows and apply them together in a task:
| Bursting Schema | Bursting Key | Recipient |
|---|---|---|
| VP | VP | VPs |
| Manager | VP, Manager | Managers |
Then write a formula:
if ( isRunBursting() && currentBurstingSchema() != "VP" )
return true
else
return false;
Next use the formula to control the Suppress property of the group headers and group footers in the VP group panel.
Then all results to the managers will hide the VP level.
 Previous Topic