The File Column
Database architects often find it useful to design tables that store BLOBs (binary large objects) or CLOBs (character large objects) in a column. Logi Info developers can manipulate this kind of data using the File Column element, which is discussed in this topic.
- About BLOBs and CLOBs
- Prepare Data in a Datalayer
- Work with Retrieved Data
- Example: Retrieve Dashboard Configuration Data
The File Column element is not available in Logi Report.
About BLOBs and CLOBs
The ability of some database servers to store large amounts of data in individual columns provides a interesting dimension to data storage and retrieval. A common BLOB implementation example is an HR table that stores employee data and includes an actual photo of each employee in one of its columns. Other examples of BLOBs include audio and multimedia objects, and even executable code.
Other implementations may store large amounts of text, called CLOBs, in the same manner. For example, the HTML for entire web pages could be stored in a single table column as part of a content management system. Other examples of CLOBs include XML data, documents, and logs.
BLOB and CLOB data may be stored as a collection of bytes right in the database's standard storage area or they may reside outside it, in auxiliary files, referenced by pointers in the table record. The size of a BLOB or CLOB can be quite large; for example, ODBC and JDBC specs impose a 4Gb limit.
Prepare Data in a Datalayer
Data from a database is usually retrieved in Logi applications using a datalayer element. The File Column element, used to access data in a BLOB or CLOB column, does so by manipulating the columns in a datalayer. This is similar to the Calculated Column element, which can be used to add additional columns to a datalayer. The File Column element performs these operations:
- Reads the BLOB or CLOB data from the datalayer and saves it to a temporary file, then deletes it from the datalayer.
- Adds two columns to the datalayer and inserts values into them for the temporary file's path and filename.
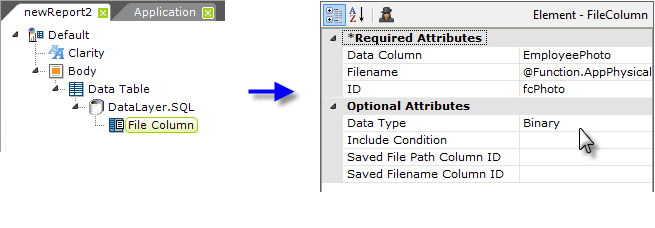
The following example illustrates how the File Column element is used:

- As shown above, a File Column element is added beneath a datalayer; multiple File Column elements can be used as necessary. Its attributes are set as follows:
- Data Column - the name of the column in the table that contains the BLOB or CLOB data.
- Filename - the fully-qualified path and filename for the file that will hold the BLOB or CLOB data. The example uses one @Function token to get the Logi application's base folder path and another to create a unique identifier for the actual file name. The complete value might look like this:
@Function.AppPhysicalPath~\rdDownload\@Function.GUID~.gif
Use of rdDownload as the location for temporary files within your application folder ensures that they'll be "cleaned-up" automatically after soon each user's session ends. Don't forget to provide a file extension appropriate to the data type, such as .gif, .doc, .xml, etc.
If a file of the same name already exists in the specified location, it will be overwritten without warning.
- ID - a unique identifier for the File Column element.
- Data Type - the type, text or binary, of the BLOB or CLOB data. Binary values should be Base64-encoded when they're retrieved into the datalayer (this is typical).
The configuration of the File Column element thus far has satisfied the first of the two operations mentioned earlier, saving the data to a temporary file and automatically removing it from the datalayer.
The final two File Column element attributes are discussed in the next section.
Work with the Retrieved Data
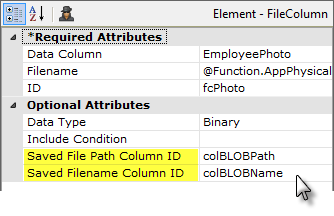
In order to be able to work with or display the data retrieved from a BLOB or CLOB column, you need to be able to accurately reference the temporary file. After saving the data to a temporary file, the File Column element adds two columns to the datalayer, to hold the file path and file name. The element's final two attributes allow you to give IDs to those columns:
- Saved File Path Column ID - this attribute provides an ID for the column that will be added to the datalayer for the temporary file's path data. This should be a unique column ID; don't use the ID of an existing column in the datalayer.
- Saved Filename Column ID - this attribute provides an ID for the column that will be added to the datalayer for the temporary file's file name data. This should be a unique column ID; don't use the ID of an existing column in the datalayer.
At runtime, these two columns will automatically be added to the datalayer and populated with the actual path and filenames that were used to save the BLOB or CLOB data to temporary files.
Now you're ready to actually put the BLOB or CLOB data into your report. The following example displays BLOB data in an Image element; the techniques for displaying CLOB data in a Label element are similar.

- As shown above, a Data Table Column element has been added to the definition, and a child Image element beneath it.
- The Image element's Caption attribute has been set to the @Data tokens representing the columns containing the path and file name data for the temporary file holding the BLOB data:
@Data.colBLOBPath~\@Data.colBLOBName~
Remember when using a Label element to display CLOB data that, if the data is HTML, it may be useful to set the Label element's Format attribute value to HTML.
Example: Retrieve Dashboard Configuration Data
Here's an example scenario where the configuration data for a super-element, the Dashboard, which is usually saved to an XML file, is also saved to a database table and retrieved using the File Column element.
Requirements
- Your database server must be capable of saving a CLOB in a data column. This example uses Microsoft SQL Server 2008 R2, which has an "XML" data type (also available on MS SQL Server 2012).
- The database account used to connect to the server must have permissions for Bulk insert/update operations.
- A database table must exist that includes the following schema:
UserName VARCHAR(50) -- a unique identifier for retrieving the record
SaveFile XML
Write the Data
We'll use a Process Task to write the data to the database. This task can be called by a user action, such as clicking a "Save" button or link, or logging out of the application, or by something more automatic, such as the end of the session.

An example of the task is shown above. Writing the data relies on a SQL command that reads directly from a file:
1. INSERT INTO DashboardData
2. SELECT '@Function.UserName~', SaveFile
3. FROM
4. (SELECT * FROM OPENROWSET (BULK '@Function.AppPhysicalPath~\SavedDashboards\
@Function.UserName~.xml', SINGLE_CLOB)
5. AS SaveFile) AS R(SaveFile)
Note that line 4 is wrapped on the page, and the line numbers are not part of the actual SQL syntax.
This example assumes that the user name is available as a token, either through Logi Security or another security scheme. The user name is then used in the SQL command to provide a value for the unique identifier column, and for the name of the dashboard save file. This syntax is correct for SQL Server 2012 and 2008 R2 but may vary for other database servers.
Naturally, the Dashboard will have to be used at least once so its configuration is saved to its Save File before the data can be written to the database.
Read the Data
When running the report, the data stored in the database needs to be read once and saved to an XML data file on the web server that the Dashboard element can use.

We'll do this, as shown above, with a Local Data element. Its Condition attribute can be set in some manner to ensure that it only runs the first time the page is displayed (@Request token, cookie, what have you). Data retrieval will take place using DataLayer.SQL and a query similar to:
SELECT SaveFile FROM DashboardData WHERE UserName = 'Bob'
The use of Local Data allows important data to be available, using an @Local token, anywhere in the rest of the definition.

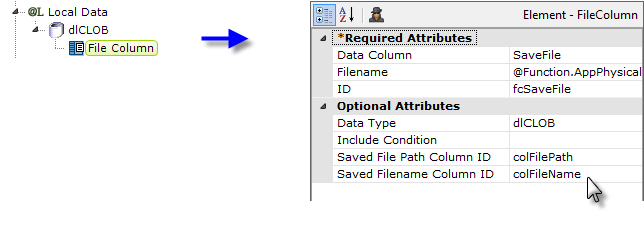
A shown above, a File Column element is used to extract the stored data from the database column and save it as a file on the web server. The complete Filename attribute would be something like:
@Function.AppPhysicalPath~\SavedDashboards\@Function.UserName~.xml
which you'll recognize as matching the file path and name used in the SQL INSERT command in the previous section. File Column will overwrite any existing file when it saves the XML data.
Use the Data in the Dashboard
Finally, the Dashboard element needs to be configured to use the newly-written data file:

When configuring the Dashboard element's Save File attribute, you can use the @Function.AppPhysicalPath~\... string we used earlier, or you can use a combination of Local Data tokens created by the File Column element, such as:
@Local.colFilePath~\@Local.colFileName~
if you aren't tying the Save File to individual users.
This approach, storing configuration data in an XML data type column in a database table, is also applicable to other super-elements, such as the Analysis Grid.
