Customizing Dashboard Appearance
Dashboard appearance can be changed most easily by applying a
theme to the report definition. Most of the screen shots in this
document were taken with the Signal theme applied.
You can create your own custom theme, based on a standard theme, using the tool.
Changing Appearance Using Style Classes
Dashboard appearance can also be customized using style classes and Logi Studio provides the following standard style sheet for all Dashboards:
- <yourAppFolder>\rdTemplate\rdDashboard\rdDashboard2.css
Developers can override classes in this style sheet by copying them into their own application style sheet and modifying them there.
![]() Do not make changes in the standard style sheet in the rdTemplate folder!
If you're using a Theme, it will override some of the Dashboard classes.
Do not make changes in the standard style sheet in the rdTemplate folder!
If you're using a Theme, it will override some of the Dashboard classes.

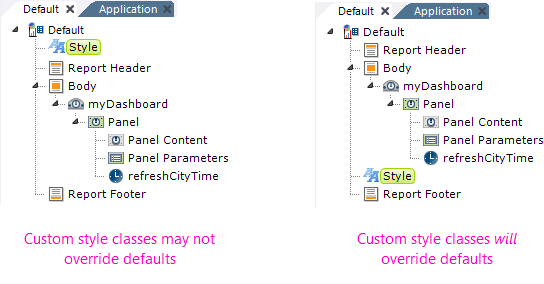
As shown above, to ensure that style classes cascade correctly, in your report definition your Style element should be lower in the element tree than the Dashboard element (the Style Sheet element has to be processed after the Dashboard element in order to override the default classes).
Here are some examples of specific classes, with their default values, that can be overridden by adding them to your project style sheet and then setting additional elements:
Change font size of all panel captions:
.rdDashboardTitleCaption {
font-size: 14pt;
}
Change pop-up parameters panel caption:
.rdPopupPanelTitleCaption {
font-size: 14pt;
}
Change color of the pop-up parameters panel "Done" button text:
.rdPopupPanelTitleCaption {
color: Red;
}
Many of the class names needed to override Dashboard styling can be discovered by using your browser's development tools (press F12 in many browsers).
Changing Appearance Using Template Modifiers
The Dashboard element uses a "template file" to define certain element properties that are not otherwise available as attributes to the developer for modification. These include language- and culture-specific Caption attributes that you may want to change for locale-based reasons (or you may simply want to change the captions to better suit your application). The Dashboard element's Template Modifier File attribute identifies a custom XML file developers can create containing elements that will override the same elements in the template file. For example, the Dashboard template file:
- <yourAppFolder>\rdTemplate\rdDashboard\rdDashboard2Template.lgx
contains several Label elements. One of them has an ID = "lblAddPanelsTitle"; this controls the title in the Add Panels selection list (shown earlier). The title for that selection list can be modified by changing the Caption associated with that Label element.
To change the title from its default "Add Panels" to "Add New Dashboard Panels", create your own XML file, identify it in the Template Modifier File attribute, and add this code to it:
<TemplateModifier>
<SetAttribute ID="lblAddPanelsTitle" Caption="Add New Dashboard Panels" />
</TemplateModifier>
You can set the attributes for any number of elements in this file; examine the rdDashboard2Template.lgx file to learn the ID and Caption attributes available. The template modifier file can be in any folder accessible to the web application; if a fully-qualified file path is not provided in the Template Modifier File attribute value, then the application expects it to be is your project's _SupportFiles folder. More detailed information about template modifier files can be found in Template Modifier Files.