Using Event Handlers with Javascript
A very powerful feature of Logi Info is the ability to execute JavaScript when an event occurs.

Developers can use the Action.Javascript element, shown above, beneath an Event Handler element. JavaScript code can be entered directly into the Javascript attribute; multi-line code is supported. Now we're able to use the power of JavaScript and the DHTML object model for activities such as validation. The Attribute Zoom window comes in handy when entering code (double-click the Attribute name). Here are some use-case examples:
Example 1: Ensure that some data is entered
It's beyond the scope of this topic to delve too deeply into JavaScript or the object model, but essentially the following code assigns the data in the inpLoginID control to a variable, then tests the length of that variable's value, and displays a message box if the length is zero.
var myStr = document.getElementById('inpLoginID').value;
if (myStr.length == 0 ) alert('You must enter some message text.');
if (myStr.length == 0 ) return false;
return true;
This is very similar to the Validation.Required element's functionality. The Document object's getElementById method is very handy in this situation. Remember: JavaScript is case-sensitive.
![]() While you may enter multi-line Javascript, you may not include code blocks that are set off by curly brackets. This means structures like If...Then...Else blocks are not usable. As shown in these examples, you can get around this by using multiple lines of code, each with a single If statement.
While you may enter multi-line Javascript, you may not include code blocks that are set off by curly brackets. This means structures like If...Then...Else blocks are not usable. As shown in these examples, you can get around this by using multiple lines of code, each with a single If statement.
Example 2: Ensure some data is entered but not more than 4,000 characters
The example script that follows does something special: it limits the length of data that can be entered into an Input Text Area element.
var myStr = document.getElementById('inpTextArea1').value;
if (myStr.length > 4000) alert('Your message is too long (' + myStr.length + ' chars) - maximum length is 4,000 characters.');
if (myStr.length > 4000 ) return false;
if (myStr.length == 0 ) alert('You must enter some message text.');
if (myStr.length == 0 ) return false;
return true;
Input Text Area does not have a "maximum length" attribute. The code above sets a limit and if the text entered is too long, it reports the actual number of characters currently entered. It also requires that some data be entered.
Example 3: Replace all occurrences of '@' with '#'
This example demonstrates a method for replacing certain characters in the data entered, using a JavaScript Regular Expression.
var myStr = document.getElementById('inpTextArea1').value;
myStr = myStr.replace(/[@]/g, '#');
document.forms[0].inpTextArea1.value = myStr;
return true;
In the example, any @ characters that were entered by the user are replaced with the # character, and then the altered data is substituted for the data that was entered. Regular Expressions are very powerful, can be quite complex, and can perform actions such as adding, replacing, or removing characters, changing character case, and expanding or contracting phrases.
As you can see, the ability to run JavaScript whenever data changes in user input elements provides developers with a very powerful validation tool.
Example 4: Handling Links within Tables
This is a slightly different kind of example that deals with a common problem. Suppose you have a data table and each row has a column in it that contains a link or button; for instance, an "Edit" button. When the link or button is clicked, you want to send data from that row to another report or process task. Internally, the Logi engine adds a row designator - "_Row1, _Row2, etc." - to the datalayer column names, so addressing the correct data using tokens (@Request.myCol_Row#~)
in
the receiving Report or Process task is difficult.
However, there's an easy solution: add an Event Handlerand an Action element beneath the link or button. The Event Handler will assign the data from the current table row to one or more Input Hidden elements (depending on how many columns you need to send) and the Action element submits the page and calls the next Report or Process task. The next report or task can then work with the values in the @Request token for the Input Hidden elements.

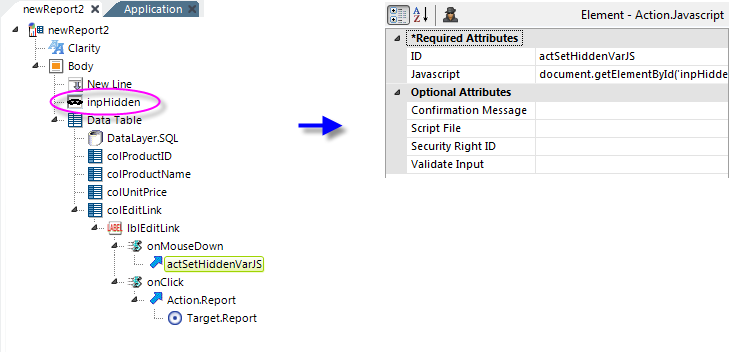
The example above shows the elements that might be used in this situation.
First, an Input Hidden element is added at the top of definition, outside of the table and its columns. We'll put the value we want to work with in this element, getting around the @Request.myCol_Row# issue.
Inside one of the table columns, beneath the Label element (which is the "Edit" link) an Event Handler is added and its DHTML Event attribute is set to onMouseDown. Beneath the Event Handler, ActionJavascript is added and its code set to:
document.getElementById('inpHidden').value = @Data.ProductID~;
return true;
So, when the mouse button is depressed on the link, the data from the ProductID column for the current row will be assigned to the Input Hidden element.
And then another Event Handler, for the actual mouse-click, is added with child Action.Report and Target.Report elements. These submit the page and calls the next Report or Process task, where the Product ID value will be available as @Request.inpHidden~.
This is a common and useful technique that allows you to perform multiple actions based on what seems like one mouse click.