Creating a ReportCenter Menu
Once we've tagged all of the report definitions for the menu, we can build the actual menu:

This is done by adding a ReportCenter Menu element to the report definition that presents the menu.
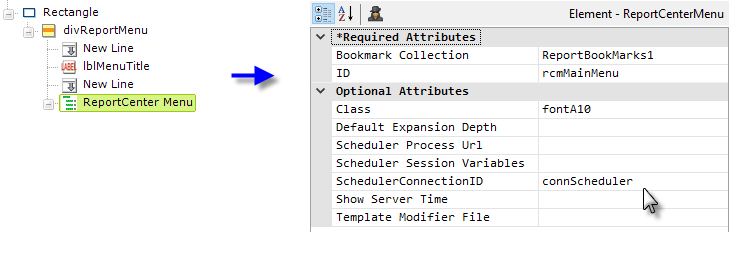
The elements used to create the menu example shown at the top of this document are shown above. It was created by using Rectangle and Division elements to contain the menu, with style applied to the Rectangle to provide a border, background color, and padding. A separate Label element was used to provide the menu title. This is, of course, just one of many possible ways of presenting the menu.
The ReportCenter Menu element's attributes are shown above, right and have been configured as follows:
| Attribute | Description |
|---|---|
Bookmark Collection | (Required) Saved bookmark collection name, e.g. myBookmarks1. If bookmarks have been created on a per-user basis, using a GUID or a user name, identify the collection with a token here. Note: The path to the folder where bookmarks have been saved must be configured in the General element's Bookmark Location attribute in the _Settings definition. Bookmarks can also be stored in a database, see Storing Bookmark, Gallery, and Save Files in a Database. |
ID | (Required) A unique identifier for the element |
Class | Specifies the style class for the menu report links. |
Default Expansion Depth | Specifies which level of the menu folders items will be expanded by default. Blank or 0 = no expansion, or enter a number such as 1 or 2. |
Scheduler Process Url | Specifies the full URL of the Logi Info application that will run the scheduled task. The URL should specify the folder that contains the rdProcess.aspx file. For example: http://myWebServer/myApplication The default value is the URL used to access the current web application. |
Scheduler Connection ID | If users will be allowed to schedule reports for email distribution, this attribute specifies the ID of the Connection.Scheduler element configured in the _Settings definition (a pull-down list of connections is provided). |
Scheduler Session Variables | Specifies a comma-separated list of Session variables to be passed by the Logi Scheduler to a scheduled task during execution. |
Show Server Time | Specifies whether the Scheduler's user interface should display time based on the server's current time. This can be useful when the application user's Time Zone differs from the server's zone. The user can infer and adjust the time for running scheduled reports. Default value is False. |
Template Modifier File | Specifies the name, with file extension, of a Template Modifier Files to be applied to the menu at runtime. This is an XML file that can be used to change the underlying template used to create the menu. Template Modifier files can be in any folder accessible to the application; if a folder isn't specified, the _SupportFiles folder is assumed. |
Nothing more is needed for the basic menu; running the definition now will cause all of the other report definitions tagged with ReportCenter Item elements to appear in the menu.
Controlling the Report Links Dynamically
The ReportCenter Menu element creates its own internal DataLayer.Definition List element and filters it based on the tagged definitions. However, if you want more control over the included report definitions, you can override that internal datalayer by adding your own DataLayer.Definition List element beneath the ReportCenter Menu element and filtering it as desired.
![]() This datalayer type can retrieve root element
"custom attributes" along with the other definition information; these are attributes you enter manually by editing the source of a definition's root Report element. You might use a custom attribute, for example, to indicate whether definitions are to be included in the menu or not, then apply filtering to the datalayer based on the custom attribute's column value.
This datalayer type can retrieve root element
"custom attributes" along with the other definition information; these are attributes you enter manually by editing the source of a definition's root Report element. You might use a custom attribute, for example, to indicate whether definitions are to be included in the menu or not, then apply filtering to the datalayer based on the custom attribute's column value.
Ordering Menu Items
The menu items in a basic menu will normally be ordered alphabetically by their menu link text. However, if desired, you can rearrange the order of the menu items.


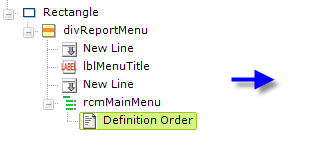
This is done by adding one or more Definition Order elements beneath the ReportCenter Menu element, as shown above, and assigning a report definition to them. The menu items will then appear in the top-to-bottom order of the Definition Order elements. Any remaining menu items not represented by a Definition Order element will be shown in alphabetical order in the menu, below those items that are represented by one.
Ordering Menu Folder Items
As described earlier, the ReportCenter Item element allows you to create folder items in the menu. In a manner similar to controlling the arrangement of menu items, you can also control the order of these folders within the menu items.


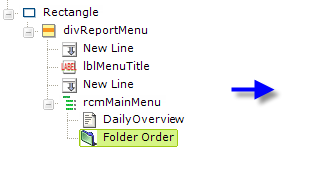
This is done by adding one or more Folder Order elements beneath the ReportCenter Menu element, as shown above, and assigning a report definition to them. The Folder Name attribute value must exactlymatch the ReportCenter Item element's ReportCenter Folder value. The menu folder items will then appear in the top-to-bottom order of the Definition Order and Folder Order elements. Any remaining menu items not represented by a Definition Order or Folder Order element will be shown in alphabetical order in the menu, below those items that are represented.
Additional child Definition Order and Folder Order elements can be placed beneath a Folder Order element in order to control the arrangement of child menu items and folders displayed when a menu folder is expanded.