Creating Printable Reports
Report consumers often want to print hard copies of their web-based reports. To do this, the reports need to be paginated and formatted for printing. Logi reporting products make this easy to accomplish by providing the Printable Paging element.
The process causes the report to be formatted for printing and then loaded into a browser window, after which it can be printed. The process automatically hides any Interactive Paging element, which ensures that the navigation controls do not appear on the printout and increases the number of records in tables so they fill the page.
There are two things that must be done to make a report "printable": the addition of a Printable Paging element, which governs page margins, size, and headers, and the addition of a link that's clicked to begin the formatting/printing process. The formatting/printing process formats the report for printing and then, optionally, outputs it to a printer or other formats, such as Adobe PDF or Microsoft Word.

Begin, as shown above, by adding a Printable Paging element beneath the root Report element (its location in the element tree does not matter). Set its Margin attributes as desired, in inches. To calculate the proper Page Height and Page Width attribute values, start with the physical paper size in inches and subtract the related margin values. So, in the example, working with a standard U.S. Letter size page, subtract from the physical paper height (11") the bottom margin (- .5") and the top margin (- 1") to arrive at the Page Height value ( =9.5").
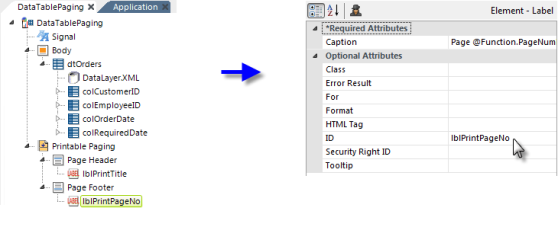
If desired, a page header and footer that will only appear in the printed output can be included by adding Page Header and Page Footer elements as child elements beneath the Printable Paging element, as shown above. They, in turn, can contain other elements, including Labels and Images. In the example, the footer makes use of some Function tokens to present the current page number and total page number. The complete Caption attribute value for this is:
Page @Function.PageNumber~ of @Function.PageCount~
![]() The @Function.PageNumber~ token is only valid when Interactive Paging or Printable Paging elements are in use and the @Function.PageCount~ token is only valid when Printable Paging is in use.
The @Function.PageNumber~ token is only valid when Interactive Paging or Printable Paging elements are in use and the @Function.PageCount~ token is only valid when Printable Paging is in use.
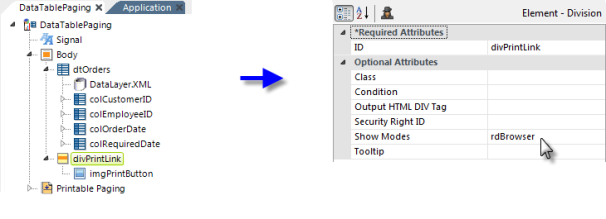
Next, add the element that users will click to print the report:
- Add a Division element beneath the Body of your report and set its Show Modes attribute to the system value rdBrowser, as shown above.
- Add an Image, Label, or Button element beneath the Division to use as the report's "print link".
The rdBrowser Show Modes value causes the Division element (and its child elements) to only be visible when the report is viewed in a browser; ensuring that it will not appear on the printed report. Next, select the appropriate actions depending on the type of output required.
Format Report for HTML Display and Printing
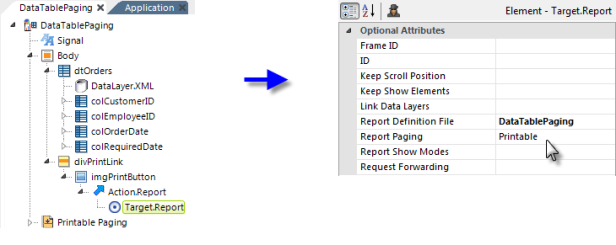
- As shown above, add Action.Report and Target.Report elements beneath the print link element. Set the Target.Report element's attributes as shown.
When the print link is clicked, the report will be reformatted and displayed in the browser window. A dialog box will appear to allow printer selection and printing.
Format Report and Display as a PDF
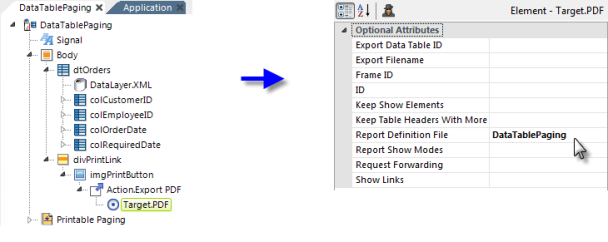
- As shown above, add Action.ExportPDF and Target.PDF elements beneath the print link element. Set the Target.PDF element's attributes as shown.
When the print link is clicked, the report will be reformatted, saved as a temporary .PDF file, and displayed using the Adobe Reader browser extension (which must be installed on the client machine). From there, the report can be saved as another PDF file or printed.
Page headers and footers are rendered separately when exporting to PDF format. Since space is limited on printable pages, it's advisable to keep the size of page headers and footers small to allow room for the body of the report.
Format Report and Display as a Word Document
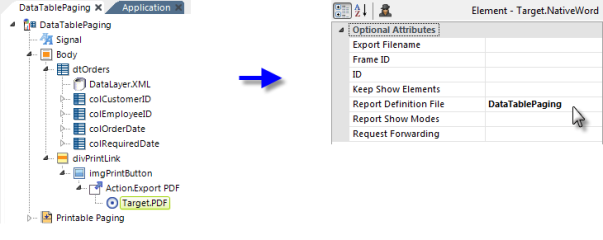
- As shown above, add Action.Export Native Word and Target.Native Word elements beneath the print link element. Set the Target.Native Word element's attributes as shown above.
When the print link is clicked, the report will be reformatted, saved as a temporary Word file, and opened using Word. From there, the report can be saved to another Word file or printed. Microsoft Office or the Word browser viewer must, of course, be installed on the client machine.