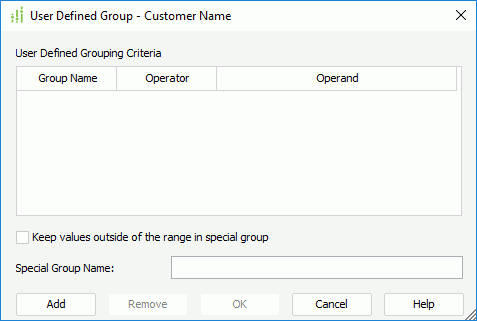
User Defined Group Dialog Box
You can use the User Defined Group dialog box to define how to group data. This topic describes the options in the dialog box.
Designer displays the User Defined Group dialog box when you select Special Group from the Sort column in the Group screen of the banded/table wizard or Map Binding Data Wizard dialog box, or select Special Group in the Display screen of the chart wizard or the Range > Properties subtab in the Format Category(X) Axis dialog box.

You see the following options in the dialog box:
Group Name
This column shows the names you specify for the grouping criteria.
If you use this dialog box to group data in the dataset to bind with a map, the group name here should match with the data in the specified group-by field.
Operator
This column shows the operators that you select to compose the grouping criteria. You can select from the following operators:
- >
Greater than - <
Less than - =
Equal to - <=
Less than or equal to - >=
Greater than or equal to - !=
Not equal to - [not] between
The operator allows the system to evaluate whether data values are located between a range of values indicated in the predicate. For the operator "between" or "not between", Designer displays two value text boxes for inputting the same type of values.
Operand
This column shows the values that you specify for the grouping criteria. If the data type of the value is not Numeric, you need to type it with double quotation marks.
For example, if you place a field named "Score" for grouping which contains student scores that range from 0 to 100, and you want to group the students in 5 ranks, rank A: 90~100, B: 80~89, C: 70~79, D: 60~69, and E: 0~59. You can define the groups as follows:
| Group Name | Operator | Operand |
|---|---|---|
| A | between | Op1: 90, Op2: 100 |
| B | between | Op1: 80, Op2: 89 |
| C | between | Op1: 70, Op2: 79 |
| D | between | Op1: 60, Op2: 69 |
| F | <= | 59 |
There are five groups in the order from A to F. You can also change the order of the groups.
Keep values outside of the range in special group
Select to put the values that are not included in any of the specified criteria in a new special group.
- Special Group Name
Specify the name for the special group.
Add
Select to add a new grouping line.
Remove
Select to remove the specified grouping criterion.
OK
Select to apply your settings and close the dialog box.
Cancel
Select to close the dialog box without saving any changes.
Help
Select to view information about the dialog box.
 Previous Topic