Applying RLS at Report Scope
Besides defining Record Level Security (RLS) at data source scope, you can also set it at report scope, that is, you can create different RLS policies for different reports. When you apply RLS of both the report and data source scopes to a report, the report scope RLS overrides that of the data source scope. This topic describes how you can specify report scope RLS on reports.
![]() You can apply RLS at report scope to page reports that use query resources only.
You can apply RLS at report scope to page reports that use query resources only.
To set up a record level security policy for a query-based page report
- Navigate to File > Open to open the page report.
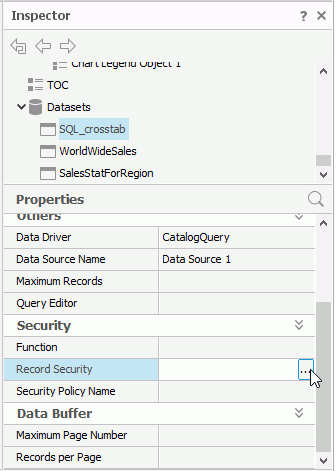
- In the Report Inspector, select the name of a dataset used in the page report under the Datasets node.
- In the Security section of the Properties sheet, select in the value cell of the Record Security property, then select the ellipsis
 .
.

Designer displays the Record Level Security Information dialog box.

- Select Add to add a condition line and edit the security information by selecting the corresponding cells.
More than one user can share one role; therefore, for one role, you only need to define once and other users can share this role.
"Column" can be the name of a DBField in the current query, the name of a formula (summary) based on any DBField in the current query, or the name of a parameter. You do not need to quote the name when the name contains spaces. However, you must make sure the names you type actually exist.
When specifying "Value" of a condition, you should pay attention to the following:
- For String type values, single quotation mark (') to quote the values, for example, 'Absolute Java';
- For Boolean type values, use 0 (false) or 1 (true).
- For Date type values, make sure the format of the value you specify is consistent with that of your database.
- For the values of other types, type them in their original form.
If you want to use more values in one cell, use "|" to separate them (applies to the User, E-mail, and Title cells). This is useful when you want to apply the same conditions to multiple users. For example, if you want user1, user2, and user3 to share the same security setting, type user1|user2|user3 in the User cell, and then define the security condition.
- Repeat the preceding step to add more condition lines. If you want to apply more than one condition expression to a user, you can edit the condition expressions in several individual lines (typing the same user name for each line). For such compound conditions, the relationship among them is logical "OR".
You can also create a text file, add the security settings, and then select Import Text to import the security information from the text file into the Record Level Security Information dialog box. After importing, you can select the cells to further edit the security settings. Note that when you create the text file to include the security information, you should use TAB to separate each item, and always keep the headings (User, Role, Column, and so on) on the first line of the text file. For example:
User Role Column Operator Value E-mail Title admin admin user1 Customer ID >= 10 user1@yoursite.com Mr. user1 Customer Name = 'Absolute Java' user2 Customer Name IN ('Absolute Java','American Coffee Inc.') user2@yoursite.com Miss user3 Phone IN ('(212) 555-3462','(317) 555-1274') user3@yoursite.com Mrs. - Select OK to finish defining the security information and close the dialog box.
- You can also use a formula to specify the security condition and set it as value of the Function property on the dataset to control the RLS conditions of the report.
For example, if user1 should only see records which satisfy the condition "State = 'CO' and Customer ID >= 10", you can create a formula as follows:
if ( @State == 'CO' && @"Customer ID">= 10 ) return "user1"Then from the value list of the Function property, select the formula.
When you set both the Record Security and Function properties, both settings take effect, and the relationship between them is logical "OR".
- Repeat the preceding steps to define record level security on the rest datasets in the page report.
After you publish the report to Server, when different users sign in to Server and run it, they can only see the data they are supposed to see.
![]() In the Record Level Security Information dialog box, the date values Designer provides in the drop-down list may not be valid for your database, because they are date values that Designer has reformatted using your customized date format settings.
In the Record Level Security Information dialog box, the date values Designer provides in the drop-down list may not be valid for your database, because they are date values that Designer has reformatted using your customized date format settings.
 Previous Topic